Pye Jirsa is the co-founder of SLR Lounge and Lin & Jirsa Photography, one of Southern California's most recognized wedding photography studios. He is the creator of SLR Lounge's full educational library and has trained over 20,000 photographers since 2008 across lighting, posing, editing, and business strategy. He is also the co-creator of Visual Flow Presets and has spoken at WPPI, PPA, CreativeLive, Fstoppers, and Adorama.
In creating the Smoke Texture Pack, SLR Lounge has created the foremost resource for smoke and fog textures. Within it, you’ll find over 400 smoke and fog textures, and 6 video tutorials specifically tailored to guide and help you gain mastery in everything from photographing smoke, to processing and creating your own custom smoke brushes. …
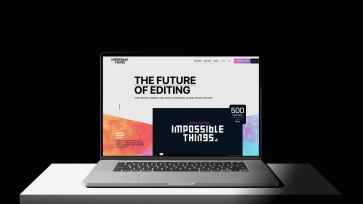
DVLOP and SLR Lounge have partnered to create Impossible Things, a new, advanced AI Photo Editor. This new AI powered solution provides an intuitive, powerful editing tool that enhances photos with speed, accuracy, and artistry. The goal is to not only save photographers hundreds of hours each year, but to also improve the quality and …
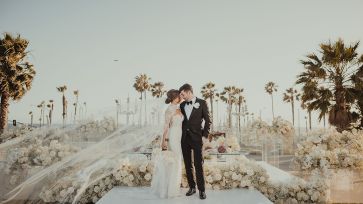
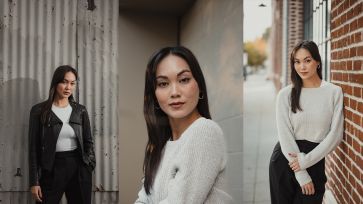
Cities provide a ton of opportunities to get creative with your photography. With gritty textures, array of colors, and unique lighting, downtowns become playgrounds for photographers with keen eyes for composition. In this video, I’m going to challenge myself to find 5 compositions for portraits in the city using only available light and existing elements in the city.
Video: 5 Compositions for Portraits in the City Using Only Available Light
I love this photography challenge because it’s designed to get us out of our own heads. Wielding just a camera and a basic lens, you have to work with what’s available to find your portraits. You’re forced to really see the way the light bounces off surfaces and look for unique shapes, textures, and compositions. Simply get out there, and see what you find!
Before we dive in, be sure to give Kiara a follow on Instagram. For today’s portraits in the city, I’ll be using my Canon EOS R5 with the Sigma 35mm f/1.4 Art lens. All of the final portraits in this video are edited using Visual Flow’s Mood Presets.
We began toward the end of the day and the sunlight was reflecting off of a building in the background. This provided a nice light on the grates on the side of this building. For our first shot, I used the grates as leading lines and framed Kiara on the right third of the image.
Scene #2:
Camera settings: 1/500 sec, f/1.4, ISO 100
For our second scene, we headed over to these stairs. Rather than capturing straight on, I moved to the side and shot through the railing. This angle gives us a cool, voyeuristic perspective. The color of the railing also fit with Kiara’s outfit, giving us a cohesive feel the final photo.
Scene #3:
Camera settings: 1/1000 sec, f/1.4, ISO 400
Our next location provided a great opportunity to add in some motion. We came across this crosswalk with a building in the background still catching some of the remaining sunlight. I angled the camera low and up and shot as Kiara walked across the street. This created an awesome “city” vibe. To prevent motion blur, I cranked the shutter speed up to 1/1000.
Scene #4:
Camera settings: 1/500 sec, f/1.4, ISO 800
Next, we stopped at a closed-down ship with a large window that was covered in white paper. The white paper created a large negative space that doubled as a fill light. I got right up against the window and had Kiara lean against it as well. I utilized the negative space by framing Kiara on the left for a “commercial” look.
Scene #5:
Camera settings: 1/160sec, f/1.4, ISO 1600
Our last scene takes place after the sunset. I found that at night, the city takes on a while different vibe with the various store lights creating unique portrait opportunities. We found a large window that created a beautiful soft light. By having Kiara casually lean against it, we get this perfect downtown, winter-style portrait.
Conclusion
I highly recommend this challenge for anyone looking to sharpen their eye for portraits in the city using available light! If you enjoyed this video, check out our Mastering Lightroom course on SLR Lounge Premium. There, you’ll also find entire training systems on Flash Photography, Wedding Photography, and more. You can also visit Visual Flow for our library of Lightroom presets and retouching tools.
Don’t miss our next episode of Mastering Your Craft on Adorama’s YouTube channel next week! If you want to catch up on all the episodes, make sure you check out our playlist!
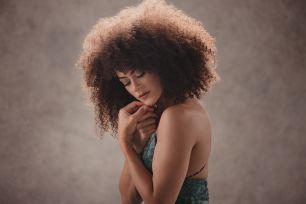
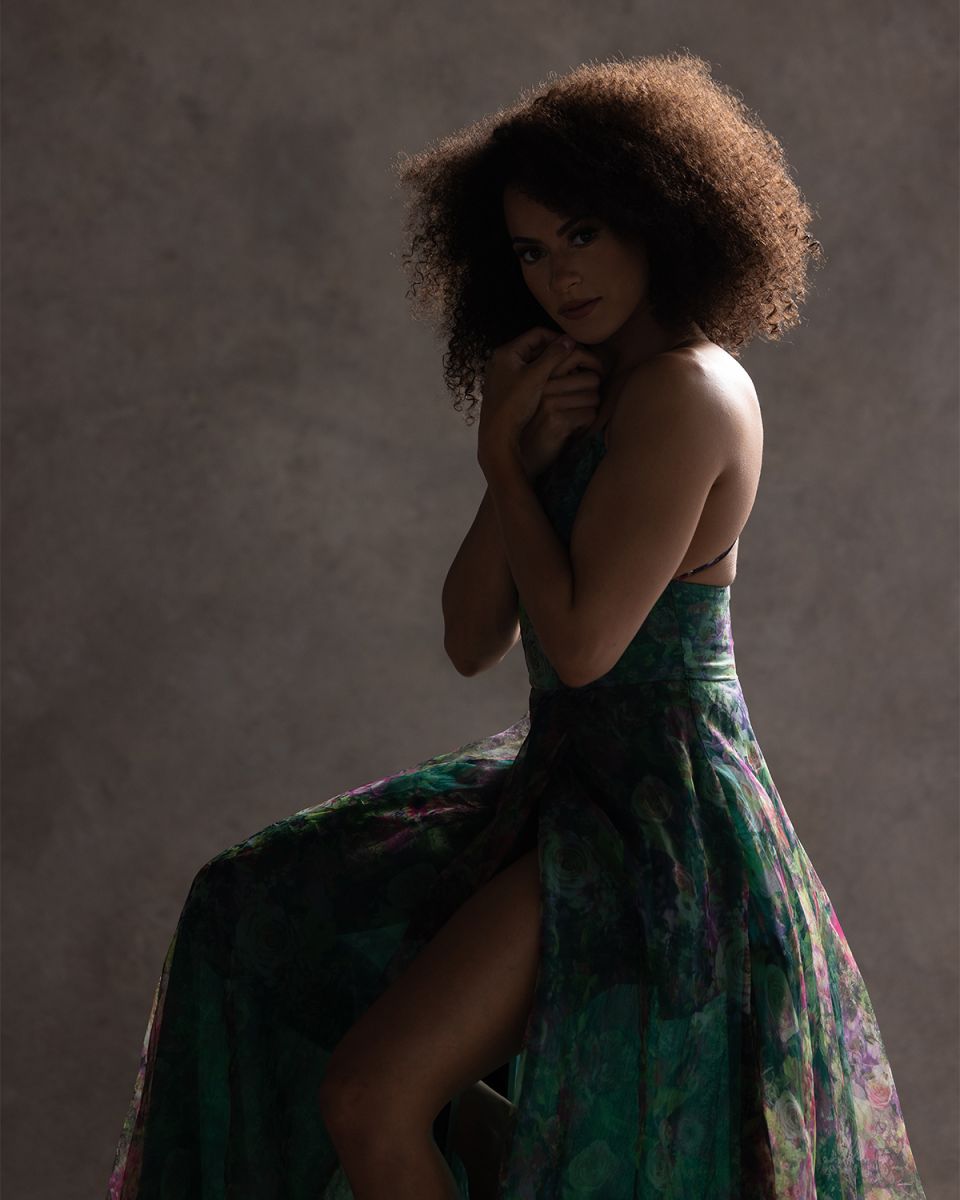
In a previous tutorial, I walked through an unconventional one light portrait setup. In this video, I’ll be adding in a second light to make it an unconventional two light studio portrait setup.
Video: An Unconventional TWO Light Studio Portrait Setup
Before we start, be sure to check out the Unconventional One Light Portrait tutorial here. You’ll learn the complete steps to the final image above which we’ll be starting with today. Let’s dive in.
Preparing the Scene
Captured at 1/200, f/2.8, ISO 100
In the one light setup, I used a V-Flat to bounce the light from the Westcott FJ400 and umbrella that I placed behind Kiara. This created a soft fill that lifted the shadows on Kiara’s face. We’re going to yeet the V-Flat and go back to the base image with only the backlight. Then, I’m going to pull down my ISO to darken the image.
Add in the Second Light
Let’s bring in the second FJ400. I have on it the Lindsay Adler Optical Spot. However, any light modifier will work to control the light such as an ordinary grid, snoot, or a softbox with a grid.
With Kiara holding the same pose as before, I’m using the modeling light to create a Rembrandt effect on her face.
An feauture of the Lindsay Adler Optical Spot is the ability to open up or close the light using the built-in flags.
Photograph!
Edited with Visual Flow > Pure Presets
From here, all I have to do is make subtle tweaks to the direction of the spotlight. I can also turn Kiara away from the camera and move the light back. This will give me a variety of images using the same fundamental two light studio portrait setup.
One vs. Two Light Studio Portrait Setups
Check out the differences between the one and two light studio portrait setups. We started off with an unconventional method by placing the main light behind our subject. Then, we lifted the shadows on her face using a V-Flat. Next, we replaced the V-Flat with a second flash to create an optical spot on the face, creating a whole new look with a simple addition of one light.
Conclusion
If you enjoyed this tutorial, be sure to check out SLR Lounge Premium. There, you’ll find a full course on Flash Photography where you can learn how to creatively use flash in your own photography. You’ll also find a ton of other photography related courses such as Building a Photography Business, Lightroom Editing, and more. You can also visit Visual Flow for our entire library of Lightroom presets and retouching tools.
Don’t miss our next episode of Mastering Your Craft on Adorama’s YouTube channel next week! If you want to catch up on all the episodes, make sure you check out our playlist!
If you ask me what my favorite light modifiers are, I’d tell you anything that helps me control the light. In this video, I’ll be walking through 3 subtle portrait lighting techniques using Profoto’s new Clic light modifiers.
Profoto recently released their new set of Clic light modifiers: The Grid, Snoot, and Barndoors. These are absolutely tiny and as the name suggests, they simply click onto your flash, making them perfect for travel and fast-paced photography.
I’m with my friend Sabrina and I’ll be using these modifiers with my Profoto A2 flash to capture 3 natural portrait lighting techniques.
The grid is a perfect tool tosubtly bump the highlights on your subject. I started off by placing Sabrina in front of this patterned metal wall and composing her on the right third. You can see the direct sunlight coming in at an angle. This will be important in the next step.
I set up my A2 and positioned it in the same direction and angle as the sun.
I started off without the grid and you’ll notice how similar the shadows are due to the same light angle as the sun. However, there’s a lot of light spill on the wall.
Rule of thumb: In bright conditions, start off at the highest power and work your way down.
This is where the grid comes in handy. We can use the grid to focus the light right on Sabrina. This helps bump the highlights right where we want it without spilling the light on the rest of the scene.
I started off by having Sabrina against this ledge. I took advantage of the leading lines on the wall behind her as well as the shrubs in the foreground on the right. This leaves the brightest area of the frame near the middle.
The shrubs create an opportunity to add more interest to the image. I placed the A2 behind the shrubs that are in front of Sabrina. The idea is to shoot the light through the trees like a gobo to create a pattern on the wall. This is how it looks without the grid. You’ll notice a lot of extra light hitting the walls in the back.
This is where you can interchange the snoot and the grid depending on how much you want to contain the light. You can think of the snoot as a higher power grid. It simply funnels the light into a tighter circular pattern. If you prefer the light to be more open, just swap out the snoot for the grid.
Technique #3: Control the Backlight with Barndoors
The barndoors can open and close to control the light spread.
You might be asking, how do the barndoors differ from the grid and the snoot? Well, the barndoors allows for more flexibility in how you can shape the light. You can open and close the wings to get the specific light control that you need. You’ll see in just a second.
I started off with this shot of Sabrina that captures a ton of depth behind her. Notice that much of the highlights are coming in behind her.
To add some dimension to the shot, I placed the A2 behind Sabrina as a backlight.
The flash creates a beautiful rim light but without any modifiers, we get a lot of extra light spill. We’re also shooting into the light, which increases the chances of flare. The barndoors can address both of these issues.
I threw on the barndoors and closed it up to create this tight rectangular shape. Check out the difference. Because the barndoors simply flag the edges of the light, we don’t lose as much power output as the snoot or the grid.
Edited with Visual Flow > Mood Presets
The result is a beautiful, soft edge light that brings out the detail in the hair and helps refine our portrait.
So here’s a tip for building SEO traffic to your website: Optimize your images for search engines. Most artists don’t take advantage of this, and all it takes is a little extra effort each time you add an image to your site to improve your image seo. Of the hundreds of millions of searches that …
I’ve been photographing weddings for over 10 years and recently, I thought to myself, “What are some useful tips for someone shooting their very first wedding?” In this video, I’ll be sharing 10 critical tips for first time wedding photographers that will actually matter.
Video: 10 Critical Tips for First Time Wedding Photographers
Since you’re new, you might be able to charge a premium, but charge something. It doesn’t matter if it’s $500 or $1000. The truth is that people don’t appreciate things that they don’t pay for. If you don’t place any value on your time, your clients will likely take advantage of you.
Tip #2: Set the Right Expectations
Your work may be worth higher than you’re charging, but be honest with your client that you’re new to this. It’s hard to justify prices without prior experience and your clients are taking a risk by hiring a new photographer. Set the proper expectations and then blow them out of the water with incredible results. By providing more value than your clients are paying for, they’re likely to rave about your services. This is your ticket to higher paying clients as you gain experience. However, remember to always keep your rates below the value of the service you’re providing.
Tip #3: Know Your Client’s Values
Since you’re new to this, you’re likely at it alone or with only a second shooter. A wedding can get pretty hectic and as one or two people, you have to make sure that what you’re capturing is what your client actually values. We have an exercise for discovering exactly this in our Wedding Photography Training System at SLR Lounge Premium.
To keep it short here, sit down with your clients. Stop asking about their wedding plans. Save them for later. Instead, ask them open ended questions to get them to tell stories and reveal what’s truly important to them. An example would be, “What are you looking forward to most on your wedding day?” Listen closely and remember their answer when the time comes to photograph their wedding.
I know you want to get creative and show off some mind-blowing shots on your portfolio. However, if those shots are not what your client values, hold them off until after you’ve covered the must-have shots.
Here’s another scenario. There’s a crazy guest on the dance floor. It’s amazing and interesting so you focus in on that moment. However, when you deliver the photos, your client asks if you had a chance to photograph their grandmother, who was next to the dance floor at that time. You check your catalog and sure enough, no portraits of grandma. This is why it’s important to remember that despite what other interesting opportunities arise during a wedding, always focus on what your client values.
Tip #5: Shoot RAW
Shooting RAW allows for much more flexibility in post-production. Weddings are often so fast-paced that it’s not uncommon to dial in the wrong settings. Shooting RAW will give you a good chance of being able to recover details that would’ve otherwise been lost had you been shooting JPEG’s.
Along with this, use a camera that has dual-memory card slots and make sure your images are being saved into both memory cards. A wedding is a once-in-a-lifetime event (in most cases) and having an in-camera backup as you shoot will save a ton of heartache down the road.
Bonus Tip: When we leave a wedding, we send the primary cards with the lead shooter and secondary cards with the second shooter. This way, two copies of the entire wedding exist at all times just in case of an accident or stolen gear situation. We also don’t clear those cards until we verify that all of the images are on the server and the cloud.
Tip #6: C.Y.A. (Cover Your Assets)
If you don’t know whether you should capture something or not, shoot it anyway. These could be some random wedding details or the food. Even if you don’t know if your client will want those images, capture them anyway. It won’t cost you anything to capture extra images. However, it will cost you a lot if you don’t capture enough.
Tip #7: Take Control and Be The Director
A lot of photographers are uncertain and timid, especially early in their career. They have a hard time directing a group of people to pose or going up to ask if a stranger would like to be photographed.
As creatives, many of us are introverted. However, a camera in our hand is a passport into the moment. You are being paid to ask to take photos and you have the permission to direct and pose (kindly, of course).
So long as you’re holding the camera, embrace the role and don’t let it go until you’ve put down your camera for the night.
Tip #8: Wide, Medium, Tight
Early on in your career, it’ll be difficult to be creative on the spot and focus on the story while under pressure. Don’t worry, everyone struggles with this you’ll gain the comfort and ability to think creatively in a pinch over time.
For now, remember Wide, Medium, Tight. In order to properly tell a story through wall art, albums, or blog spreads, we need a variety of images. A wide shot establishes the overall scene of the story. A medium shot shows who’s involved in the story. Then, the tight shots focus in the key memories and moments.
This framework appears in TV and films everywhere, so keep an eye out to see how it’s used in your favorite show or movie!
Tip #9: Create a List for Family Portraits
Even if the photographs are incredible and epic, the most common area for client complaints is family portraits. This boils down to one of two:
You didn’t get a certain portrait.
You didn’t get a certain combination.
Maybe you photographed the entire bride’s side of the family, but maybe they wanted separate shots of just the girls and guys. We discourage detailed shot lists because it often takes away from your ability to capture what’s happening in front of you, but at least have a shot list for family portraits. The shot list should show who and in what combination. Let the family know that each combination will take 2-3 minutes each and make sure you have enough room in the wedding timeline to capture those portraits.
Tip #10: Hire a Second Shooter With Experience
If you want to fast-track your career, I highly recommend this tip. Yes, you may be only getting $500-$1500 for the wedding and an experienced second shooter will cost around $500. For some of you, this could be your entire revenue for the job, so why do this?
Treat your early weddings as live educational events. Live workshops can can cost you more than $2000, but an experienced second shooter at around $500 will not only instantly level up the quality of your work, they bring just that: Experience. You’ll have access to someone who knows what they’re doing and that you can ask for advice on the spot. You’ll also have all of their images in your catalog which you can study after the shoot.
If you don’t need the money urgently, hiring a second shooter will amplify your career five to tenfold. In a year’s time, you’ll be far ahead from having learned on the job from more experienced photographers.
Conclusion
I hope you enjoyed these tips for first time wedding photographers! If you’d like to learn all there is to know about how to photograph every aspect of a wedding, check out our Wedding Photography Training System on SLR Lounge Premium. This is the same training system that our photographers at Lin & Jirsa use and is created from over 10 years of experience in this field. You’ll also find a ton of other photography related courses such as the Flash Photography and Photography Business Training Systems, so be sure to check them out.
Don’t miss our next episode of Mastering Your Craft on Adorama’s YouTube channel next week! If you want to catch up on all the episodes, make sure you check out our playlist!
If you had only one light for your portrait, where would you place it? Usually, we’d think of placing the light in front of the subject. In this video, I’ll show you an unconventional one light studio portrait setup that places the flash behind the subject.
Video: An Unconventional One Light Studio Portrait Setup
Rembrandt, loop, split, and paramount should sound familiar. These are fundamental portrait lighting techniques. While they’re known for their flattering light quality, I want to try something different for our one light studio portrait. Rather than placing my key light in front of the subject, I’ll be placing it behind her.
Before we jump in, be sure to give Kiara, our model today, a follow on Instagram.
Conventional One Light Studio Portrait
Let’s start off by looking at an example of a conventional lighting setup. Here, I placed the light in front of Kiara at an angle, similar to the Rembrandt. Not bad, right?
I’m going to change things up by pushing the light all the way back behind the backdrop.
Notice that when I do this, it leaves most of Kiara in the shadows. We’ll fix this in our next step.
Add in Fill Lighting
To bring the light back on Kiara’s face, all we need is a V-Flat.
I placed it in front of Kiara so that it catches the light from the flash and creates a nice, soft fill light.
Center the Light
Let’s try moving the light directly to the center of the frame. Here, the light is coming in from behind and over the backdrop. Check out the difference.
If you’ve noticed, this unconventional one light studio portrait setup is very similar to what you would find in a mid-day backlight situation. Rather than wrestling with the harsh mid-day sun, turn your subject away from the light and use fill to balance out your portrait.
No need to wait around for golden hour lighting when you can create great light for portraits no matter the time of day.
Conclusion
I hope you enjoyed this article/video! If you found it helpful, be sure to check out SLR Lounge Premium. There, you’ll find a ton of courses on photography related subjects such as Wedding Photography, Mastering Lightroom Editing, Flash Photography and more. You can also visit Visual Flow for a complete library of Lightroom presets and retouching tools for your post-production workflow.
Don’t miss our next episode of Mastering Your Craft on Adorama’s YouTube channel next week! If you want to catch up on all the episodes, make sure you check out our playlist!
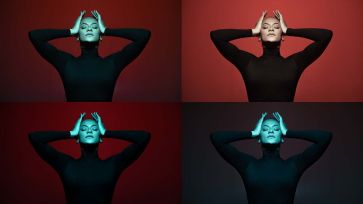
When you’re working with gels, you’ll find that dialing in the right colors in post can be quite tricky. In this video, I’ll be walking through a 6 step Lightroom color grading guide for these types of stylized portraits.
Video: 6 Step Lightroom Color Grading Guide for Stylized Portraits
Left: Raw Image Right: Final Edited
Our goal is to emphasize the complementary colors in this image through Lightroom color grading and arrive at the final result above.
To see how this image was captured, check out our tutorial and behind the scenes here.
Step #1: Temperature / Tint
Getting the right color temperature when working with color gels can get tricky. A good tip while shooting is to keep your color temperature neutral in order to capture the colors as they really are.
Then, in post, you can use the eyedropper tool to select the areas that you want to be neutral. You can see the differences when I:
Select the shirt, which has a teal tone.
Select the red background.
Since we’re aiming to bring out both colors, I settled on more subtle adjustments.
Step #2: Tones
I want to reveal the highlights in the scene, however, I don’t want to brighten the entire image. To do this, I used the Highlights and Whites sliders to isolate those tones. I then made subtle adjustments to the shadows and clarity to help lift out some detail.
Steps #3-5: Hue / Saturation / Luminance
Here, I’ll be dialing in precise colors using HSL. Check out the adjustments in each of the steps above.
Step #6: Fine Tune
There are two Lightroom color grading tools you can use on your image. The Color Grading tool is most common but I’m actually going to use the RGB Curves. The curves tool is usually used for basic contrast but we can tweak each channel to bring out certain colors in our shadows and highlights.
Variations
Afterwards, we can rewind back to Step 1 where we selected different color temperature settings and create unique variations following the same steps. Check out our final Lightroom color grading variations!
Don’t miss our next episode of Mastering Your Craft on Adorama’s YouTube channel next week! If you want to catch up on all the episodes, make sure you check out our playlist!
In recent years, home photoshoots have become increasingly popular, as more people look to capture special moments and memories within the comfort of their own home in an organic, everyday style. However, with so many people taking part in home photoshoots, it can be challenging to find new and innovative ways to stay creative and …
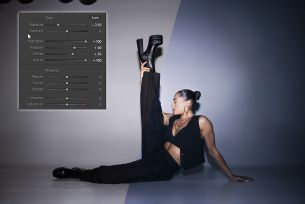
While there are many approaches to Lightroom editing, most methods follow “conventional” steps. Instead, in this video, I’ll be taking an unconventional approach to achieve a unique look to this image without using any local adjustments.
Video: 6-Step Unconventional Approach to Lightroom Editing
For this image, I’ll be using a Lightroom editing method called “Dark Mode.” This involves dropping the exposure and pulling back the details using individual sliders. You can compare this to pushing film. To achieve the final look, I won’t be using any local adjustments.
The typical Lightroom editing approach would be to make small adjustments to bring back the details in the image. Nothing too exciting and we end up with a pretty basic edit.
Step #1: Drop the Exposure
Our first step to this unconventional Lightroom editing method is to drop the exposure, and don’t be shy with it! We can bring it up later as needed.
Step #2: Bring Back the Tonality
We bring back the tonality of the image using the tone sliders (Highlights, Shadows, Whites, Blacks). If the highlights and whites slider aren’t able to bring the tones up to where you’d like, you can raise the exposure here.
Keep in mind that you’ll want your original image properly exposed with a wide range of tones. This will allow you to control each tonal range individually.
Step #3: Adjust the White Balance
Here, we can cool off the image a bit using the white balance sliders.
Step #4: Presence
Normally, we’d add dehaze to bring back some contrast, but we’re going to go backwards and lower it. We’re effectively adding a bit of haze and by doing so, reducing contrast by a touch. Here, I also added in a bit of clarity.
At this point, you can continue to fine tune the other adjustments to your liking. Here are our settings so far.
Step #5: Give It a Matte Finish Using the Tone Curve
This is where we return to a bit of the conventional Lightroom editing method. On the tone curve, pull the white point down and black point up. Anything above the white point turns into a soft light gray and anything below the black point becomes a dark gray. Then, add a subtle S-Curve to give the image an additional kick of contrast.
Step #6: Tweak the Colors
We won’t need a ton of HSL or Color Grading adjustments, but a little bit helps to dial in the exact colors we want.
HSL Adjustments
Color Grading
Final Comparison
Make your final adjustments to the image including retouching, and let’s compare both conventional and unconventional Lightroom editing approaches. Big difference, right?
Conclusion
I hope you enjoyed this article/video. If you’d like to learn more about Lightroom editing, head over to SLR Lounge Premium. We have an entire course dedicated to Mastering Lightroom as well as a ton more courses and tools designed to help you build your dream photography business. You can also visit Visual Flow for our library of intuitive Lightroom presets and retouching tools to maximize your own editing workflow.
Don’t miss our next episode of Mastering Your Craft on Adorama’s YouTube channel next week! If you want to catch up on all the episodes, make sure you check out our playlist!
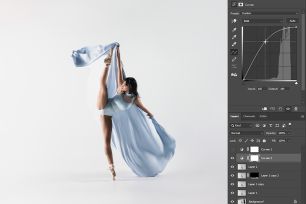
A clean background keeps the focus right on your subject without any unnecessary distractions. In this video, I’ll be showing you how to edit perfectly clean backgrounds in Photoshop.
Video: 5 Steps for Editing Clean Backgrounds in Photoshop
Sometimes, the background might not be perfect for the shot that you have in mind. For example, the cyc wall might not extend far enough. The air conditioning unit might show. The last people might have left the backdrop a little messy. Don’t worry though, this is where we’ll lean on Photoshop to help us arrive at our final image.
Before we start, check out How to Freeze Motion With Flash for the behind-the-scenes on how this image was shot. Let’s dive in.
Step #1: Apply the Look/Preset
We’re starting off in Lightroom by applying the desired look. I used Visual Flow’s Pure Pack and made some adjustments to the settings to get this look.
An important tip is to remove all grain before taking the image into Photoshop. This will prevent unusual texture and artifacts in the upcoming steps.
Step #2: Remove Background Elements
Create a new layer and use the lasso tool to select out the elements you want to remove. Hit Shift + Del/Back for the fill tool and choose Content Aware with Color Adaptation checked. Repeat for all elements you want to remove.
Sometimes, content aware will fill in spots with strange textures. This is completely normal. Repeat the content aware fill or use the patch tool until the background is smoothed out.
You can also pull down the exposure using the curves adjustment layer to reveal any other spots you may have missed.
Extend the background using the crop tool and Content Aware checked at the top. This will automatically fill in the missing space.
Step #3: Retouch
Use the Spot Healing Brush to remove any dirt or stains, particularly on the floor. You can also use gaussian blur on a separate layer to mask over rough spots.
It’s common for editors to use Liquify to exaggerate the action in images like ours. Just hop over to Filter > Liquify and make your adjustments.
Step #5: Dodge Using Blend-If
This technique is great for applying a dodge effect over the entire image. Raise the brightness using a curves adjustment layer. Then, right click the layer and open the Blending Options. This blend-if tool tells the layer to “blend if the underlying layer” is within this selected range.
We’re going to affect the highlights but feather the blend all the way down to the shadows. This creates a nice and gradual dodge effect. Then, adjust the overall intensity using the layer opacity.
Conclusion
Here’s the final before and after comparison. As you can see, the process of editing clean backgrounds in Photoshop is incredibly simple!
I hope you enjoyed this article/video! Head over to SLR Lounge Premium to find complete courses designed to help you build your dream photography business as well as mastering many aspects of photography such as Lightroom editing and working with flash. You can also find a full library of Lightroom presets and retouching tools over at Visual Flow!
Don’t miss our next episode of Mastering Your Craft on Adorama’s YouTube channel next week! If you want to catch up on all the episodes, make sure you check out our playlist!
Free Newsletter
Tutorials, gear reviews & pro tips — straight to your inbox.


 I started off without the grid and you’ll notice how similar the shadows are due to the same light angle as the sun. However, there’s a lot of light spill on the wall.