


Wide-angle lenses are often considered landscape and architectural photography lenses, but they also offer unique creative possibilities for portrait photography. If you’re looking to add a dynamic touch to your portraits, a using a wide-angle lens can be a great tool to use. This article will provide practical tips to help you master the art of wide-angle portrait photography so that you can capture impactful and stunning imagery.
Understand the Characteristics of Wide-Angle Lenses
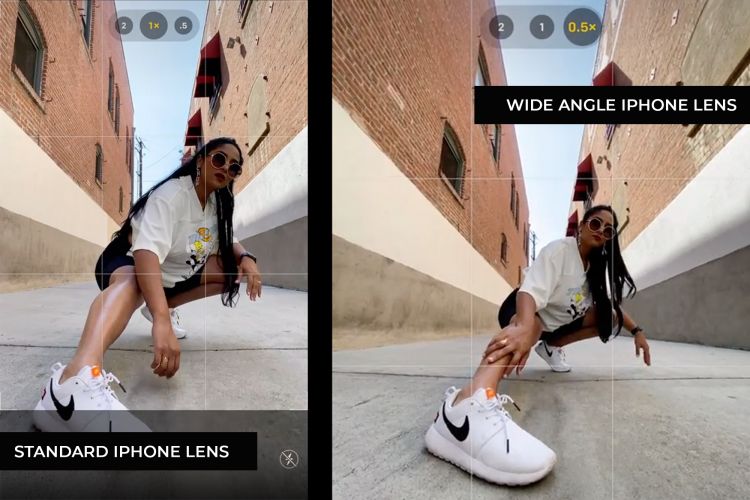
 Wide-angle lenses typically range from 14mm to 35mm. These lenses are known for their ability to capture a broad field of view, which significantly affects perspective and depth. When used in portrait photography, wide-angle lenses can capture more of the scene, create a sense of space and context around the subject, and feel more “in-the-action” than telephoto lenses. However, they can also introduce distortion, especially at the edges of the frame, which can either enhance or detract from the portrait depending on how it’s handled.
Be Mindful of Bad Distortion
Wide-angle lenses naturally distort images on the edges of the frame. While this can be used creatively, it’s important to be aware of how it affects your subject. Distortion can make faces appear stretched or body parts disproportionately large if placed too close to the lens edge.
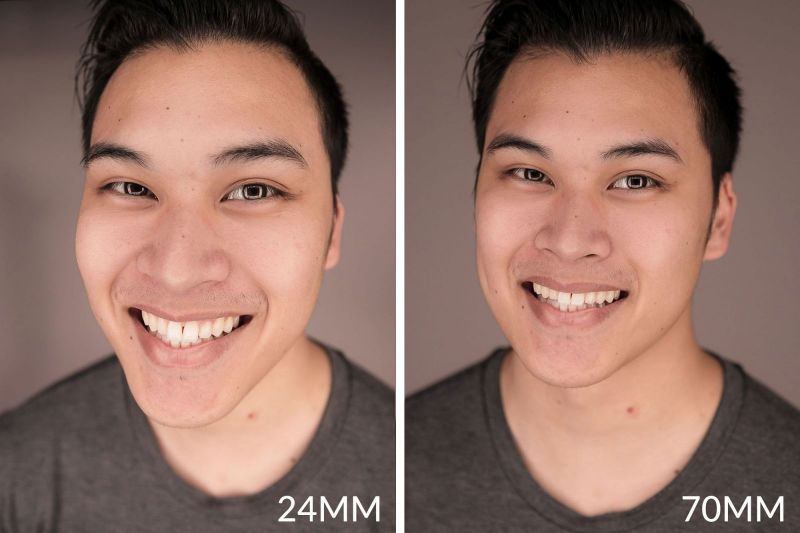
A wide angle lens makes whatever is closest to the camera appear larger in relation to anything further from the camera. For example, if you’re photographing a headshot with a wide angle lens, and you place your lens too close to the subject, the nose will appear larger than normal, as you see in the photo above.
Follow These Rules When Taking Portraits With A Wide Angle Lens
- Position your subject in the center of the frame where distortion is minimal
- In group photos, never place a person too close to the edge
- Use editing tools to correct distortion if it detracts from the portrait
- Experiment with slight angles to control how the distortion affects the final image
Get Close to Your Subject
One of the key aspects of using a wide-angle lens is proximity to your subject. Unlike telephoto lenses, which allow you to shoot from a distance, wide-angle lenses require you to get up close and personal. While you can shoot from far away with a wide angle lens, your subject will likely be too small and get lost in the surroundings.
This proximity can create a sense of intimacy and immediacy in your portraits. However, as mentioned above, be mindful of getting too close, as this can cause unwanted distortion, making your subject’s features appear exaggerated.
Be Mindful of Backgrounds
One of the strengths of wide-angle lenses is their ability to capture a wide field of view. This makes them excellent for environmental portraits where the background plays a significant role in the composition. This is great when you’re backgrounds are beautiful, such as beaches and mountain ranges. However, this can create challenges in less appealing locations like busy cities or unappealing public parks. When the backgrounds are less appealing, consider using telephoto lenses to have full control over the field of view and the backgrounds.
Understand Depth of Field for Wide Angle Lenses
Wide-angle lenses generally have a larger depth of field, meaning more of the scene is in focus. This can be used to your advantage to create portraits with a sharp subject and a detailed background. However, if you’re looking to capture a portrait with a wide angle lens and still have a nice blur to the background, you would have to achieve that look in photo editing or with techniques like the Brenizer method.

Understand Their Affect Action Photos
Focal lengths can completely change the way an image feels. By getting up close and moving with your subjects, you can make the image feel alive and immersive. See the following video to learn how to capture action in your portraits with a wide-angle lens. For this video, the Canon EOS R5 was paired with the RF 28-70mm f/2 as well as the RF 70-200 f/2.8.
Telephoto Lenses – Photographing From Far Away
To illustrate the difference between telephoto portraits and wide angle portraits, see the images below starting with the telephoto images.

Notice the distance between the photographer and the subjects. With the telephoto lens. you’ll get images like the ones below.

While these images are good and provide variety to the collection of images, notice the lack of foreground. In addition, the entire image just feels far away. The viewer may not feel the excitement in the images.
Wide Angle Lenses – Getting In the Action

I recommend using a wide-angle prime lens for this technique, such as a 24mm or 35mm. If you don’t have a prime lens, a good wide-angle zoom like the 28-70mm f/2 will work well. Also, take advantage of your camera’s face detection feature to help stay in focus.

Instruct the couple to walk or run towards you to show more direction in the movement as well as depth. Then, start photographing them while moving backward to maintain the distance. Below are the unedited results.

Telephoto vs Wide Angle Portraits

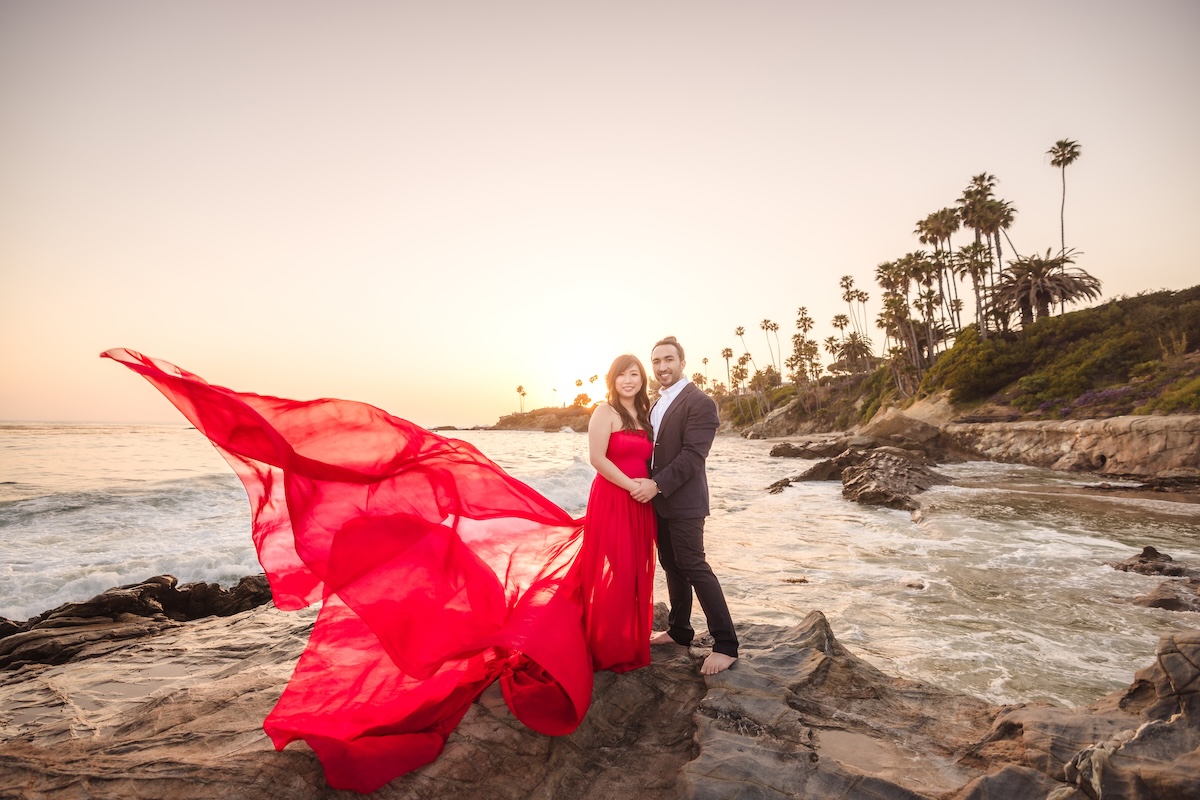
Here is the final look compared to where you first started. The difference is huge. Your final portraits with a wide-angle lens feel very in the moment and spontaneous. In addition, you see much more of the background and are immersed in the action.
Conclusion
I hope you enjoyed this article/video. Next time you’re photographing a couple, give this technique a try! See the difference when you capture your portraits with a wide angle lens. Your viewers will feel much more connected and the photos will feel much more spontaneous and authentic.
For a full course on photographing couples, check out Engagement Photography 101, available on SLR Lounge Premium. In addition, check out Visual Flow for intuitive lighting based presets such as the Modern Pack which we used for our final images.


