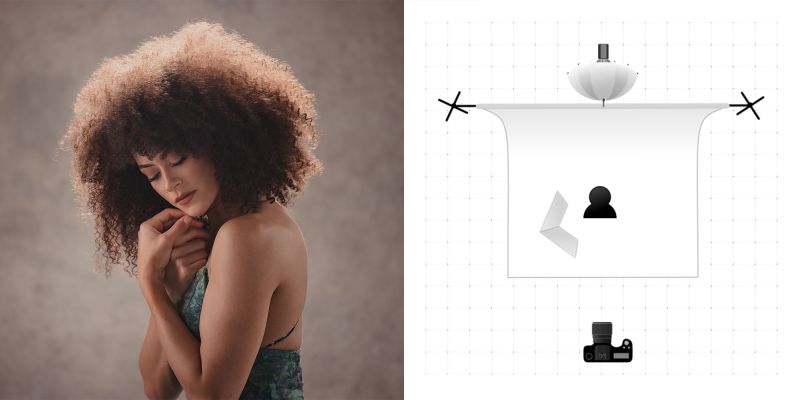
In a previous tutorial, I walked through an unconventional one light portrait setup. In this video, I’ll be adding in a second light to make it an unconventional two light studio portrait setup.
Video: An Unconventional TWO Light Studio Portrait Setup

Before we start, be sure to check out the Unconventional One Light Portrait tutorial here. You’ll learn the complete steps to the final image above which we’ll be starting with today. Let’s dive in.
Preparing the Scene

In the one light setup, I used a V-Flat to bounce the light from the Westcott FJ400 and umbrella that I placed behind Kiara. This created a soft fill that lifted the shadows on Kiara’s face. We’re going to yeet the V-Flat and go back to the base image with only the backlight. Then, I’m going to pull down my ISO to darken the image.
Add in the Second Light

Let’s bring in the second FJ400. I have on it the Lindsay Adler Optical Spot. However, any light modifier will work to control the light such as an ordinary grid, snoot, or a softbox with a grid.

With Kiara holding the same pose as before, I’m using the modeling light to create a Rembrandt effect on her face.

An feauture of the Lindsay Adler Optical Spot is the ability to open up or close the light using the built-in flags.
Photograph!

From here, all I have to do is make subtle tweaks to the direction of the spotlight. I can also turn Kiara away from the camera and move the light back. This will give me a variety of images using the same fundamental two light studio portrait setup.
One vs. Two Light Studio Portrait Setups

Check out the differences between the one and two light studio portrait setups. We started off with an unconventional method by placing the main light behind our subject. Then, we lifted the shadows on her face using a V-Flat. Next, we replaced the V-Flat with a second flash to create an optical spot on the face, creating a whole new look with a simple addition of one light.
Conclusion
If you enjoyed this tutorial, be sure to check out SLR Lounge Premium. There, you’ll find a full course on Flash Photography where you can learn how to creatively use flash in your own photography. You’ll also find a ton of other photography related courses such as Building a Photography Business, Lightroom Editing, and more. You can also visit Visual Flow for our entire library of Lightroom presets and retouching tools.
Don’t miss our next episode of Mastering Your Craft on Adorama’s YouTube channel next week! If you want to catch up on all the episodes, make sure you check out our playlist!


Get Connected!