Pye Jirsa is the co-founder of SLR Lounge and Lin & Jirsa Photography, one of Southern California's most recognized wedding photography studios. He is the creator of SLR Lounge's full educational library and has trained over 20,000 photographers since 2008 across lighting, posing, editing, and business strategy. He is also the co-creator of Visual Flow Presets and has spoken at WPPI, PPA, CreativeLive, Fstoppers, and Adorama.
A clean background keeps the focus right on your subject without any unnecessary distractions. In this video, I’ll be showing you how to edit perfectly clean backgrounds in Photoshop.
Video: 5 Steps for Editing Clean Backgrounds in Photoshop
Sometimes, the background might not be perfect for the shot that you have in mind. For example, the cyc wall might not extend far enough. The air conditioning unit might show. The last people might have left the backdrop a little messy. Don’t worry though, this is where we’ll lean on Photoshop to help us arrive at our final image.
Before we start, check out How to Freeze Motion With Flash for the behind-the-scenes on how this image was shot. Let’s dive in.
Step #1: Apply the Look/Preset
We’re starting off in Lightroom by applying the desired look. I used Visual Flow’s Pure Pack and made some adjustments to the settings to get this look.
An important tip is to remove all grain before taking the image into Photoshop. This will prevent unusual texture and artifacts in the upcoming steps.
Step #2: Remove Background Elements
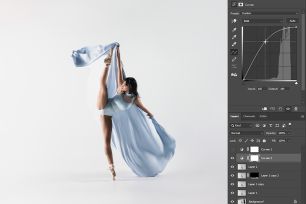
Create a new layer and use the lasso tool to select out the elements you want to remove. Hit Shift + Del/Back for the fill tool and choose Content Aware with Color Adaptation checked. Repeat for all elements you want to remove.
Sometimes, content aware will fill in spots with strange textures. This is completely normal. Repeat the content aware fill or use the patch tool until the background is smoothed out.
You can also pull down the exposure using the curves adjustment layer to reveal any other spots you may have missed.
Extend the background using the crop tool and Content Aware checked at the top. This will automatically fill in the missing space.
Step #3: Retouch
Use the Spot Healing Brush to remove any dirt or stains, particularly on the floor. You can also use gaussian blur on a separate layer to mask over rough spots.
It’s common for editors to use Liquify to exaggerate the action in images like ours. Just hop over to Filter > Liquify and make your adjustments.
Step #5: Dodge Using Blend-If
This technique is great for applying a dodge effect over the entire image. Raise the brightness using a curves adjustment layer. Then, right click the layer and open the Blending Options. This blend-if tool tells the layer to “blend if the underlying layer” is within this selected range.
We’re going to affect the highlights but feather the blend all the way down to the shadows. This creates a nice and gradual dodge effect. Then, adjust the overall intensity using the layer opacity.
Conclusion
Here’s the final before and after comparison. As you can see, the process of editing clean backgrounds in Photoshop is incredibly simple!
I hope you enjoyed this article/video! Head over to SLR Lounge Premium to find complete courses designed to help you build your dream photography business as well as mastering many aspects of photography such as Lightroom editing and working with flash. You can also find a full library of Lightroom presets and retouching tools over at Visual Flow!
Don’t miss our next episode of Mastering Your Craft on Adorama’s YouTube channel next week! If you want to catch up on all the episodes, make sure you check out our playlist!
The new Rotolight AEOS II LED lights pack a punch and opens up a ton of creative possibilities with its features. In this video, I’ll be walking through a creative constant light studio portrait setup while showing off some of the great features this light has to offer.
Video: Creative Studio Portrait Setup with Rotolight AEOS II LED Lights
The Rotolight AEOS II
The Rotolight AEOS II is an intuitive and powerful light for its size. It features an LED light panel that produces both flash and constant light. For today’s studio portrait setup, we’ll be using its constant light, but let me show you its capabilities, all controllable by the back panel, or through your phone.
From the menu, you can control its wide range of white balance from deep tungsten all the way to a super cool 10K color temperature.
You can choose from a list of gel emulations.
The Rotolight also offers a wide range of filters and gel emulations, accessible on the app or the back panel.
Left: Control the hue and saturation. Right: Control the overall brightness.
You can then customize the color and brightness to get the exact look, providing so much more control over your colors than traditional gels.
On top of its seemingly limitless color selection, it offers fun special effects which can be perfect for in-camera video effects. From lighting and strobes to police lights and fireplaces.
The Rotolight AEOS II runs entirely on simple v-mount batteries which makes it the ultimate portable constant light to meet your on-location creative demands.
Let’s dive into our studio portrait setup. We have Kiara with us in studio today and I’ll be using the Canon EOS R5 with the RF 28-70mm f/2L lens.
Composition
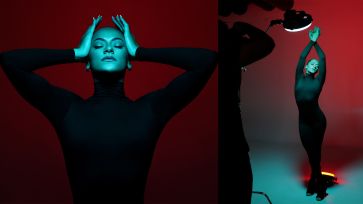
Starting with our composition, I placed Kiara in front of the white wall to contrast her black jumpsuit. Our intent is to add color into the background so a neutral background is preferred.
Ambient Light
We want the Rotolights to provide the main constant light. To do this, let’s cut the room lighting. We’ll set our exposure to 1/200 sec, f/2, ISO 800.
Modify/Add Light
Controlling the Rotolight from my phone, I set it to a nice blue color and raised it centered above Kiara.
Let’s add in our second light. I set the color to a deep red to complement the blue from the key light. I placed the light on the ground behind Kiara and aimed it up at the background. This beautifully lights up the background in red.
Now that we have our studio portrait setup, let’s start photographing!
Conclusion
All the color options, effects, and mobile interface makes the Rotolight AEOS II not only a blast to work with but super easy and efficient to use. It opens up endless creative potential to create incredible images without the hassle of gels.
I hope you enjoyed this article/video! Be sure to visit SLR Lounge Premium for an entire library of courses designed to help you create your dream photography business. There, you can master Lightroom Editing, learn all about the Business of Photography, and more. You can also visit Visual Flow for a ton of intuitive Lightroom presets and retouching tools to make the most of your editing workflow.
The over the shoulder shot is my favorite signature portrait when photographing couples. In this video, I’ll be walking through how you can recreate this look to try on your next photoshoot.
Video: Step-by-Step Guide to Capturing Our Favorite Signature Portrait
Before we jump in, be sure to give Olivia and Tyson a follow on Instagram! I’ll be shooting with the Canon R5 with the RF 28-70mm f/2L lens.
If you like this tutorial, be sure to check out one of our other top signature shots, The Shutter Drag Portrait!
Find Your Composition
For this signature portrait, you’ll need a large directional light. It could be a window, a large door, or in our case, the opening of a cave. We can begin by posing our couple in front of the light. I had Olivia and Tyson standing in front of each other looking slightly down and to their sides.
Captured at 1/320 sec, f/2, ISO 400
Once we lock down the basic composition and our ambient light setting, we can move on to modifying our light.
Modify the Light
Pivot the entire shot away from the light so the backlight becomes a sidelight.
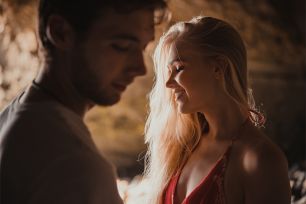
We can modify the light by turning altogether so that the light is coming in from camera-left. The light will focus on the subject, usually the female in this style of portrait. The male will be in the foreground, helping guide the focus to his partner.
Turn slightly back toward the light to capture the brighter background.
If the background is too dark, the male subject may be hard to see. To emphasize him in the foreground, we pull the angle slightly back toward the cave (or window) opening. The walls will be brighter in the background and help him stand out. Notice the difference.
The key to modifying the light is to vary the angles until the background and your subjects are properly lit. Focus on your couple’s eye-lines to help guide the viewer through the image and have fun with this incredibly simple but beautiful signature portrait.
Conclusion
I hope you enjoyed this article/video. If you’d like to learn all about photographing extravagant engagements and weddings, be sure to head to SLR Lounge Premium. There, you’ll find entire courses on photography designed to help you build the studio and career of your dreams. You can also visit Visual Flow for an entire library of Lightroom presets and retouching tools for your ideal editing workflow.
Don’t miss our next episode of Mastering Your Craft on Adorama’s YouTube channel next week! If you want to catch up on all the episodes, make sure you check out our playlist!
Modern cameras can capture a ton of dynamic range, preserving incredible details in the deep highlights and shadows. In this video, I’ll be walking through a 5 step guide to editing HDR environmental portraits while retaining natural skin tones.
Video: The Ultimate Guide to Editing HDR Portraits in Lightroom
Before we jump in, if you’re a member of SLR Lounge Premium, go ahead and load up the exercise file. You can also follow along using one of your own images.
Step #0: How to Shoot for HDR
Before we even start editing HDR portraits, it’s important to get the right settings in-camera to maximize the information in the image.
Shoot RAW format.
Use the histogram.
Expose as dark as you can without losing shadow detail. This may take understanding your camera’s capabilities.
Let’s take a look at my exposure. The histogram shows that I have plenty of shadow information. The Highlight Clipping Alert also shows me where I peaked, but this amount is expected for this kind of scene.
Step #1: Maximize Tone & Dynamic Range
Our first step when editing HDR portraits in Lightroom is to bring out as much dynamic range as we can. Visual Flow offers presets designed specifically for quick and natural HDR effects, but this time around, we’re going to start from scratch. Start by pulling the highlights and whites down and the shadows and blacks up. Bring the contrast back using the tone curve. It’s important to note that we haven’t touched the actual contrast slider yet.
Step #2: HSL Adjustments
First, let’s tone down the parts of the image that are oversaturated, such as the oranges, and for me, the blues. You can also adjust the overall color temperature to add back the warmth to the image.
Step #3: Color Grading
Here, we can make further stylistic adjustments to our colors. I added in subtle yellows to the highlights and slightly bumped up the orange in the mid-tones. The key is to keep these adjustments subtle.
Step #4: The Contrast Slider
The reason I saved the contrast slider for step 4 is because it affects the overall image without precision control. By making all the other adjustments first, I get a good and clear picture of how I want my image to look. Then, the contrast slider can provide that last little touch to the overall tone.
Step #5: Local Adjustments
The final step for editing HDR portraits is to make local adjustments to recover more of the background. Select your Subject and invert the mask. Then, slightly pull down the exposure on the background.
You can also add a subtle vignette using a radial burn and again using a linear gradient that affects just the sky. This helps pull more attention to your subjects.
I also like to lift my subjects out with a touch of highlights.
Final Comparison
Finish up with some noise reduction in the shadows and any touch ups in Photoshop. Check out the difference between a quick and dirty edit vs our detailed and clean HDR edit.
Conclusion
We hope you enjoyed this article/video! While this was a complete manual method of editing HDR portraits, these settings are all loaded up in Visual Flow‘s presets. All of Visual Flow’s presets are intuitively designed to work with specific lighting conditions for natural tones and colors. Be sure to check those out to maximize your editing workflow and get beautiful results. For complete photography tutorials such as Mastering Lightroom, check out the SLR Lounge Premium Library.
Don’t miss our next episode of Mastering Your Craft on Adorama’s YouTube channel next week! If you want to catch up on all the episodes, make sure you check out our playlist!
We’re at the beach to capture some golden hour portraits. In this video, I’ll walk through how to balance flash with natural light using the Profoto A2 in 4 simple steps.
Video: How to Balance Flash with Natural Light Using the Profoto A2
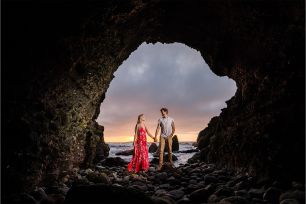
Before we even think about lights, let’s grab our composition. I want to have Olivia and Tyson in the opening of the cave with the ocean behind them.
Step #2: Dial in Ambient Light
Here, we’ll decide what we want our background to look like. The rule of thumb is:
Dramatic: Darker ambient exposure + more flash power.
Natural: Brighter ambient exposure + less flash power.
Even with a low exposure, try to retain some shadow information.
I want this portrait to be dramatic. My settings landed at 1/160 sec, f/4.5, ISO 100, retaining the color in the sky while lifting some details in the shadows.
Step #3: Add in Your Flash
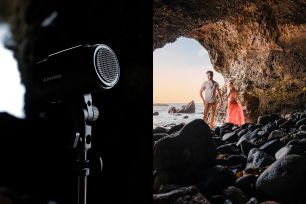
The Clic Grid funnels the light right onto our subject.
I’m using the Profoto A2 for its incredible power and portability features. I placed the A2 with a Clic Grid on a stand just off camera right. I aimed the light at Olivia to place her as the focus of the image.
The key is to make our subjects brighter than the background. The Profoto A2 at 9-power (50 watt seconds) was perfect.
After some small posing adjustments, we’re good to start photographing! Check out our final images.
Conclusion
That’s all there is to it! As you can see, balancing flash with ambient light for a dramatic effect is incredibly easy.
I hope you enjoyed this article/video! If you’d like to learn more about working with flash, check out the Flash Photography Training System on SLR Lounge Premium! There, you’ll find complete courses on photography related topics to help you sharpen your skills as a photographer. Also, be sure to head over to Visual Flow for a complete library of Lightroom presets and retouching tools.
Don’t miss our next episode of Mastering Your Craft on Adorama’s YouTube channel next week! If you want to catch up on all the episodes, make sure you check out our playlist!
The recently released Profoto A2 is a new tiny flash that packs a punch. Roughly the size of a soda can, the compact design, high-quality build, reliability, and power (of up to 100Ws) make it a tempting purchase for photographers who value portability and versatility. The flash is compatible with the full “Profoto Clic” system of accessories like their gels, grids, and soft boxes, making it usable for almost any type of look and style. But is it worth the $1,000 price tag? In this Profoto A2 review, we’ll discuss the pros and cons of the new flash unit and give you our final verdict.
Profoto A2 Specs
Flash Specs
Max energy: 100 Ws
Energy range: 10 f-stops (0.1-100 Ws)
Recycling time: 0.1-1.6 s
Flash duration: t0.11/350 s (100 Ws) – 1/26,000 s (0.1 Ws)
Flash duration: t0.51/1200 s (100 Ws) – 1/ 56,000 s (0.1 Ws)
Color temperature: 5800 K +-100 K
Continuous light Specs
Lamp typeLED
Max power2.1 W
Color temperature3 – 500 K
Max luminous flux200 lm
Max illuminance @ 1meter180 lx
Physical Measurements
Width: 7.9 cm / 3.11 in
Length: 12.6 cm / 4.96 in
Height: 7.9 cm / 3.11 in
Weight: 773 g / 1.70 lb with battery and stand adapter, 495 g / 1.09 lb without battery and stand adapter
Profoto A2 Review | Pros
Small and Portable – The most noticeable thing is just how small it is (about the size of a soda can). It’s clearly designed for the traveling/on-the-go photographer (i.e. perfect for wedding/portrait photographers).
100Ws of Power – It puts out 100Ws of power at 5800K (a bit warmer than typical Profoto lights) which is up nicely from the on-camera variant that does 75Ws
Uses A-Series Batteries – All the batteries you have from your A10 (former A1) are all usable with this new light
400 Full Power Strobes – Somehow they managed to squeeze extra efficiency out of the same batteries as the A10 getting around 400 full-power pops.
Profoto AirX Connectivity – Bluetooth pairing, so you can use the flash with a smartphone camera using the Profoto AirX App.
Solid Build Quality – This thing is built tough. It’s lightweight but still built in a way that feels like it can take a beating. This is one of the things that Profoto is best known for, and part of the “you get what you pay for” aspect. More on that later!
Profoto Quality + User Experience – As usual, it’s incredibly easy to use and very reliable. The A2 offers the same consistent Profoto user experience which is really my favorite feature of their gear. I don’t worry about whether or not it’s going to work and they can stand up to a serious beating.
Profoto A2 Review | Cons
Price – The only main drawback of this Profoto flash is the same one for other Profoto gear: the price tag. At $1,000 MSRP, it’s not cheap, and some will criticize that they can get other options for less. That said, those other options will not provide nearly the same level of quality and overall user experience or service. Profoto is well-known for its long-lasting durability.
Speaking of price, though: note that if you haven’t already bought into the Profoto system, you will need to buy one of their Air Remote triggers which range from ~$200 to ~$400.
No Hotshoe – By design, this flash doesn’t have a hotshoe which means it can’t be used on-camera or as a true backup for your Profoto A10. This isn’t really a drawback if you’re purchasing the item for its intended use, but it’s worth noting.
No Variable Temperature LED – It would be nice if this had a variable temperature LED like its big brother the Profoto B10. Carrying a CTO gel is easy, though.
More Accessories – I wish more accessories were available within the Clic ecosystem. For example, I still haven’t found a suitable Profoto replacement for my MagMod Sphere, a very popular modifier for on-the-go photographers. (But, again, that’s more of an on-camera lighting tool!)
Demo | See the Profoto A2 in Action
Let’s review a quick demonstration video from our Youtube Channel. As a wedding photographer, the portability of my gear is critical. Combine portability, reliability, and power, and I have the perfect on-location flash for epic destination portraits. In the video below, we’ll demonstrate and review the Profoto A2 on a recent destination shoot.
In this video, I’ll use the Profoto A2 to capture epic destination-style portraits of my friends Olivia and Tyson. Let’s dive in with the C.A.M.P. framework.
Right off the bat, you can see that getting to this exact spot involved a bit of scrambling. Being able to fit my entire kit into a comfortable backpack is already a huge benefit before I even start taking pictures!
Composition & Ambient Light
We’re inside this incredible cave by the beach, which is perfect for a dramatic portrait of Olivia and Tyson. Obviously, with the dynamic range being what it is in the ambient light of this angle, my creative vision absolutely won’t be possible without adding light to the scene.
I had Olivia face the ambient light, and I posed Tyson towards the shadow to create contrast. I used the edge of the cave to split the frame into two zones, and dialed the ambient exposure to 1/200 sec, F/5.6, at ISO 100.
NOTE: The Profoto A2 does have HSS (high-speed sync) and TTL capabilities, but the shutter speed of 1/200 sec just happened to work for this scene.
Adding in the Profoto A2
Grids are used to control light spill.
Let’s bring in the Profoto A2. I snapped on a Profoto Clic Grid to control the spread of the light.
I placed the Profoto A2 facing Tyson. You can see that I aimed it so that Olivia is behind Tyson and won’t catch the light.
The Profoto A2 at full power provides the perfect amount of light on Tyson. I had him turn his face toward the light and captured this incredible shot.
In post-production, the raw image data allowed me to recover just the right amount of detail in the shadows on the cliff walls, as well as a natural-looking amount of detail in the sky outside the cave.
Still, regardless of how much dynamic range a camera has, there is no substitute for adding light on a subject’s face! It totally changes the final result and makes for a much more dramatic image.
The Profoto A2’s size makes it an absolute breeze to carry around, even on a rocky beach where I may need both hands free! At 100 watt seconds, it packs plenty of power to get beautiful portraits just about anywhere. Its battery compatibility with the Profoto A series gives it up to 400 flashes per charge, all controlled by the new Profoto Connect Pro. All in all, the A2 is an incredible piece of gear and essential for traveling photographers anywhere. The durability, simplicity, and portable power make this “pocket strobe” stand out above the rest.
I hope you enjoyed this article & video. When it comes to gear, for me, portability and reliability are at the top of the list now after a decade-plus of full-time work. These priorities are also what make the Profoto A2 so perfect for capturing breathtaking destination portraits.
Whether it be the weather or timing, the sky might not have turned out as exciting in your shot as you imagined. Photoshop AI provides an easy fix. Photoshop uses Adobe Sensei AI to let you quickly & easily replace any sky in your images. In this video, I’ll show you how to swap your sky in minutes.
Video: How To Replace Your Sky in Photoshop AI in Minutes
If you’re an SLR Lounge Premium member, go ahead and download the exercise file. Otherwise, you can load up your own image and follow along the edit.
After applying your basic look in Lightroom, hop into Photoshop.
Photoshop AI Sky Replacement Tool
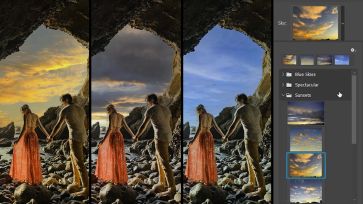
First, select the sky that best fits the scene. If it’s a sunset scene, be sure to pick a sunset sky.
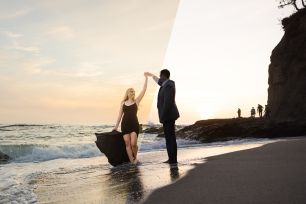
Next, match the lighting direction. The light in this shot is coming from the left. Use the “Flip” box to flip the sky to match. You can also move the sky around to find the best position.
Now, adjust the brightness and temperature to feel more fitting in the scene.
Once we hit “Done,” the sky replacement gets put into its own folder in the layers. Here, pull back the overall opacity of the new sky until it looks natural and realistic. A sky that’s too vivid will feel Photoshopped.
Lastly, create a shallow gradient mask where the sky meets the surface. This will help clean up the horizon and blend the overall effect with the rest of the image.
Before & After
Something I was impressed about Photoshop sky replacement is how quickly the scene was “re-lit” after choosing and/or adjusting the skies position in relation to your image. Sensei AI will automatically adjust the colors and lighting of your image to match the visible sky, making your scene more realistic and believable.
You can also scale the sky images (larger/smaller) and manually make adjustments to the brightness and color temperature if you choose.
The best part is everything you do is saved as separate layers, given you the utmost control afterwards to make adjustments should you need too!
Conclusion
I hope you enjoyed this article/video! Adobe has been adding incredible Photoshop AI tools to make the editing process more efficient. For an entire course on Lightroom editing, visit SLR Lounge Premium. You can also visit Visual Flow for intuitive Lightroom presets and retouching tools to maximize your workflow and editing needs.
Don’t miss our next episode of Mastering Your Craft on Adorama’s YouTube channel next week! If you want to catch up on all the episodes, make sure you check out our playlist!
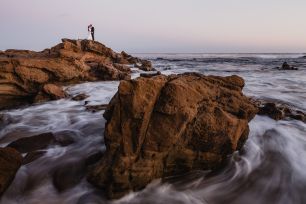
You can capture extraordinary landscapes at the beach using a simple technique called Shutter Drag. In this video, I’ll show you how to perfect this technique in 5 super simple steps.
Video: The Ultimate 5 Step Shutter Drag Reference Guide
Before you fix your camera on your tripod, find your basic composition. Get in the action and look for the direction of the water. To get exaggerated motion, capture the motion as it moves across the frame, rather than towards the camera.
Step #3: Dial In Your Composition
Once you have an idea of your composition, secure your camera and tripod in place. Now, you can find your exact framing.
Step #4: Set Your Exposure
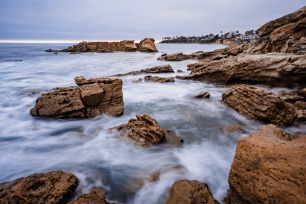
The slower the shutter speed, the “silkier” the motion.
To capture the motion, we need to slow down the shutter speed. The slower the shutter speed, the silkier the water will appear. My preferred shutter speed for shutter drag landscapes at the beach is around 2 seconds.
Now wait for the right motion and start photographing! Since you’re working with a slow shutter speed, it’s a good idea to use a remote shutter to prevent camera shake. You can also shoot at a high frame rate to capture an entire sequence of images.
Change up your compositions and capture more incredible shutter drag landscapes!
Conclusion
I hope you enjoyed this article/video and give the shutter drag a try and see what great images you come up with! To learn more incredible in-camera special effects, check out our Advanced SFX Course on SLR Lounge Premium! There, you’ll find A-Z guides on many photography related subjects that can help you advance your photography career. You can also visit Visual Flow for a complete library of Lightroom presets and retouching tools.
Don’t miss our next episode of Mastering Your Craft on Adorama’s YouTube channel next week! If you want to catch up on all the episodes, make sure you check out our playlist!
Carving out a niche for your photography business can be the key to standing out in a crowded market. Specializing in a specific genre or style not only allows you to hone your skills to perfection but also helps in attracting the right clientele who are searching for the exact expertise you offer. Here are four compelling reasons why specializing when creating a photography business isn’t just a strategic move—it’s essential for long-term success and fulfillment in the industry.
Video: 4 Reasons To Specialize
One of the biggest mistakes professional photographers make is not specializing. In this video, I’ll be giving 4 reasons why you need to specialize when creating a photography business.
Reason #1: You might not be as good as you think you are
Generalists often look at being able to photograph everything as a way of opening up their potential audience when creating a photography business. In theory, this makes sense. However, when I look at their portfolios, their work is often decent at best.
In psychology, this is known as the “Dunning-Kruger Effect.” Basically, when we approach something with limited experience, we tend to have more confidence than we should. Only by diving deeper do we realize how much more we need to learn and this process of growth never really ends.
The photographers at the top are there because they dedicated all their efforts to one particular genre. Because a generalist is spread across a little bit of everything, they usually don’t get the experience necessary to truly compete with the best.
Reason #2: Your time and resources are limited.
It can take decades to master a single genre of photography. Still, the masters insist that they have a lot left to learn. Now you don’t have to be a master, but it still will take time to develop a skillset worth paying for. I’d say 2-3 years for the average person.
How do you do this if you’re a generalist with 4-5 different focuses? It might take a decade to get enough experience in each of these genres to make considerable money. Most of us don’t have that time. Specializing is going to be the quickest way to develop the skillset necessary to generate revenue when creating a photography business.
Reason #3: You’re competing with other specialists.
Generalists tend to compare their work with other generalists. They fail to recognize that they’re actually competing with other specialists.
Put yourself in the shoes of a client looking for an architectural photographer. Photographer A shoots architecture but also showcases automotive, fashion, and corporate headshots on their portfolio. Photographer B, on the other hand, spends all their time shooting architecture. Unless Photographer A’s architecture photographs are out of this world, you’ll likely choose Photographer B.
A client is going to be looking for exactly what they need, not everything else you might be photographing. They’ll be looking to get the best product for their money. In order to provide the best product, you need to invest the time to become the best. How do you do that while creating a photography business if your time is split across multiple genres?
Reason #4: Marketing is virtually impossible.
A specialist knows exactly who their audience is. They can then design their portfolio to showcase exactly what their potential clients are looking for. For example, a wedding photographer, whose clients consist of brides and grooms, will find it incredibly easy to create content curated just for them.
What about a generalist? Who is their target client? What do they put on their website? What do they say that they actually do? Automotive, wedding, corporate, real estate… These are all different clients. It’s virtually impossible to communicate one message to all of them.
More Reasons to Specialize
We discussed the importance of choosing a niche and specializing in order to best market your business to your ideal client, here is short video summarizing that discussion with fellow Ambassador Tanya Goodall Smith:
We also asked several top professional photographers “How has specializing helped you and your business?” and here is what they had to say:
“Specializing has helped me by being recognized as an expert in the field. This has become very evident within my online social network. Often I’ll see someone post “Can anyone recommend a good wedding photographer?” and I’ll see people I’m friends with online comment, “Check out Raph, he’s amazing”… even though these people have not worked with me, but seeing that I specialize and often share only wedding-related images, they are confident in recommending me to their friends. In addition, being consistent with posting within your niche has helped me reach a wider audience on potential clients.”
“Choosing to specialize in commercial/branding photography for local businesses has helped me be able to more effectively market my services. I know exactly who needs me and where to find those people. It’s made my brand super recognizable, people hear about WorkStory Photography and know exactly what we do. I get a lot of referrals and stand out from the hundreds of other photographers in the Spokane area because of my specialty. I’ve received awards by local publications for “best commercial photographer,” voted on by the public, based 100% on my reputation and have had the opportunity to be interviewed on local radio and podcasts because I had a unique point of view and “specialty”. I highly recommend specializing!”
“Specialization as a new photographer is tough because when you are new you want to dip your toe in all the buckets. You are so excited about the art and creativity of the craft that is photography, that it is hard to decide where you will thrive and be able to make a real ‘go of it’ as a business owner. After a year or two of practicing and honing in on your passion, it is critical to find one area to concentrate on. I think there is an assumption that you have to ‘micro specialize’; only families, only infants, only couples. That isn’t true. I think it is important to ‘macro specialize’ and hone in on one genre – event photography, commercial photography, portrait photography, etc. Each of these areas has so many ‘micro specializations’ that if you are exploring every facet you will have so much to do it will be hard to do it all. You will be able to perfect your workflows and automations and answer questions your clients didn’t know they had. When you truly specialize in an area you will be able to anticipate your ideal client’s needs before they are voiced and meet expectations they didn’t know they had. Your value will outweigh your price which will, in turn, lead to more leads, bookings and allow you to scale your pricing as your value increases.”
“Anytime you have a very important service that needs to be done, regardless of what it is, if it’s important to you, you’re likely going to seek out someone who has mastered that service. Through years of trial and error, I have found that to be the case regarding my business and photography. Certainly, I can photograph more than one subject type, but by focusing all my energy into one specific genre (weddings, in my case) and into a specific aesthetic within that genre (creative photojournalism) I have better aligned myself with ideal clients who want exactly what I enjoy creating and who value me as the expert in just that.”
“Over the last few years, our studio has worked towards specializing in luxury client experiences. All of the focus is on quality, instead of quantity. The photography has to be great, that is a given; however, when you genuinely take care of your clients with five-star service, they will not only refer great clients but also become an advocate for your studio. We have spent considerable time refining all of the details that are part of our client’s experience. Every little detail matters and there is always room for improvement. We continue to work on creating the ultimate experience for our clients.”
“Creating a unique brand was the most challenging piece of the puzzle when it came down taking my business to the next level. For the first few years that I was charging for photography, I was more of a “jack of all trades” studio. I quickly learned that the clients I wanted to market to were hiring specialists, who’s photography centered around only one style. Their focus was very clear and only for clients who needed their expertise. Whether it be family, newborn, senior, or in my case, wedding photography. In 2015, my wife and I knew what we had to do and completely rebranded to represent exactly what our photography and our studio are all about. We created a very specific brand that made it crisp and clear what we specialized in. That brand is what took us from shooting 10 weddings to over 120 with multiple photographers working for us. While a lot of photographers think of rebranding as changing a logo or color scheme, it’s so much more than that. If you look at our site it’s not hard to tell what we specialize in which is weddings and engagements with a unique style which also offers a very specific experience. It’s not for everyone, and that’s the point. To be successful in this over-saturated market you need to be willing to accept that and know that the clients you hire will appreciate your work that much more.”
Have you selected a niche to focus on and specialize in? If not, what are your thoughts on the subject? If you have, how has it helped you and your business? Join the discussion in the Master the Business of Photography community!
Conclusion
Many photographers think that by specializing, they’re limiting their potential customer base when creating a photography business. In reality, it’s the exact opposite. By specializing, you actually open yourself up to everyone in a particular niche.
I hope you enjoyed this article/video. Specialization is only one piece of the complete Photography Business Training System, available at SLR Lounge Premium. This is an A-Z course on how to build a 6-7 figure photography business or studio of your dreams. Be sure to check it out to learn more!
In the following video clip, Lindsay Adler demonstrates studio lighting with a speedlight and shows us the differences between TTL metering and manual light metering
Creating happy clients is arguably the most important goal we have as client serving photographers. Client satisfaction is even more important than creating high quality photos, and the two are often not as correlated as we think. In other words, even the most incredible photos captured and delivered can lead to unhappy clients if expectations …
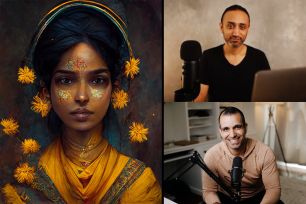
We’re in the age of AI and it’s about to transform how we approach art and creativity. Today, I’m joining pro-retoucher, Pratik Naik, to discuss how AI generated art will impact the creative industry.
Video: How Will AI Generated Art Change the Creative Industry?
So far, AI technology has only been used in the form of plugins and tools designed to speed up certain editing tasks. However, you may have heard of Midjourney, the most popular among several recent AI programs that can generate their own artwork.
Pratik and I were invited to test out Midjourney during their beta phases and the results were incredible. Not only was the AI able to interpret abstract concepts, it was even able to emulate other artists’ styles.
As a creative, this technology raises tons of questions. What does this mean for the future of certain creative fields such as illustration and graphic design? What about photographers? How can we integrate this technology into our creative processes?
Today’s video is in a podcast style as Pratik and I dive deep into how this revolutionary AI technology will impact us all as creatives.
Check out some of the AI generated art along with the descriptions we used to create them.
“Symmetrical portrait of an Indian woman painted”“Mysteries of the universe standing on Vormir”“A very strange fashion show in Paris alien cloth”“Hokusai illustrated the Emei Mountains in China”
I hope you enjoyed the conversation! Before you go, be to check out Pratik’s work on Solstice Retouch as well as Infinite Tools.
Visit SLR Lounge Premium for full courses on photography related topics such as Lightroom editing, as well as complete Wedding and Flash photography training systems. You can also visit Visual Flow for a complete library of Lightroom presets and retouching tools.
Don’t miss our next episode of Mastering Your Craft on Adorama’s YouTube channel next week! If you want to catch up on all the episodes, make sure you check out our playlist!
Free Newsletter
Tutorials, gear reviews & pro tips — straight to your inbox.