Adobe has made local adjustments a whole lot easier by adding AI based masking in their latest Lightroom update. With just a simple click, we can now get quick and clean masks around our subjects and skies. Today, I’ll be walking through advanced masking in Lightroom using their new AI based features.
Video: Advanced Masking in Lightroom Using New AI Features
The new AI-based masking in Lightroom can be utilized a number of ways to automatically select out specific parts of the image while saving time. Not only can we control where our adjustments are applied, this can save tremendous amounts of editing time. We no longer have to spend time hand drawing around our subjects and horizons. Now we can bring out the key features of our images with just a simple click or two.
The New AI Based Masking in Lightroom
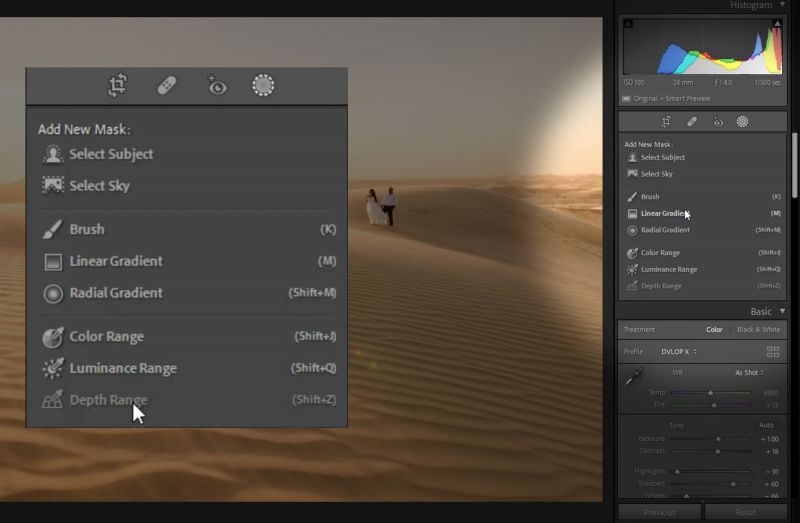
Here is the new layout of the tools for AI based masking in Lightroom. Most of the tools should be familiar such as the brushes and gradients. However, you’ll notice “Select Subject” and “Select Sky.” These use AI software to detect and automatically select out the subject and sky. We can use these tools in a variety of combinations to get precise edits and here’s how.
AI Based Subject Masking Feature


First, we want to make our global adjustments to get to our basic look.

Then, in the mask menu, click “Select Subject.” Keep in mind that when masking, areas in white will reveal the adjustments and areas in black will conceal the adjustments.


Any adjustments I make will affect just the subjects.

Next, create a new mask and select out your subjects again. However, this time, invert the mask to select everything around the subjects.


Using this, I lowered the exposure of the scene around my subjects for a dramatic effect.
AI Based Sky Masking Feature

Take the same exact steps to select out the sky. The AI software will detect the horizon and create a mask of the sky. To make further corrections to the mask, click “Add,” then “Brush,” and make corrections to the edges.

Checking “Auto Mask” will automatically detect and refine the areas you brush in.
Combining the Tools for Advanced Masking in Lightroom
To get total precision and control over your edits, you can combine both of these tools.

Create a new mask of the sky. Then, invert it to select the landscape instead. From here, you can subtract out your subjects and create a mask that affects only the landscape around your subjects.
Final Image


Using these two new AI masking tools, we were able to get control over our sky, subject, and landscape. Then, we were able to adjust each piece individually to get to our final image.
Conclusion
I hope you enjoyed this article/video. With these new AI based tools for masking in Lightroom, we can save a tremendous time editing with incredible results. We can edit with precision without spending all that time drawing our masks by hand. For a complete course on Lightroom editing, check out Mastering Lightroom on SLR Lounge Premium. In addition, visit Visual Flow for more lighting based presets as well as powerful and versatile retouching tools.
Don’t miss our next episode of Mastering Your Craft on Adorama’s YouTube channel next week! If you want to catch up on all the episodes, make sure you check out our playlist!


Get Connected!