We’ve teamed up with Adorama to bring you a new series of photography tutorials called “Master Your Craft” to be featured on their YouTube Channel. Subscribe to see more of our videos on their channel throughout the next couple of months that will cover photography, lighting, posing, and editing education to help you hone your skills and master your craft. To watch the entire series, check out our playlist!
Video: How to Dodge and Burn in Lightroom via Dark Mode
If you’ve ever wondered how to get that dodge and burn look without spending an excessive amount of time in Photoshop, we have your solution. The short answer is we can achieve that same look in just a fraction of the time using an editing technique called “Dark Mode” in Lightroom. This comes with our Visual Flow Preset System but we will be showing you how to dial it in yourself! We’ll start by showing you our typical approach to editing an image and then jump into the “Dark Mode” technique. We will also show you how to create your own preset and shoot with this editing technique in mind.
Be sure to download this exercise file so that you can follow along with the tutorial.
Typical Editing Workflow in Lightroom

Our typical editing workflow in Lightroom involves making a few key adjustments under the basic panel in the Develop module. The goal for this basic edit is to preserve the highlights and reveal more detail in the shot.
Here is a quick list of the adjustments we made in the above image:
- White Balance: Increased temp & adjusted tint to warm the image
- Exposure: Increased exposure +.99
- Contrast: Increased contrast +30
- Highlights: Lowered highlights -100
- Shadows: Lifted shadows +40
- Whites: Lowered whites -60
- Blacks: Lowered blacks -20
We would continue to make color adjustments before considering the edit complete, but this otherwise covers our typical approach to editing images in Lightroom.
[Related Reading: How to Light and Shoot a Dramatic Portrait by Yourself]
Dark Mode Editing Workflow in Lightroom


As you can see in the before and after images above, using the dark mode editing technique in Lightroom produces similar results to dodging and burning an image in Photoshop.
Step 1: Make the Basic Adjustments for Dark Mode Editing in Lightroom
The dark mode editing technique unfolds in almost the exact opposite direction of our typical workflow.
Here’s a quick overview of the basic adjustments we made for the dark mode edit:
- White Balance: Left “As Shot”
- Exposure: Lowered exposure -2.37
- Contrast: Left at 0
- Highlights: Increased highlights +80
- Shadows: Lifted shadows +60
- Whites: Lifted whites +21
- Blacks: Increased blacks +100
Lowering the exposure is a great starting point for a dark mode edit. It allows you to set the stage for the rest of your basic adjustments. After setting our exposure, we increase the black point all the way to +100. Then, we increase the highlights to lift and control the skin tone. We then raise the white point to further control the skin tone; raising the white point works similarly to using a brush to dodge areas of the skin that further lifts highlights in key areas, such as over the nose and along the “T-zone” of the face. Next, we lift the shadows until we reach a more pleasing level of contrast. Finally, you can further adjust your exposure until you get the look you’re after. For example, we started by lowering the exposure to -3.07 and ended up increasing the exposure to -2.37.
Step 2: Understand How to Shoot for Dark Mode Editing in Lightroom
Now that you understand the editing workflow for the dark mode technique, let’s look at how to shoot for dark mode edits. It’s important to note that the concept behind dark mode editing is similar to that of “Chiaroscuro” lighting, an Italian term that translates to light & dark and references the high contrast between them.
Basically, we need our skin tones to be brighter than the background. In our example image (the exercise file), our subject was placed in natural light against a darker backdrop. While you can do this most anywhere (we placed our subject agains a bush along side a sidewalk on the street), some locations and conditions won’t work as well.

For instance, the image on the beach that we used to demonstrate our typical editing workflow above is a great example of a scene that doesn’t really lend itself to the dark mode editing technique. The subject’s skin didn’t include many highlights and the scene itself mainly limited the highlights to the sky. The beach photo would be better suited for an HDR-type edit.

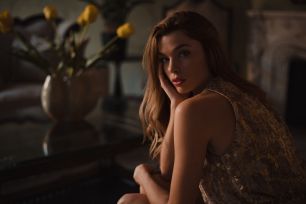
In the image above, we placed our model in front of a window and adjusted the curtain to control the lighting. This allowed us to control the highlights on our subject. By placing our subject in the brightest part of the room and choosing an angle with a dark background, we were able to capture a portrait that is perfect for using the dark mode editing technique. Once in Lightroom, we simply followed the editing technique outlined above to end up with a great, painterly portrait.

Here, we have more of the same, only this time we’re using a strobe in a soft box in a studio setting. We’ve placed our subject in front of a dark background and we’re using the strobe to control the lighting and get the perfect highlights on our subject. It’s important to note that the background should be darker than the highlights on the subject’s skin.
[Related Reading: How to Create Incredible Black & White Images in Lightroom (and Make Your Own Presets)]
Step 3: Create Your Own Dark Mode Preset in Lightroom
If you use Visual Flow presets, specifically the Retouching Toolkit, then you already have a dark mode preset in your editing arsenal. If you don’t have Visual Flow presets, however, you can create your own dark mode preset in Lightroom to achieve the exact same results. Here’s how to do it.

First, you’ll need to dial in your settings. The image above shows the Basic panel adjustments you need to make for dark mode editing. These are the same adjustments used in the Visual Flow dark mode preset. Of course, you may want to make additional tweaks to the settings, depending on the image you’re editing. You don’t have to stick with these exact adjustments.

Next, click on the “+” button at the top of the “Presets” panel on the left of the Develop module and select “Create Preset.”

The window pictured above should then pop up. When it does, click on the “Check None” button to clear all of the checked boxes, and then select the “Basic Tone” box, as well as the “Process Version” box in the lower righthand column of options. Give the preset a name (such as “Dark Mode Edit”) and click on the “Create” button to save your preset.
It’s that easy to create your own presets. It’s trickier to know how to use them, especially when using them in conjunction with other presets, which we’ll show you how to do next.
Step 4: Use Your Dark Mode Preset with Other Presets
While you’re getting used to your new preset, it will help to create a virtual copy of your image (CTRL + ‘ on Windows, CMD + ‘ on Mac). Apply the dark mode edit to one version of the image and make any additional tweaks to get the image to where you like it. Then, on the virtual copy (which should be reset to the images original settings, straight out of camera), apply other presets to see which other edits you like (whether using Visual Flow or other preset systems).

For the image(s) above, we selected the “Soft Light” preset from the Visual Flow Modern Pack, which adds a pleasant, bright and warm look to the portrait. We then selected our dark mode preset, which adds a dark mode look to the color setup of the “Soft Light” preset we added previously. We made additional tweaks to the exposure and highlights to get the image ready to export. We also added a radial burn, which you can do as well.

To create a radial burn, select the radial gradient tool (the circle next to the brush tool in the editing panel featured above), lower the exposure, and then click and drag a circle around your subject (as shown in the image). Note, the selection should be inverted so that the darkened area rests outside of the circle, leaving your subject brighter in the center. Play with the exposure until you get a look that you like, and then save this out as a preset, just like you did for the dark mode preset. The only difference (aside from what you name it) will be that you will only select the “Radial Filters” box instead of the “Basic Tone” or any other boxes. Click create and you’ll have a custom radial burn preset ready to go any time you need it.
If you want to take the image into Photoshop and do additional dodging and burning, you’re more than welcome to do so. Using the Dark Mode editing technique, we’ve already saved a ton of time to get to a deliverable image. It’s up to you how much further you want to take the edit.
Step 5: Bonus Tip – Enhance the Hair and Eyes
You might be surprised how much retouching you can do inside of Lightroom. To illustrate this, we’ll show you how to enhance the hair and eyes while still in Lightroom. Again, if you have the Visual Flow Retouching Toolkit, you already have access to 40+ retouching tools for Lightroom, such as “Eyes: Intensify Iris” or “Hair: Enhance Details,” to name just a couple. Like before, however, you can also make your own.
Hair Enhancement

To create a hair enhancement preset, select the brush tool and dial in the above settings. As you’ve probably guessed by now, you can save this out just like the other presets, only this time you just need to hit “New” next to “Mask” scroll down until you see the “Save Current Settings as New Preset” option pictured below.

After you click “Save,” rename your preset and you’re good to go. When you use this brush and “paint” over the subjects hair, you’ll notice it takes on a glossy look.

Quick Tip: If you want to strengthen the effect, hold alt/option, click on the brush marker, and drag to the right (see image above).
Eye Enhancement

Just as you did with the hair enhancement effect, dial in the details above and save your new eye enhancement preset.

Paint over the eyes with this preset selected in order to add a bit of sharpness and enhance the detail in the eyes.

And as if that weren’t enough, we’re going to add yet another preset to whiten the eyes. Dial in the settings above and create a new preset for this effect. Brush over the eyes with this preset to further brighten the eyes. You can hold alt/option while using the brush to feather the edges and smooth the transition into where the brush is being used. We suggest following along the shadowy areas around the eyes to make the effect look more natural.

Since we mentioned it as an example above, let’s go ahead and add one more preset. Dial in the settings above and save a preset for “Eyes: Intensify Iris.” Paint this effect right over the iris to lift out some of the color tone in the eyes.
Despite the growing number of adjustments we’re making, the end goal is for the edits to look subtle. The best way to ensure you’re not going overboard is to zoom out (all the way to the thumbnail in grid view, if necessary) to see if the edits you’ve made are overly noticeable. Perhaps you over did it with the eyes and they pop off the screen in an unnatural way. Whatever area you’re editing, just double-check to make sure the enhancements aren’t over the top.
Let’s take one last look at the before and after, all edited in Lightroom using this dark mode technique.
Conclusion
We hope you enjoyed this video and lesson on how to dodge and burn in Lightroom via dark mode – catch our next episode of Mastering Your Craft on Adorama’s YouTube channel next week! If you want to catch up on all the episodes, make sure you check out our playlist!