Today, we’re talking about the fundamentals of studio portrait lighting and more. In this video, I’ll be showing you how small adjustments to your lighting, framing, and posing can completely transform your images.
Video: Studio Portrait Lighting Fundamentals and Posing Tips
We’ll be working with a simple one-light setup. I’m using the Westcott FJ400 with a medium sized softbox. I’m also shooting with the Canon EOS R5 with the RF 28-70mm f/2, however, any light, lens, and camera will work great.
Our model today is my friend Jhesus. Be sure to give him a follow on Instagram here. Let’s dive in!
The Lighting

Let’s start with the lighting. When working with studio portrait lighting, it’s all too common for photographers to simply throw up a flash, aim it at the model, and start photographing.

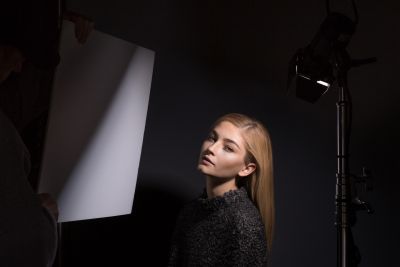
This kind of side lighting isn’t bad per se, however, I want to go for a more high-fashion look. I moved my light to a “paramount” position, or top-down down the middle. Be sure to angle the light, however. This will help even out the light on your model.

Add some negative fill by placing V-Flats on each side for some extra drama.
The Pose

Next, let’s add some interest to our model by adjusting the pose. Start small with a hand in the pocket, or a “bodyguard” stance with hands together, or fold the arms.

Then, make the pose more dynamic by having your model lean to either side.
An extra tip is to make sure your model’s expression matches the body language.
The Camera Angle

Use a higher camera angle for an “approachable” look. On the other hand, use a lower camera angle for a “strong” look.
A final tip is to move the light up and down with your model, should you have them crouch or lay down closer to the ground. A general rule of thumb is to keep your model at the same distance as the width of your softbox for the perfect light.
Putting it All Together

Let’s take what we learned about studio portrait lighting, posing, and camera angles, and put it all together. Jhesus is in a strong outfit and is also a talented dancer so I want to convey that strength. Following these steps, I captured these awesome final images.
Conclusion
I hope you enjoyed this article/video. For a complete course on off-camera lighting, check out the Flash Photography Training System on SLR Lounge Premium. Also, you can visit Visual Flow for a complete library of intuitive Lightroom Presets, designed to give you the perfect look for any lighting situation.
Don’t miss our next episode of Mastering Your Craft on Adorama’s YouTube channel next week! If you want to catch up on all the episodes, make sure you check out our playlist!