Pye Jirsa is the co-founder of SLR Lounge and Lin & Jirsa Photography, one of Southern California's most recognized wedding photography studios. He is the creator of SLR Lounge's full educational library and has trained over 20,000 photographers since 2008 across lighting, posing, editing, and business strategy. He is also the co-creator of Visual Flow Presets and has spoken at WPPI, PPA, CreativeLive, Fstoppers, and Adorama.
In this video, I’m going to show you one of my favorite compositional tricks to level up all your photographs regardless of what you’re shooting, and best of all it’s going to take less than 10 minutes. This is a technique I like to call ‘Compositional Stacking’, not official by any means, but it gets the point across. I use it as a reminder to start with a baseline composition and then add additional compositional techniques until you get to the final image. This is by far going to help you create more thought-provoking imagery that stands out and has levels of creativity. This is one of the main techniques we teach in our Creative Photography course and it has the potential to change the way you capture images. I think it’s much easier shown than explained so make sure you watch the video demonstration with our model Alyssa below.
Photography Composition Tips for Beginners
What I love about this tutorial is that it applies to all skill levels. Photo composition is something we often forget about because we rush through trying to get our lighting and posing on point and end up missing the mark when it comes to challenging our artistic ability. Here are some of my favorite compositional techniques to stack to add interest and layers to a photo.
1. Symmetry
A textbook lesson you hear when learning about photography composition tips for beginners is the rule of thirds. It’s now more commonly understood by the everyday person because phone cameras have it built into the software. Our first compositional technique is to place Alyssa in a spot in the frame that abides by the rule of thirds. She is in the center column and her body, for the most part, is equally split within the rows.
2. Depth
A commonly overlooked photography composition tips for beginners is to use your lens’s aperture as a tool to create compositional interest. You can either have a shallow depth of field which will help separate the subject from the background or choose to incorporate more of the elements in the photo by dialing in a narrow depth of field. For this shoot, I was on a Canon 24mm Prime lens shooting at f/1.4 to really showcase how depth works as a compositional element.
3. Leading Lines
Another classic photography composition tips for beginners is to find natural lines in your frame that lead the viewer’s eyes to your subject. You can see that I used the alleyway walls in this shot to frame Alyssa, in conjunction with several other compositional techniques. Most of the time, when photographers do use leading lines, they are naturally incorporating multiple compositional techniques already and that creates great visual interest.
4. Highlights
The eye of the viewer will always gravitate to the brightest part of the frame. This is an important note to remember when shooting so you can easily place your subject in that part of the frame and naturally create a point of interest. This is a great technique to use for silhouettes!
5. Perspective
Here is a technique I have been loving as of late which was greatly inspired by using my phone camera more. For most phones, the camera is located in the top corner which makes it hard to capture interesting angles. If you flip your phone, similar to how if you were to place your camera lens closer to the ground, you can get the camera’s lenses closer to the ground. Here, I am using Alyssa’s placement in the frame and lower perspective to elongate her figure. By switching to portrait orientation, I get a much more exaggerated effect and it helps make her appear as though she is much taller.
6. Shaping Poses
Lastly, you can use limbs and the body to help create shape and curves that compliment your settings. A commonly used technique is to create triangles with the arms by placing them on the head or on the hip. You can see a drawn-out demonstration in the image above. This is a common trick used in Hollywood in scenes without subjects as well. In fact, that’s my bonus tip: study tv and film to catch all of these compositional techniques in action and try and dissect why it captivated you. It’s one of my favorite things to do and is a great exercise to go through.
If you’re looking for more photography composition tips for beginners be sure to check out our Creative Photographycourse to learn how to be more creative.
Engagement photo shoots are an essential part of the wedding photography experience. Not only do these sessions provide an opportunity to capture the couple’s love and joy, but they also allow the photographer to build a relationship with the couple before the big day. However, posing for engagement photos can be a daunting task, especially for those who are not used to being in front of the camera. In this article, we will provide a photographer’s guide to engagement poses, offering tips and tricks to help photographers create stunning and natural-looking images that capture the couple’s unique personalities and love story. From traditional poses to candid shots and everything in between, this guide will help photographers create engagement photos that their clients will cherish for a lifetime.
Video: Simple Posing Framework for Engagement Poses
With so many ways to take couple’s portraits, how do you decide on the right poses? Photographers will usually run through a memorized list of poses during the session. However, in this video, I’ll be showing you a simple guide for stress-free engagement poses.
Capturing the right poses can be a stressful part of couple’s and engagement photography. There are just so many to go through. Rather than a list of poses, I’ve created a simple posing framework for a stress free couple’s shoot in 4 easy steps. Let’s jump right in.
Begin each session by teaching clients the Foundation Poses. Foundation Posing consists of the 5 basic feet positions that serve as bases for the majority of engagement poses. From here, directing and guiding my clients becomes incredibly easy and simple.
For our example, we begin building our final look by starting our couple off with the Closed Pose.
Step #2: Set The Intention For the Engagement Session
Are you looking at a romantic scene with the beautiful sunset, or a silly and playful moment between the couple?
For this step, describe to your client the image as you imagine it. Doing this will set the vibe and help bring your clients into the right moment and mindset for their engagement poses. Sometimes the best engagement poses are the poses that the clients interpret themselves.
Step #3: Micro-Posing
Rather than big changes in between each image, focus on small and simple engagement posing adjustments. For this, we want to keep in mind:
The eyes and where they’re looking.
The hands and what they’re touching.
The distance between the couple.
The emotion of the photograph.
Changing each of these small nuances can drastically shift the feel of your engagement poses. Check out this sequence of photos as well as the simple directions I’d give as we move from shot to shot. We began with a closed pose from our foundation posing.
Use micro-poses to capture small intimate details.
Engagement Posing Cues:
Pull each other close, look at her, and look at me.
Pull back a bit and look at each other.
Then touch foreheads.
The basic closed pose is still the same, yet we get a series of natural photos with simple engagement posing directions and changes.
Capture The full Story
To capture a variety of images and tell a complete story, capture “Wide, Medium, and Tight” photos. Keeping the same foundation engagement poses, simply move away to capture a wide shot, then move in closer to capture the details. No need for drastic changes or a crazy list of shots.
Add Movement and Motion
Movement is an icebreaker as well as an engagement pose. Getting your subject moving can loosen them up and help the session be more emotive and uninhibited. Plus, it invites the opportunity for candid moments to pop up for you to grab.
Attempt to capture more dramatic poses – like this lift for example – to provide varied poses in the same location. Make the most of the time you have with your clients by adjusting posing and composition based on your light and surroundings, getting in tight for portraits and zooming out to capture the environment.
Understand Emotion and Intimacy
Love and laughter can be elicited from couples with direction. Asking them to tell each other what they most love about one another can cause feelings to bubble to the surface where they can be captured. Laughter can be provoked by asking the couple to say silly things to each other.
Intimacy can be shown by keeping couples literally connected. Tangled limbs and maintaining a point of contact are a couple ways to do this.
More Inspiration From Pye
We discussed and taught you our Foundation Posing Framework and showed you the first 5 couples poses every photographer should learn. In the video below, you’ll learn 20+ couples poses in less than 10 minutes to take your couple’s photos to the next level. You’ll soon learn it’s all about the posing and direction you give your clients to elicit genuine and authentic emotion.
Conclusion
I hope you enjoyed this article/video. A simple engagement posing framework is incredibly important to keep the energy and flow positive and stress-free throughout the photoshoot. With this knowledge, you should know how to naturally interact with your couple in order to produce candid moments. Directing your subjects on where to stand, where to place their hands, and which direction to face will lead to a more cohesive shoot and prompt your clients to have faith in your process.
The beach is one of the most popular places to take photographs and justifiably so. Beaches provide stunning natural elements and at the right time of day, can create a perfect setting for any genre of photography. The combination of soft sand, sparkling water, rock formations and breathtaking sunsets offers an ideal setting for creating …
Light modifiers are where most photographers waste the most money. We buy an umbrella, then a softbox, then a beauty dish, then a grid — and half of it ends up sitting in a bag unused because we didn’t understand what we were actually buying before we bought it. This guide covers two things: the underlying principles that govern how every modifier works, and a practical breakdown of the most common modifier types so you can match the right tool to the job before spending anything.
The concepts below apply equally to a $20 umbrella and a $400 octa. Once you understand the system, you can look at any modifier and predict what it will do to your light before you ever fire a shot.
Part of the Flash Photography Guide
A complete resource for photographers learning to work with artificial light — from modifier basics to multi-light studio setups.
For the flash, we used a Profoto A10 on a stand, paired with a Canon 5D Mark IV, a 100mm lens, and a tripod with a remote to trigger the off-camera flash. Most of what’s covered here translates directly to any flash unit — the principles don’t change with the gear.
This is the most commonly confused distinction in lighting, and getting it wrong leads to buying the wrong modifiers. Soft light and hard light have nothing to do with the modifier material or whether light passes through diffusion. They have everything to do with the size of the light source relative to the subject.
A large light source produces soft light with a gradual transition from highlight to shadow. A small light source produces hard light with a sharp, clearly defined shadow edge. That’s it. Size determines softness.
To demonstrate, here’s what bare flash looks like compared to no flash at all — both shot at 1/200, f/4, ISO 100, which cuts the ambient light entirely so the only light in the image is from the strobe:
Ambient light (no detail retained) vs. hard light from bare flash — both at 1/200, f/4, ISO 100
The sharp line on Sammy’s cheek where highlight transitions to shadow — that’s the tell of a hard light source. The flash head is small relative to the subject, so the light is hard.
Two practical implications worth internalizing. First, the sun is enormous physically, but it’s a pinpoint in the sky relative to us, which makes it one of the hardest light sources in nature. Second, in macro photography, photographers often use bare flash at close range on a tiny subject — and because the flash is massive relative to that bug or flower, the light is actually quite soft despite no modifier being used.
Tip 2: Soften hard light with a modifier
Adding a modifier increases the apparent size of the light source, which softens the light. An umbrella is the most affordable and accessible way to do this — a basic shoot-through umbrella runs around $20 and turns a small hard flash into a much larger soft source.
Two things to know about umbrellas specifically. Set the flash head to its widest zoom so light fills the entire umbrella surface — you want the full face of the umbrella acting as the light source, not just the center. And keep the umbrella at a reasonable distance from the flash head; too close and you’re not using the full modifier area.
The tradeoff: adding a modifier costs you flash power. Soften the source and you lose output. In our tests, adding the umbrella at identical power settings produced a noticeably darker image:
No umbrella (left), umbrella at same power (center), umbrella with power increased two stops (right)
To compensate, we increased flash power by two stops — which equals four times the output, not twice. One stop doubles power; two stops doubles it again. Once you account for that, the umbrella image shows clearly softer highlight-to-shadow transitions than bare flash at the same effective brightness.
Distance also matters. Moving a modifier farther from the subject makes it appear smaller relative to them, which hardens the light even if the physical modifier size hasn’t changed. Move it closer and the apparent size increases, softening the light further. You can use distance to dial in light quality without changing modifiers.
Tip 3: Diffused vs. specular light
This is the second distinction that gets mixed up constantly. Soft/hard describes shadow edge quality, based on source size. Diffused/specular describes the quality of light on the skin itself, regardless of shadow edges.
Diffused light passes through white material, which scatters it in multiple directions. The result is even, matte light on the skin with minimal shine. Specular light bounces directly off a reflective surface — typically silver — and hits the subject without scattering. The result is more direct, with pronounced highlights on any surface that has texture, oil, or moisture.
A silver-lined bounce umbrella demonstrates this clearly. Compared to a white shoot-through umbrella at the same power, the silver umbrella produces more output — the silver reflects more light directly at the subject — and the skin shows more pronounced specular highlights:
Specular isn’t worse — it depends entirely on the shoot. For fitness portraits where you want sweat and muscle definition to read strongly, a specular silver modifier is exactly right. For beauty or headshot work where you want even, flattering skin, diffused white is the better call.
And here’s the part that trips most people up: you can have a large soft source that’s specular, and a small hard source that’s diffused. A large silver reflector is soft (large) and specular (silver). A small strobe firing through a single layer of diffusion is hard (small) and diffused (passes through material). They’re independent variables.
Tip 4: Main light vs. fill light
Every lighting setup has a main light — the primary source that creates the shadow pattern — and an optional fill light that reduces the intensity of those shadows. The ratio between main and fill controls how dramatic the image feels.
A v-flat from V-Flat World with the white side facing the subject acts as a passive fill — it reflects the main light back into the shadow side of the face without adding a second flash. Move it closer to the subject and the fill strengthens; move it farther away and the shadows deepen:
Remove the fill entirely and the shadows go dark — which reads as more dramatic. Add fill and the image opens up and feels lighter. Neither is correct by default; the choice depends on the mood you’re after.
This same principle applies outdoors. The sun becomes your main light; fill comes from open sky, clouds, or a reflector you bring. You still have control — it just requires reading what’s available in the scene and supplementing where needed.
Tip 5: Light control
Umbrellas are underrated modifiers in many ways, but they have a real limitation: they don’t control where the light goes. When light hits an umbrella, it bounces backwards and spills in every direction through the scene. For some setups that’s fine. When you need to keep light off the background or restrict it to a specific area of the subject, you need something more directional.
The zoom function on most flash heads gives you a small degree of control — zooming in narrows the beam and reduces spill on the background. It’s subtle, but visible when you compare wide versus zoomed at the same power.
For serious control, add a grid. A honeycomb grid physically channels light forward, preventing it from spreading sideways. The tradeoff is a modest loss in output — budget an extra half stop to a stop of power when adding a grid. The control you gain is worth it when precision matters.
Tip 6: Mix and match modifiers
Once you understand what each modifier does, you can combine them intentionally. Grid plus umbrella, for example: the grid tightens the beam so only a portion of the umbrella fills with light, while the umbrella diffuses that light before it reaches the subject. The result is more directional than umbrella alone, softer than grid alone, with a gentler highlight-to-shadow transition than either produces on its own.
Experimenting with combinations is the fastest way to build intuition. After a few sessions, you’ll be able to look at any modifier — a beauty dish, a lantern, a strip box — and predict what it will do based on its size, surface material, and whether it controls spill. That intuition saves money and saves time on set.
Flash modifier types: which one to use and when
With the principles above as a foundation, here’s a practical breakdown of the most common modifier types — what each one does, where it works, and where it falls short.
Flash gels
Example using an orange gel for creative color balance
Gels alter the color of flash output rather than its quality or direction. They serve two purposes: corrective (matching flash color to ambient light so the two blend naturally) and creative (deliberately shifting color for effect). A CTO gel warms flash to match tungsten indoor light; a green gel matches fluorescent. For creative work, gels let you paint with color in ways that would be impossible or expensive to replicate in post.
Pros: Affordable, lightweight, easy to carry in any kit.
Cons: Requires understanding how gel color interacts with white balance settings — the wrong combination produces results that look unintentional rather than creative.
Reflectors are among the most versatile and underused tools in portrait photography. Outdoors, they can serve as a main light, a fill, or a rim — depending on how you angle them relative to the sun. In the studio, they bounce main light back into shadow areas passively, without needing a second flash. On-camera, bouncing flash off the white side of a reflector creates a larger, softer source than direct flash.
Pros: Extremely portable, inexpensive, no batteries required, highly versatile across shooting environments.
Cons: Difficult to use consistently when handheld; output varies as the angle shifts. In bright outdoor conditions, bouncing on-camera flash off a reflector loses a lot of power. High ceilings or off-white walls limit bounce options indoors.
Best for: On-location sessions, lifestyle shoots, outdoor portraiture where portability matters more than precise light control.
Beauty dishes produce a light quality that sits between an umbrella and a softbox — softer than bare flash, but with more contrast and definition than a large diffused source. The metal dish construction bounces light off a central deflector plate before it reaches the subject, which creates a distinctive wrapped quality that’s flattering on faces without losing shadow definition entirely.
Pros: Highly controllable light quality; works beautifully with a grid attachment to keep light off the background.
Cons: Many don’t collapse, require substantial flash power, and the better systems are expensive. Setup and breakdown take more time than umbrellas.
Best for: Studio portraiture, fashion and beauty work, any situation where you want flattering but defined light and have the time and assistance to set up properly. Watch how we built the shot above using a beauty dish.
These small modifiers attach directly to an on-camera flash and redirect some of the output upward or forward to create a slightly larger, less harsh light source than bare direct flash. They’re not going to replace an umbrella, but for run-and-gun event situations where you need something better than bare flash without slowing down, they earn their place in the bag.
Best for: Tight editorial portraits, events where direct flash is unavoidable, situations where setup time doesn’t allow for stands and modifiers.
Both snoots and grids are about control rather than quality. A snoot narrows the beam into a tight spotlight, useful for hair lights, rim lighting, or isolating a subject within a wide scene. A grid uses a honeycomb pattern to channel light forward while allowing a slightly wider spread than a snoot — less output loss, but less precise. As covered in the principles section above, either choice costs you some flash power, so plan accordingly.
Pros: Precise, pinpoint light shaping. Effective for accent lights and complex multi-light setups where spill control matters.
Cons: Lower-quality grids can spill more than expected or cut light too aggressively. Test before relying on them on a paid shoot.
Best for: Hair lights, rim lighting, environmental portraits where you want to spotlight a subject within a wider scene, first dance shots in dark reception rooms.
Ring flash surrounds the lens and provides flat, even frontal lighting with a characteristic halo shadow around the subject when shot against a close background. It’s a distinctive look — immediately recognizable in fashion and editorial work. Not a modifier for general portraiture, but effective for its specific aesthetic.
Best for: Fashion editorial, tight beauty portraits, any application where the ring flash look is the creative goal.
Dome diffusers attach to an on-camera flash and scatter light in all directions — some forward onto the subject, some upward to bounce off ceilings and walls. The result is a combination of direct and ambient fill that feels more natural than bare direct flash in event environments. For wedding receptions and events where you’re moving constantly through varied lighting, a dome is one of the most practical modifiers you can carry.
Pros: Portable, fast, produces more natural-feeling event light than bare direct flash. Adds ceiling bounce automatically.
Cons: Not as soft as an umbrella. Some dome options retain specularity. Results vary depending on ceiling height and color.
Best for: Weddings, events, receptions, any fast-moving situation where you need better-than-bare-flash results without slowing down.
The umbrella is the workhorse of the modifier world — inexpensive, fast to set up, and genuinely effective at producing a large soft light source. The limitation, as covered above, is spill control. Light bounces off the umbrella and goes everywhere in the scene. For simple one or two-light setups where you just need good soft light and don’t need to restrict it, umbrellas are hard to beat at the price point.
Pros: Inexpensive, fast setup, highly portable, produces a large soft source effectively.
Cons: Light spills throughout the scene with no directional control. Can create distinctive umbrella-shaped shadows on walls that are hard to eliminate in post.
Best for: Simple one or two-light portrait setups, group photography, on-location sessions where speed matters and spill isn’t a concern.
A softbox does what an umbrella does — diffuses and enlarges the light source — but with the addition of directional control. The tent-like construction prevents light from spilling sideways, keeping it aimed at the subject. Add a grid to a softbox and you have a large, soft source with significant control over where that light goes and doesn’t go. That combination is what makes softboxes the default choice for studio portrait work.
Pros: Soft, diffused light with far better spill control than umbrellas. Grid compatibility makes them even more precise. Available in a wide range of sizes and price points.
Cons: Larger and slower to set up than umbrellas. Some higher-end options are expensive. Not ideal for photographers who are moving constantly through an event.
Best for: Studio portraits, couples, families, any controlled environment where setup time is available and light quality matters more than speed.
Here’s the mental model that makes all of this click. Before buying or reaching for any modifier, ask three questions:
First, how large is the modifier relative to the subject? Larger equals softer. Smaller equals harder. Distance from the subject modifies this — closer means larger apparent size and softer light.
Second, what surface does the light interact with? White diffusion material scatters light for an even, matte quality on skin. Silver bounces light specularly for more output and more pronounced highlights. Both have their place.
Third, does the modifier control where light goes, or does it let light spill freely? Umbrellas spill. Softboxes contain. Grids and snoots restrict further. If light hitting the background or walls is a problem, you need something with directional control.
Answer those three questions about any modifier and you’ll know what it will do before you fire a single test shot.
If you want to go deeper on flash technique and modifier use in real shooting scenarios, our Flash Photography Training System covers everything from one-flash fundamentals to multi-light setups for weddings and commercial work — including the exact modifier choices we use on real jobs.
For a visual reference on how these modifiers pair with specific lighting patterns, see our guide to portrait lighting patterns and our breakdown of five one-light studio setups you can run through in under 10 minutes.
Bonus: portrait lighting cheat sheet
This is an older visual reference that covers light placement and how shadows fall across a subject’s face at different angles. For those who learn better from diagrams than descriptions, it’s a useful companion to the modifier concepts above — you can see exactly what the light does at each position rather than having to visualize it.
In this video, we are going to talk through some of these practical uses for XMP, as well as show you how to save and pass them back and forth so that you can know how to use XMP Sidecar Files whenever it is necessary to aid your workflow.
Apple first introduced Portrait Mode to iPhone users back in 2016. With each new annual Apple update, the iPhone camera gets stronger, more capable, and more realistic. Today, the iPhone Portrait mode is a powerful feature that allows users to capture professional-looking portraits with a shallow depth of field. By understanding its capabilities, limitations, and …
Flash is a powerful tool. But before you reach for it, you should be squeezing every last drop of quality out of the light that’s already there. We’ve shot hundreds of portrait and engagement sessions using nothing but the sun, a reflector, and an understanding of how light behaves — and the results consistently rival …
Parks are fantastic places to take portraits. They have tons of interesting and vibrant scenery. Not only that, but you can catch some great lighting regardless of the time of day. In this video, I’ll show you 5 simple portrait ideas that you can try in any park.
Video: 5 Simple Portrait Ideas & Tips for Any Outdoor Park
For our 5 portrait ideas, we’ll be using a pair of lenses sent to us by Tamron. We’ll be trying out the 28-75mm f/2.8 Di III VXD G2 and the 70-180mm f/2.8 Di III VXD lenses for Sony. The wide range of focal lengths as well as Tamron’s incredible lens build will help us get the perfect portrait series with our model, my friend, Sabrina. You can check her out on Instagram here.
#1: Backlight Your Portrait
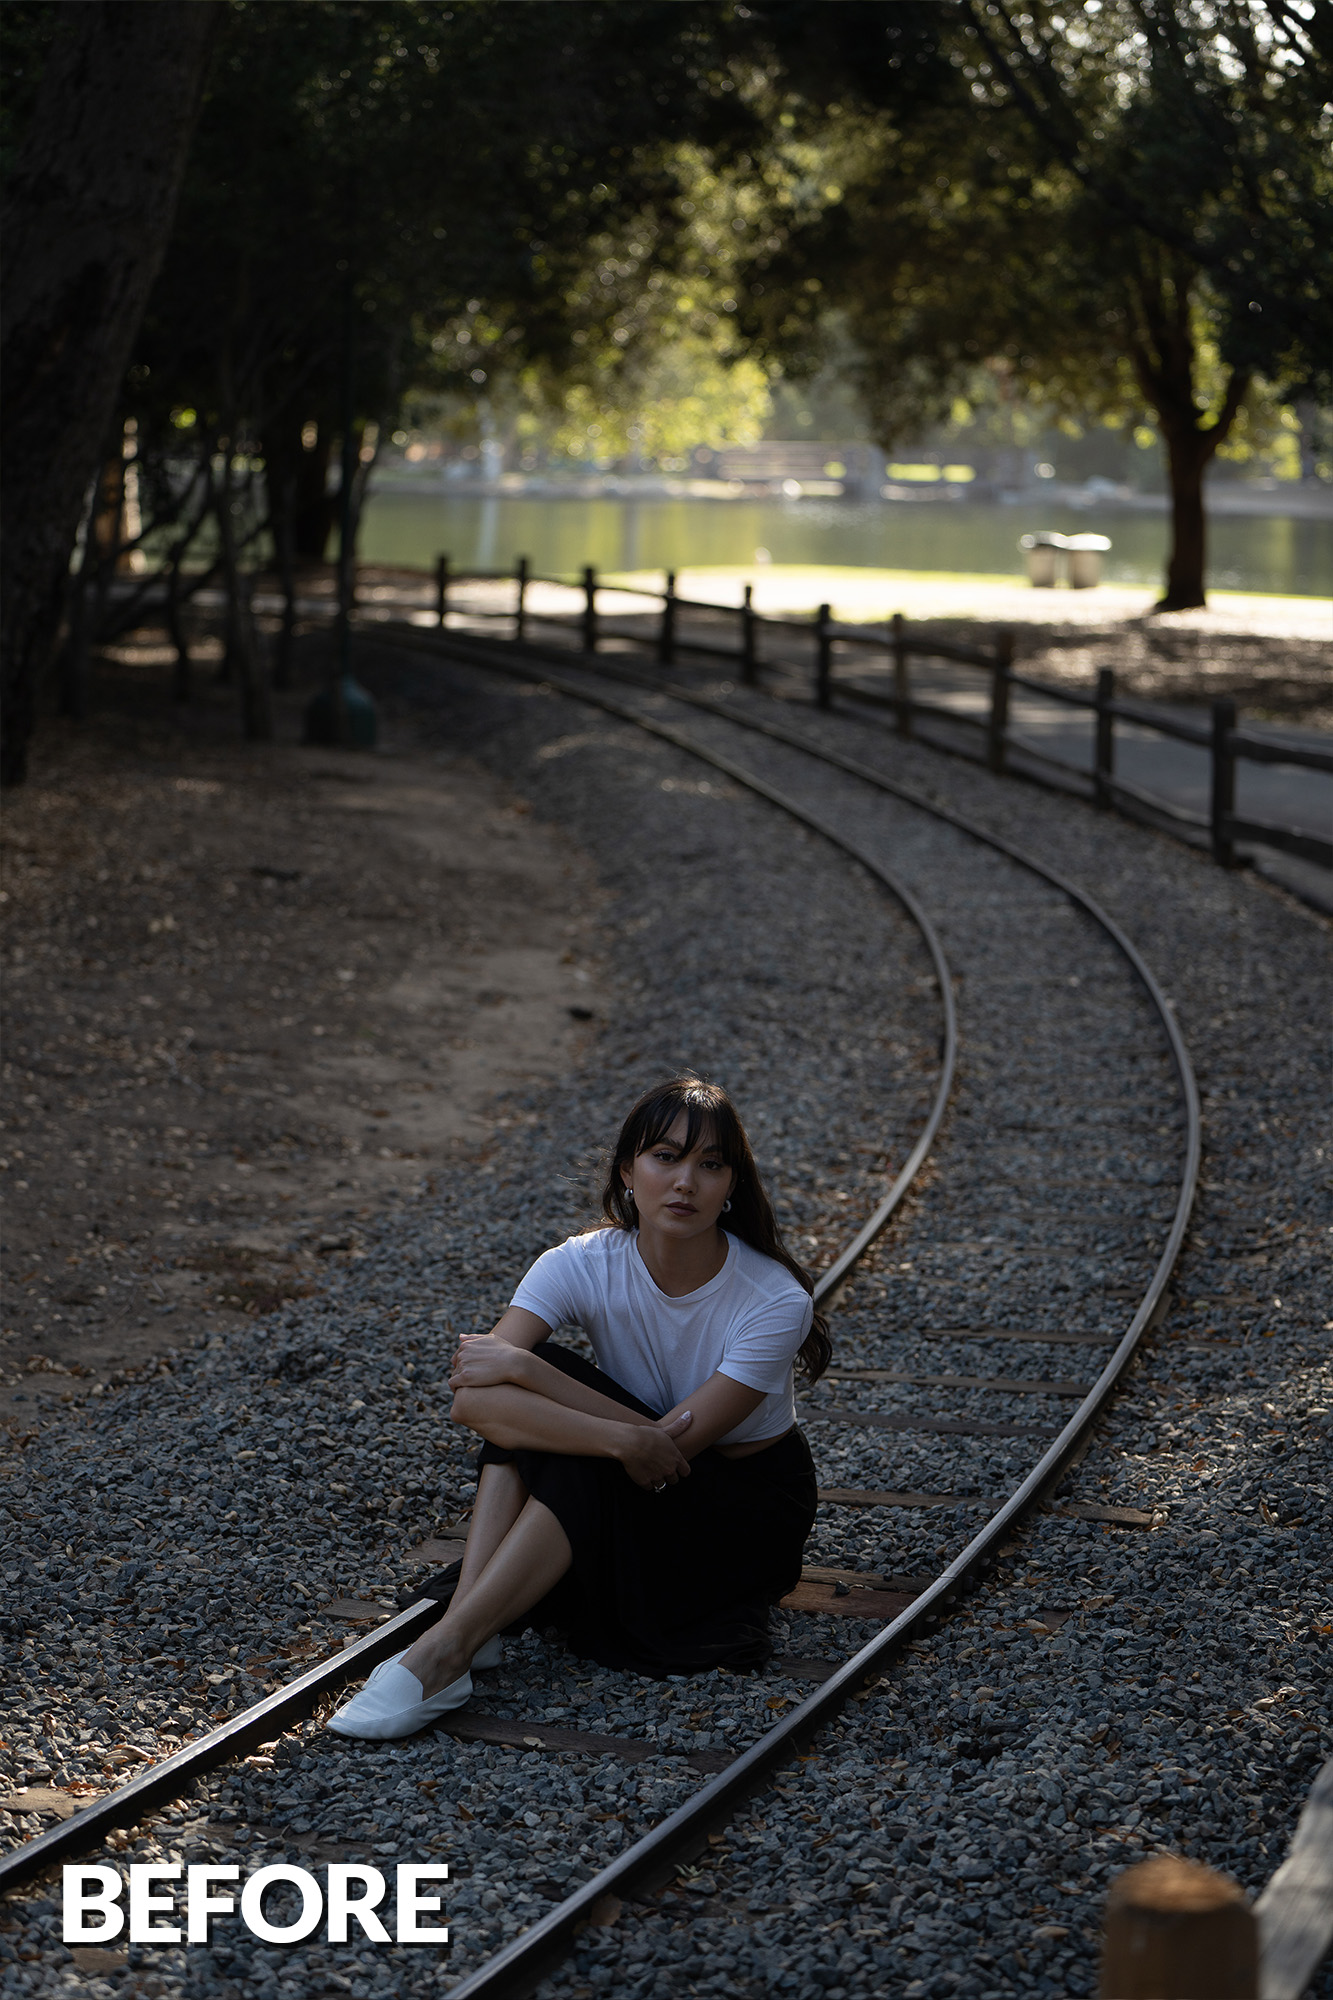
Starting with the 28-75mm f/2.8, my first tip is to backlight your subject. I placed Sabrina underneath the dabbled sunlight created by the trees above.
Compare this with an image in direct sunlight.
#2: Reflector Bump
I had Sabrina pose beside the shaded side of a tree. The only problem is that the sunlight was bouncing off of the ground and creating a slight “underlight.”
To even this out, I used a white reflector and held it up to bounce the light back on her face. This created a very pleasant and even light, perfect for portraits.
#3: Shoot in Open Shade
Let’s switch to the 70-180mm f/2.8. I call this concept the “Open Shade.” You’ll notice that one side is shaded, in this case, by the tree, and the other side is open to the sky.
This essentially creates a giant soft directional light source. You can add an accent piece or shoot plainly. Either way, the light makes for great portraits.
#4: Compress the Scene
Take advantage of the zoom lens to squash the foreground and background together to really focus in on your subject. I combined this concept with tip #1 to create a backlight on Sabrina.
I then framed her in front of a dark area in the trees beside other backlit trees and captured these great images showcasing her dance skills.
#5: Find the Brightest Spot
This is one of my favorite framing elements because it places your subject where the most attention is drawn to in the image.
In this instance, the brightest spot in the frame was the opening in the trees in the background. Check out the difference.
Conclusion
I hope you enjoyed this article/video. Give these portrait ideas a try during your next park portrait session! Be sure to visit SLR Lounge Premium for complete courses on photography related subjects including Mastering Lightroom and Creating a Successful Photography Business. You can also visit Visual Flow for all of our intuitive Lightroom presets and retouching tools. Lastly, be sure to check out Tamron’s incredible 28-75mm f/2.8 as well as the 70-180mm f/2.8 lenses to cover your full range of focal lengths for all types of photography at a great price.
Creating a seamless photoshoot experience isn’t just about knowing your camera settings or mastering lighting; it’s about effective communication and building a relaxed atmosphere that allows clients to feel comfortable and confident in front of the lens. This video is for all of you professional & aspiring professional photographers who want to communicate more effectively with your clients as well as feel like you’re having more effortless photo shoots.
Watch the Video
Tip #1: Know Your Gear
One of the things that you’re going to feel the most as a working professional, especially early in your career, is that you’re going to have a hard time separating what you’re thinking about the camera and the shoot from actually having a conversation with your clients. You’ll find that your mind will want to focus on exposure, composition, and lighting rather than communicating and building a relationship with your clients. So step number one in getting over that is to really master the gear itself, understand manual exposure so that you know how to dial those things in and it becomes muscle memory.
If you’re looking for a guide on how to do that check out our Photography 101 course designed to help you master manual mode on any camera. In addition to camera settings, I want you to master your ability to light, get confident with your ability to walk into any scene, and be able to find great photographs. When you get to that place then your mind will take it a little bit more easy you’ll back off on the technical side and allow more of your energy to focus on your clients and building that relationship with them.
Tip #2: Have a Plan
I’ve been doing this for over 10+ years and there are plenty of people that have been doing it longer but even with a decade’s worth of experience, I still scout my locations and plan before shoots. These things become even more critical as you learn more about photography because you want to set yourself up for the best shoot possible. Before the shoot, I am discussing wardrobe with my clients, helping them select an outfit that is cohesive and contextual for the locations we are shooting in because I’ve had the experience where a client shows up and they’re dressed in an outfit that doesn’t quite fit the scene which then reflects in the photos (whether the outfit isn’t flattering or the colors just didn’t compliment the scene). I typically arrive 30 – 60 minutes early depending on how intricate the shooting timeline is. If it’s a wedding, it’s gonna be a couple of hours early so I can scout the entire venue on the day of. Why? Even though I’ve shot at these venues 50 – 100 times by now, you never know what that location is going to look like on the day of. I would recommend downloading the Sunseeker App to determine where the sun is going to be throughout the day so you can better track its location and find shooting locations accordingly. This is once again another one of those things that alleviates the stress from you so that more of your emotional energy can go into your clients.
Rewind: [How to Book More Photography Clients – Free Training!]
Tip #3: Continue Building Rapport
For the first 15 minutes, I don’t want you to focus on taking pictures. This is a method I’ve explained in the past and what we teach in our first Wedding Workshop about client communication. I want the conversation to completely focus on them and what they’ve been up to recently. Talk about their work, home life, just get to know them better. In actuality, this is their first impression of you, and that matters, especially if this is an engaged couple and they are looking to book you on their wedding day. This is their first taste of how you communicate to make sure they feel comfortable but also who you are as a person beyond your art. What helps tremendously in this process is having gone through the W.A.V.E (Wall Art Vision Exercise from our Business Training). This is a visualization exercise that we do on the first time that we meet or talk to a client and it helps us to understand what the clients actually want and value what it is that they appreciate not only in their photography but actually in their own life and memories so gearing that conversation the first 15 minutes of building rapport should be geared around what the clients actually value if their values are centered around family talk about family if they are centered around aspirations and career then talk about what they’re doing next in their career focus that conversation on the things that they value most and then from there and before picking up the camera we step straight into the foundation posing exercise that I believe I’ve taught you all in previous Adorama videos so we walked them through that as a continued ice breaker and to help them feel comfortable posing in front of the camera before ever picking up the camera for the first photograph now in that process of going through the foundation posing framework.
Tip #4: Establish Authority
This comes from a book I read called Charisma Myth where it mentions having authority with warmth, otherwise, you come off to other people as arrogant. You want to be warm in the way that you’re conveying your message, but at the same time, we want to convey authority in the subject matter that we’re teaching. The Foundation Posing Framework is a crucial step in establishing authority with your clients because it allows them to trust you while you guide them through basic posing principles so they can feel more at ease. Every client is going to come to you and say the same thing “we want authentic photographs…but we don’t know how to pose we feel nervous in front of a camera” this is where you can put them at ease during the photoshoot by saying & establishing that kind of authority, this way when the camera is pointed at them they’re already at ease because you’ve done this series of steps
When I came into the industry, there were several people that I really looked up to, and I still look up to today. One of them is Jerry Ghionis, who I’ve always looked up to because of the way he communicates with his clients in this smooth Australian accent and it’s a beauty to watch. At the beginning of my career, I found myself trying to emulate this and then I realized… I’m not Jerry. I’m the kind of funny, awkward Dad and that’s the person that I need to lean into, so on every photo shoot, I am my goofy self because that is who I am. Don’t forget who you are in the process because in trying to be someone else, the best you can essentially be is a worse version of that person. Focus on being yourself and take each of the frameworks and all the things that you learn and pick up from other people and bring them into your own style of communication.
Doing these five things will help you walk away from your photoshoots feeling like you just hung out with friends for a couple of hours and managed to get tons of great photographs along the way. In fact, you’re going to find that many of your clients are not only going to become repeat clients, but they’re also going to become your friends. Be sure to catch our next episode of Mastering Your Craft on Adorama’s YouTube channel next week! If you want to catch up on all the episodes, make sure you check out our playlist!
Bird photography, with its unique blend of challenges and rewards, is a highly rewarding endeavor for photographers of all skill levels. In this comprehensive guide, we dive into the essential aspects of this captivating genre. Covering everything from selecting the right gear and camera settings to mastering composition and lighting, this article is designed to …