Have you accidentally deleted photos from your camera’s SD card? Or maybe you needed to free up space, deleted everything in one go, and then realized some important pictures were gone too? No problem! You can still get your photos back. In this article, we’ll show you how to recover deleted photos from an SD card using a few simple methods.
Ways to Recover SD Card Photos
In fact the recovery method depends on what happened to your photos. For example, if the photos were deleted directly from the SD card while it was still in the camera, data recovery software offers the best chance of getting them back. If you deleted them while the SD card was connected to your Mac, checking the Trash may be enough. And if you regularly back up your files, you will be able to restore the photos from a local or cloud backup.
Method 1. Recover Deleted Photos From Camera With Recovery Software
If you deleted the photos from the SD card before you transferred them to a computer or backed them up elsewhere, recovery software is the fastest and most reliable solution. But it’s important to stop using the SD card as soon as you realize the photos are missing. Taking new photos or recording videos on the same card can overwrite the deleted data, which makes recovery much more difficult, or even impossible. So, remove the SD card from your camera and don’t use it until you’re ready to begin the recovery process.
There are many data recovery tools on the market, but not all of them are equally effective or support different file and operating systems. So if you’re not sure which DSLR camera recovery software is the best to choose, or you simply don’t want to spend a lot of time figuring out how it works because you’ve never used one before, then Disk Drill memory card recovery software is the right option for you. It’s easy to use and has an intuitive interface, can handle scenarios such as accidentally deleting photos or even formatting a card. Disk Drill supports all SD card types and sizes, as well as common image formats such as JPG, PNG, RAW, CR2, CR3, NEF, RAF, and available for both Windows and macOS. Plus, it receives positive user reviews and ranks #1 in different listicles.
Optional: If your SD card is failing, disconnects randomly, or shows read errors, we recommend creating a disk image of your SD card with Disk Drill’s built-in Byte-to-Byte Backup feature before scanning it. This lets you recover photos from the copy instead of the original card, reducing the risk of further data loss. If the card is healthy and doesn’t have severe physical damage, you can scan it directly.
To create a disk image:
- Download and install Disk Drill on your computer.
- Сonnect SD card using a card reader or your computer’s built-in SD card slot.
- Click Byte-to-byte Backup from the sidebar.
- Select your SD card from the list of available devices.
- Click Create Backup.

- Select a destination folder on a different healthy drive.
- Click Save and wait for the disk image process to finish.
- Once the process is complete, safely eject the card.
Recover photos from SD:
- If you didn’t follow the previous advice and didn’t create an SD card image, download and install Disk Drill now. Once the installation is complete, connect the SD card using a card reader or your computer’s built-in SD card slot.
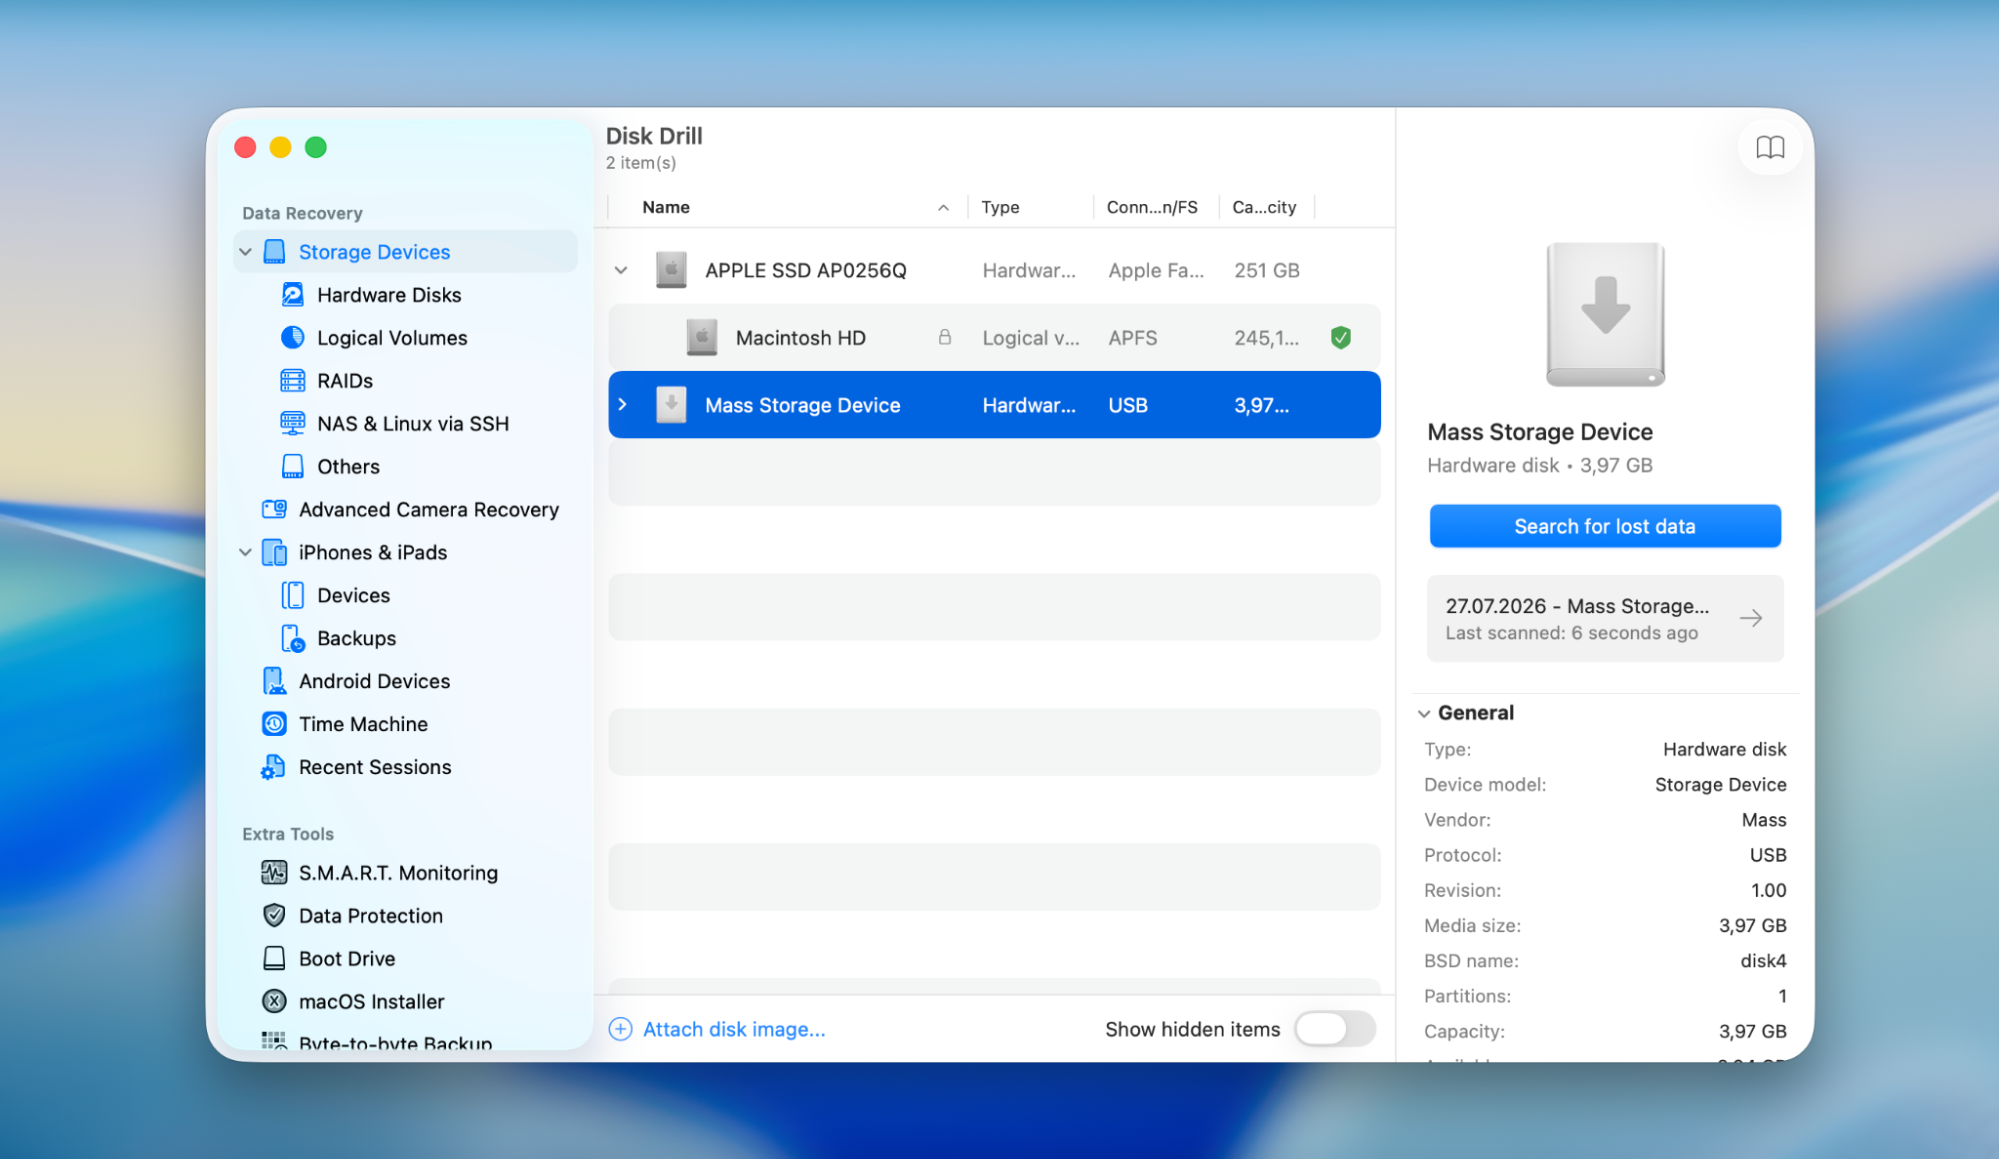
- After launching Disk Drill, locate your SD card in the list of available storage devices. Select it and click Search for lost data to start the scan. If you created a SD card image, click Attach disk image… at the bottom of the device list.
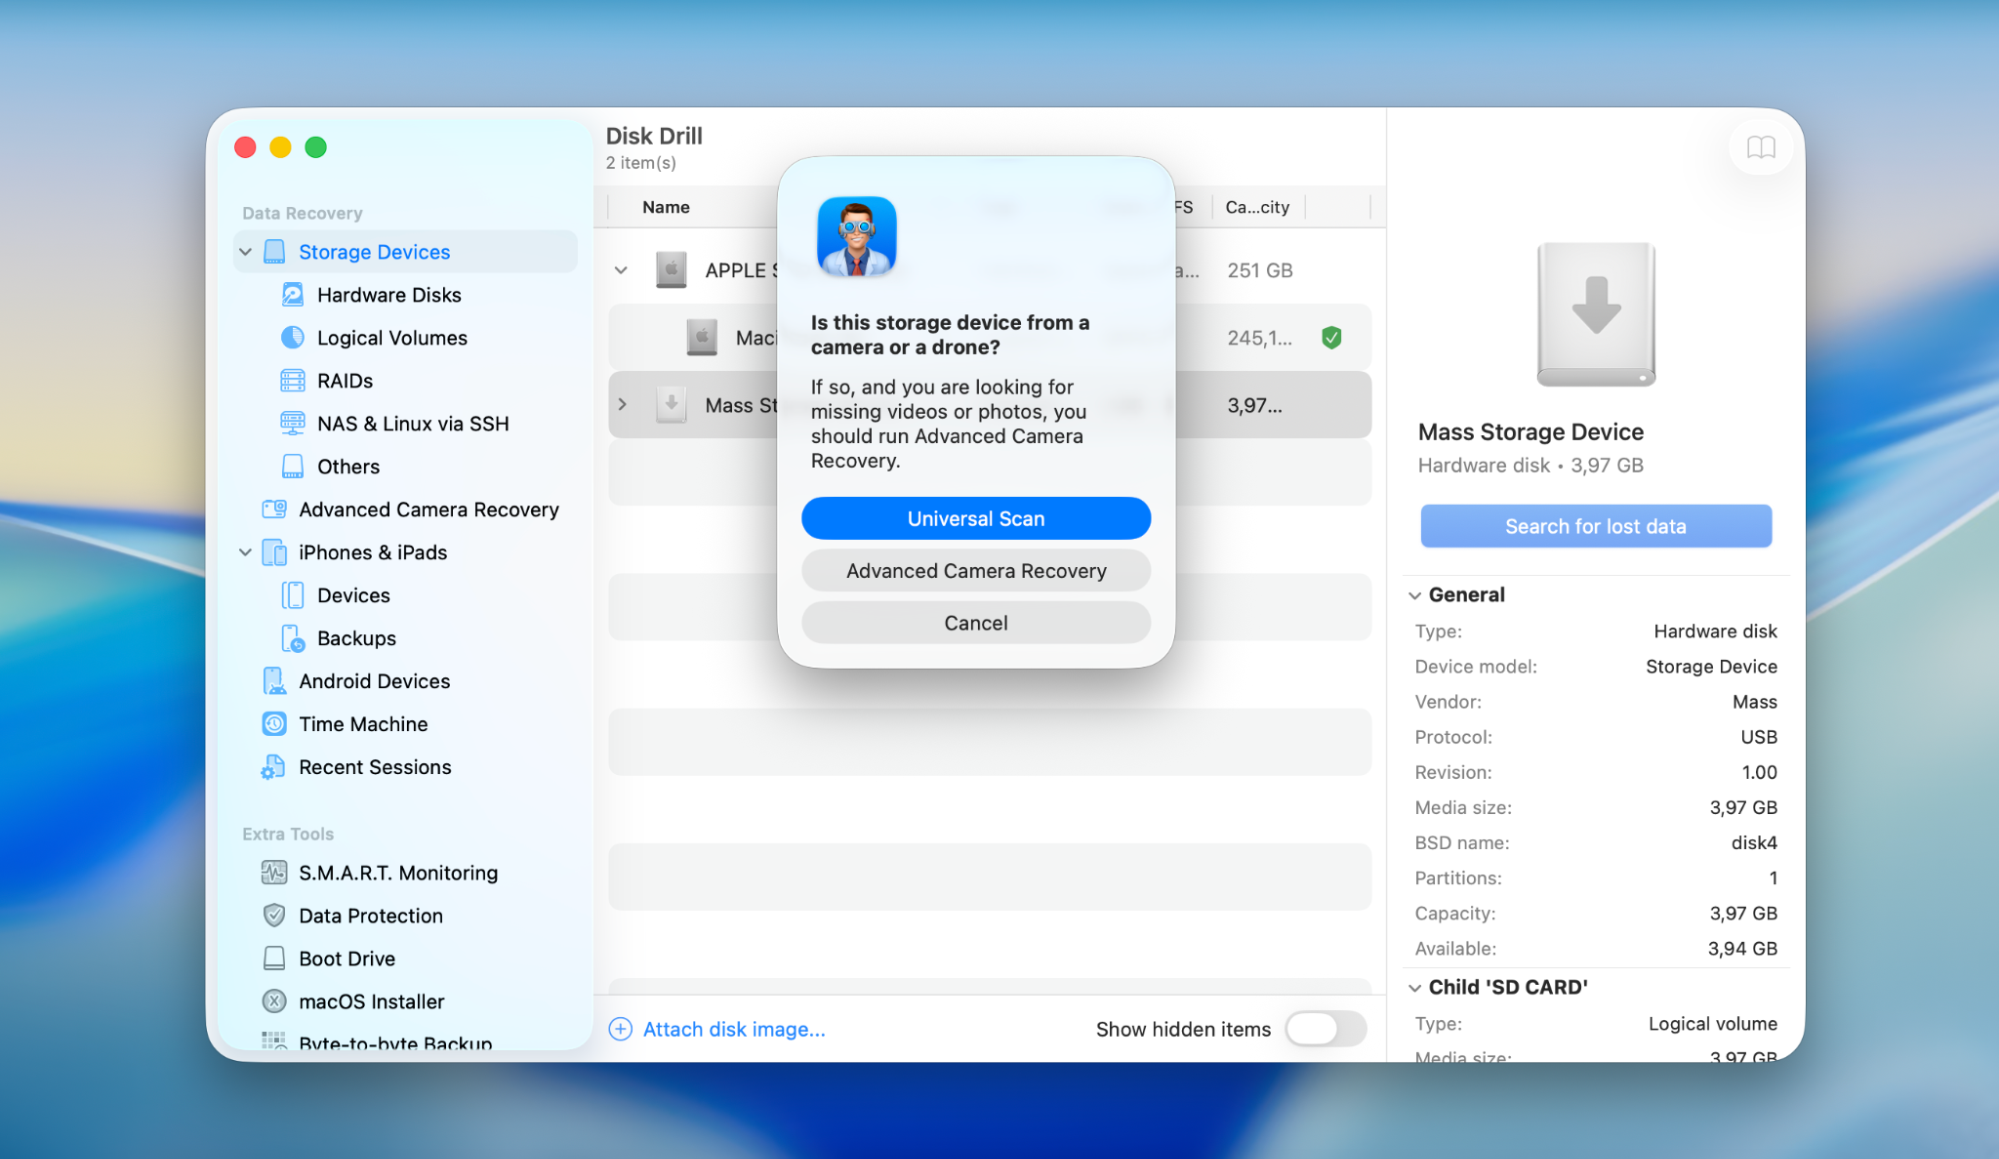
- Disk Drill offers two scanning methods. We recommend starting with Universal Scan, as it’s suitable for most memory card data loss scenarios, including accidentally deleted files and formatted SD cards. If you need to recover fragmented videos and piece them back together, Advanced Camera Recovery is specifically designed for that purpose.
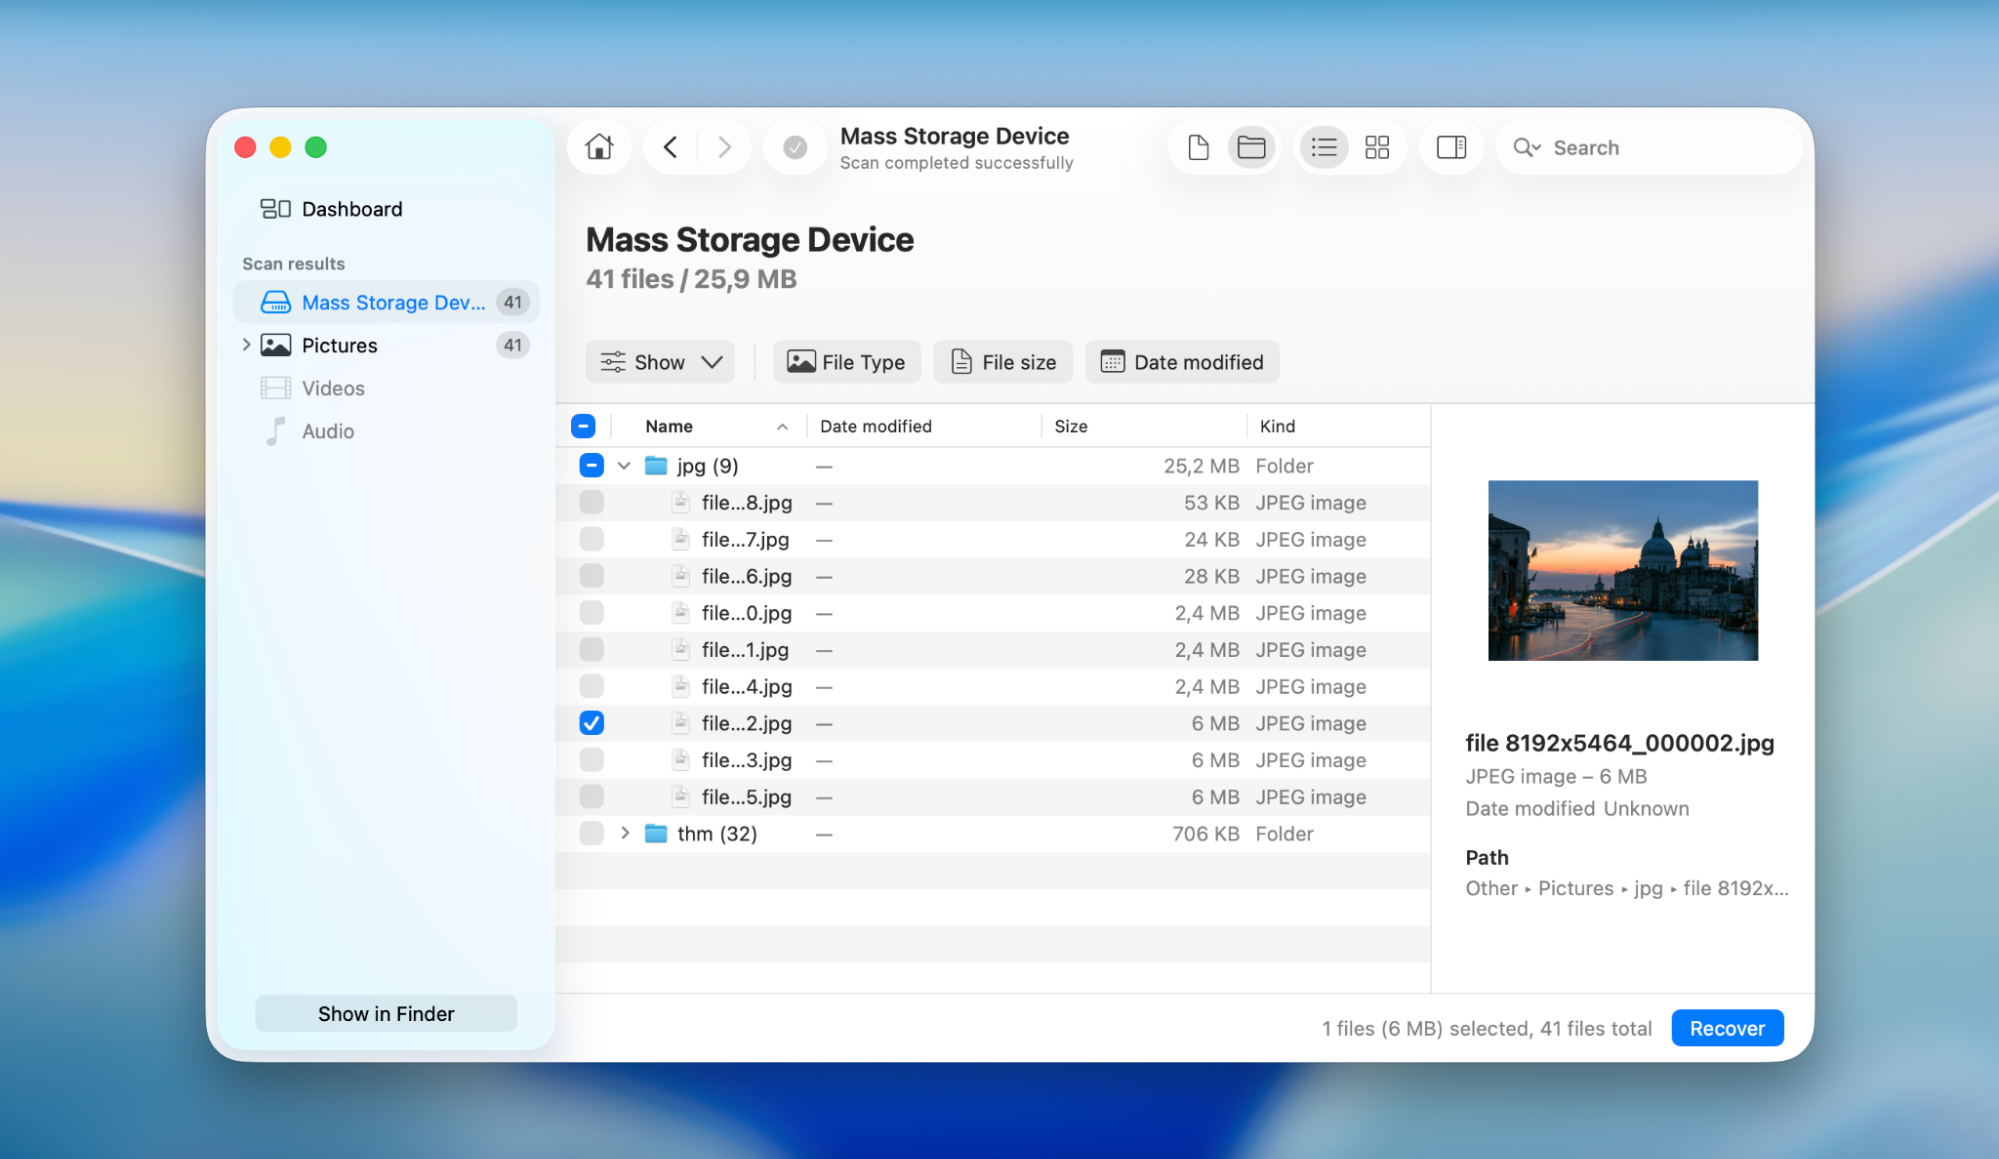
- After the scan finishes, click Review found items to browse the results.
- Use the Preview feature to verify that your photos are recoverable before restoring them. You can also use filters to narrow the results or search for specific file formats.
- After finding the photos you want to restore, select them and click Recover.
- Choose a destination on your computer, an external drive, or another storage device.
- After the recovery process finishes, open several photos to confirm that they were restored successfully. Once you’ve verified, you can copy them back to the SD card if needed.
Note: The free version of Disk Drill for Windows lets you preview recoverable photos and recover up to 100 MB of data at no cost. On macOS, the free version doesn’t allow you to save recovered photos. However, you can still scan your SD card and preview recoverable data without any limits, so you can check whether your deleted photos can be recovered before purchasing the paid version.
Method 2. Recover Deleted Photos From the Trash
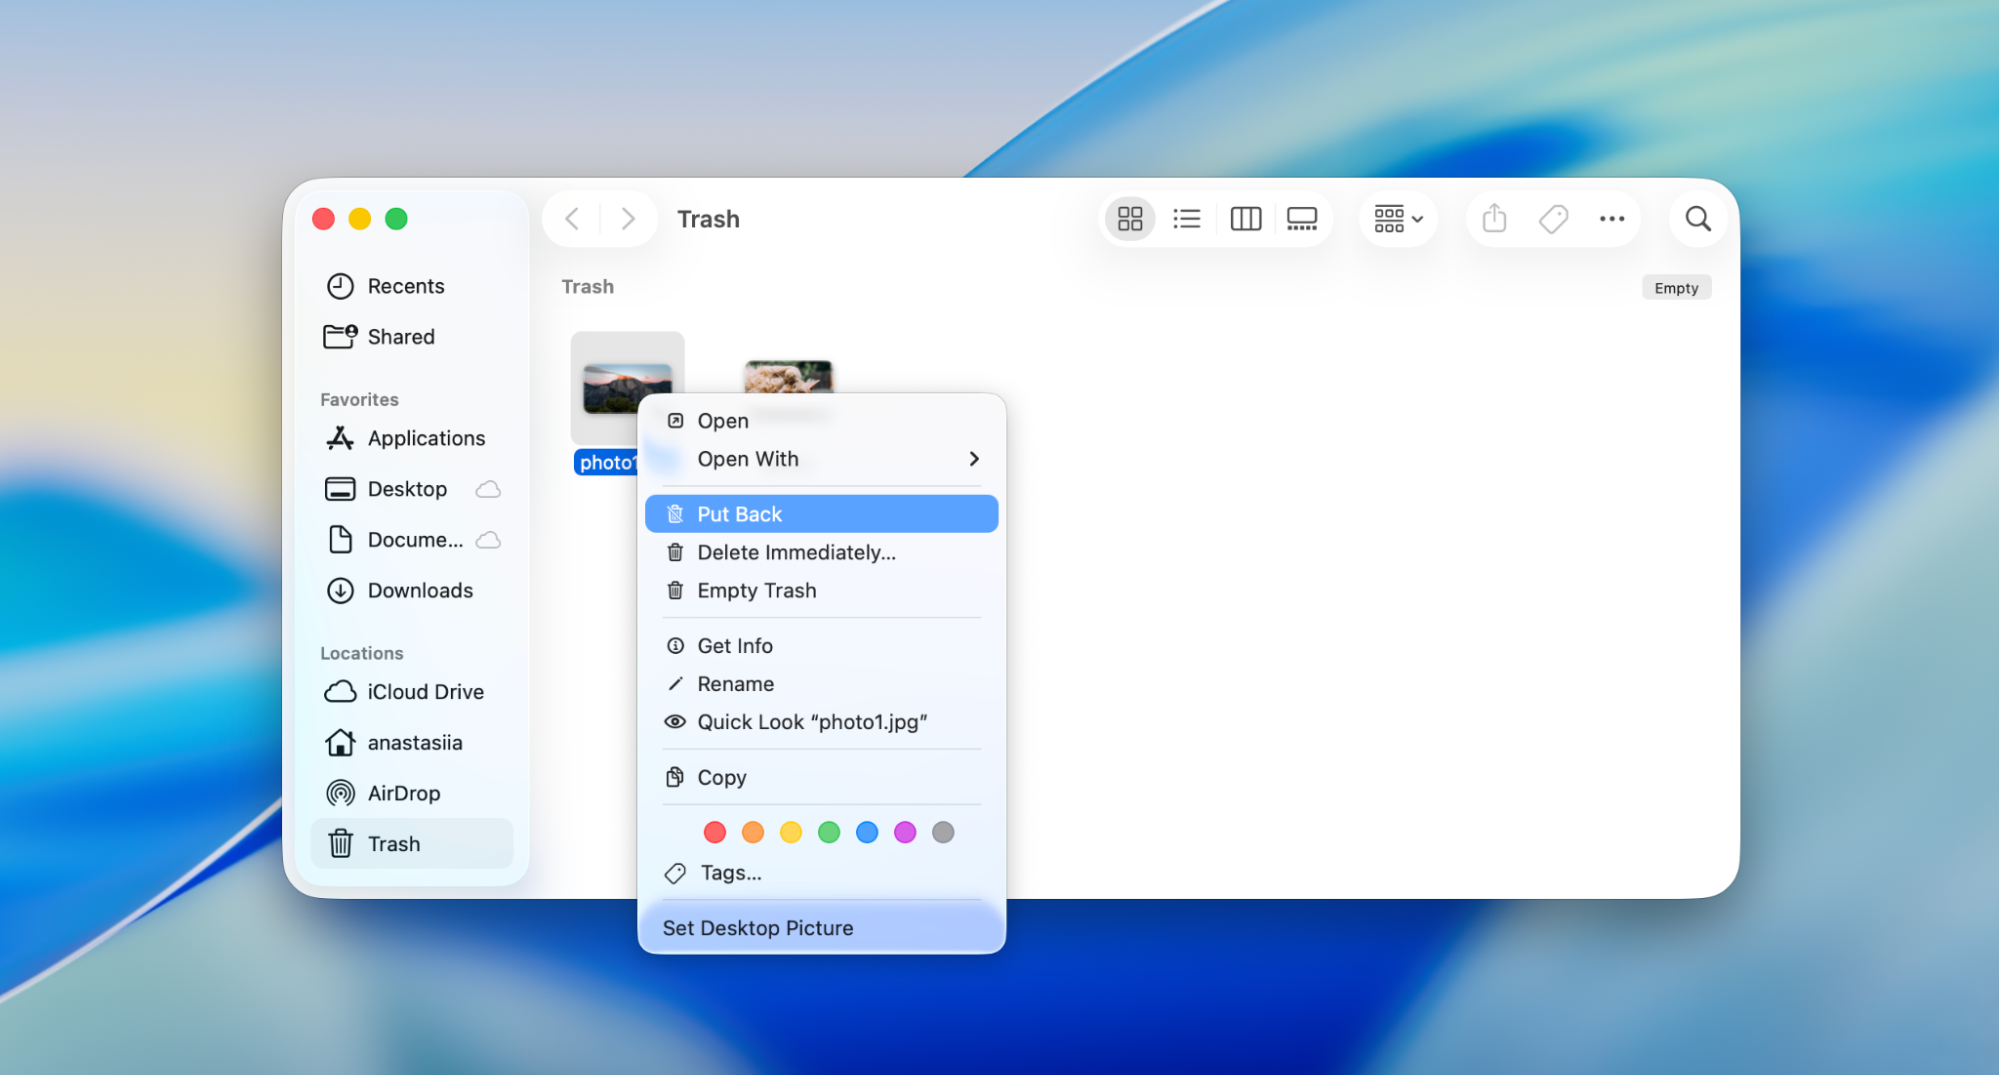
If you deleted the photos while the SD card was connected to Mac and it’s still connected, check Trash. The deleted photos may have been moved there instead of being permanently erased. Restoring photos from them only takes a few seconds.
Note: This method only works if the photos were deleted on a Mac. If you deleted them while the SD card was connected to a Windows PC, they won’t be available in the Recycle Bin. Likewise, if you deleted the photos directly on your camera, it won’t help because cameras don’t have their own trash.
To check for deleted photos:
- Open Trash from the Dock.
- Browse the contents and look for the missing photos.
- Select the photos you want to restore.
- Right-click them and select Put Back. The photos will be restored to their original location.
Method 3. Recover Deleted Photos From Backups
If you previously copied your photos from the SD card to your computer or set up automatic local or cloud backups, restoring them is much easier than you expect. You can recover deleted photos from the camera SD card directly from a backup.
Option 1. Restore Photos From File History or Time Machine
Both Windows and macOS include built-in backup tools that can restore deleted files if they were enabled before the photos were lost. File History is available on Windows, while Time Machine provides similar functionality on macOS.
To recover photos on Windows:
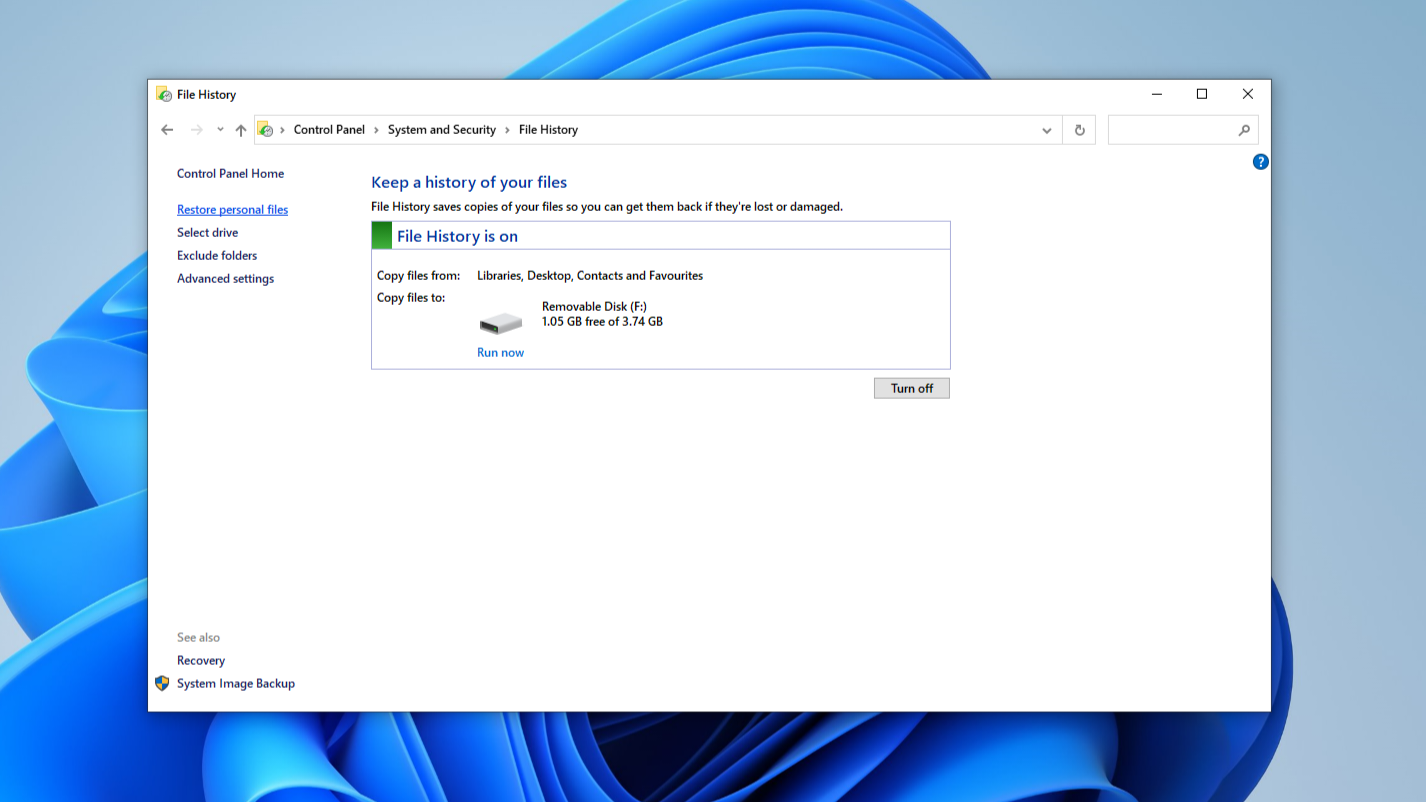
- Connect the external drive that contains your File History backup.
- Open Control Panel.
- Go to System and Security > File History.
- Click Restore personal files from the left sidebar.
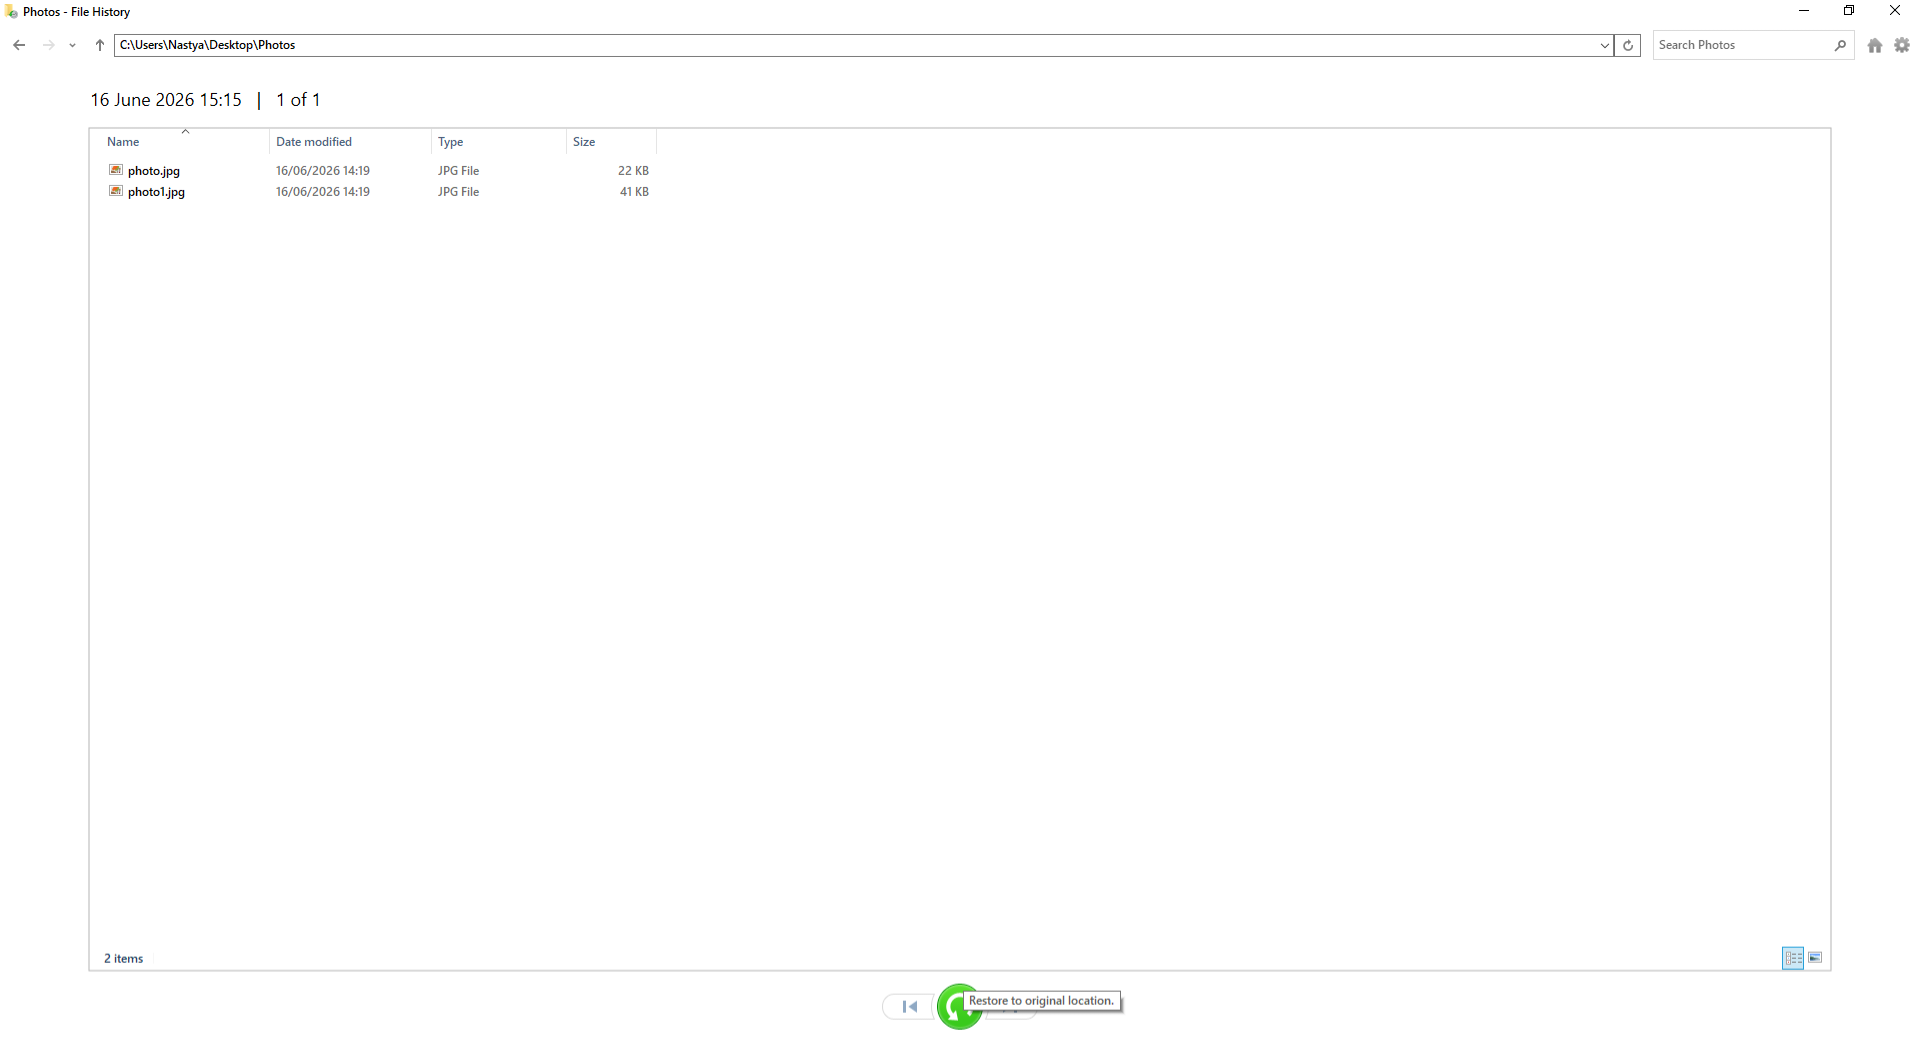
- Navigate to the folder where the photos were originally stored.
- Browse the available backup versions.
- Select the photos you want to restore.
- Click the green Restore button.
To recover photos on macOS:
- Connect your Time Machine backup drive.
- Open the folder where the deleted photos were originally stored. For example, if they were in your Pictures folder, open Finder > Pictures.
- Click the Time Machine icon in the menu bar and select Browse Time Machine Backups. If the icon isn’t visible, open System Settings > Menu Bar. Scroll down to Time Machine, then click the checkbox next to the Time Machine icon.
- Use the timeline on the right side of the screen or the arrows to browse through older backups until you find the date when the photos were still available.
- Select photos or folders you want to recover.
- Click Restore.
Option 2. Check Your Cloud Storage
If you use a cloud storage service such as OneDrive, iCloud Drive, Google Drive, or Dropbox, your photos may already be backed up there.
To check cloud storage:
- Open your cloud storage service and sign in to the account where your photos were backed up.
- Browse the folders or use the search feature to locate the missing photos.
- If you can’t find them, check the Trash, Recycle Bin, or Deleted Files folder, as many cloud services keep deleted files for a limited time.
- Select the photos you want to recover.
- Click Restore to return the photos to your cloud storage, or Download if you want to save them directly to your computer.
Tips to Prevent Photo Loss From a Camera SD Card
Recovering deleted photos isn’t always guaranteed, especially if the files have already been overwritten or the SD card is severely damaged. Make the following habits part of your workflow to reduce the risk of losing your photos in the future.
- Take a moment to review what you’re about to delete, especially when selecting multiple photos or formatting an SD card. A few extra seconds can prevent accidental loss of important data.
- Regularly backing up your photos on macOS or Windows is extremely important. Keep additional copies on an external drive or in cloud storage instead of relying on a single location. Don’t put it off until later! Creating a backup doesn’t take long, but it can save you a lot of time and stress in the future if something happens to your photos.
- Use cameras with dual SD card slots whenever possible. If one card becomes corrupted or files are accidentally deleted from it, you’ll still have a second copy on the other card. If your camera’s companion software supports automatic backups, enable them for an additional layer of protection.
- Always eject the card safely from your computer and wait until your camera finishes writing photos before removing it. This helps prevent file system corruption.
- Memory cards wear out over time. If your SD card starts showing errors, disconnects unexpectedly, or becomes slow, replace it before it fails completely.
- Format the SD card in your camera after backing up your photos. This helps keep the file system clean and reduces the chance of corruption.
Conclusion
Deleting valuable photos may seem like an irreversible problem at first, but that’s not always the case. What you should do next depends on how the photos were lost. If you deleted them directly from the SD card while it was still in your camera and don’t have any backups, then use data recovery software. If the photos were deleted while the SD card was connected to your Mac, you can restore them from the Trash. Well, if you do happen to have local backups or cloud storage, just restore them from there. Finally, don’t forget to build good backup and storage habits. They can save you a lot of time, stress, and frustration the next time something goes wrong. Most importantly, don’t forget the simple habits that can help prevent photo loss in the future!
Frequently Asked Questions
Should I keep using my SD card after I accidentally delete photos?
No. If you don’t have any backups, stop using the SD card immediately. Every new photo or video saved to the card increases the chance of overwriting the deleted data, reducing the likelihood that recovery software will be able to restore your files.
Can I preview photos before recovering them?
Yes. Disk Drill allows you to preview recoverable photos before recovery, so you can verify they’re intact and recover only the photos you need. But preview support depends on the file format. Common formats such as JPG and PNG are usually supported. Some RAW formats may be previewed if your operating system has a compatible default image viewer installed, but this isn’t guaranteed. Even if a photo can’t be previewed, it can still be fully recoverable.
Can I recover photos after formatting my camera SD card?
Yes, if the SD card was quick formatted, data recovery software can recover your photos, as long as the deleted data hasn’t been overwritten by new one. However, some cameras and SD cards support SD ERASE commands (CMD32, CMD33, and CMD38), which work similarly to TRIM on SSDs by instructing the card to erase data blocks. If these commands have been executed, the deleted photos are permanently erased, and data recovery software will no longer be able to recover them. A full format also leaves no chance of recovery.