
For some photographers, flash is only used out of necessity in low light scenarios. These natural light photographers rarely, if ever, use their flashes outdoors. Other photographers love flash and use it often both indoors and outdoors in a variety of lighting scenarios. While there is no “correct” method, having a firm understanding of flash concepts can broaden your toolkit and allow you to achieve the exact look and style you’re going for, regardless of the available ambient light or time of day. In this article, we’ll give you outdoor flash photography tips and techniques to broaden your understanding and set you up for success. We’ll review the following concepts:
- When to Use Flash in Outdoor Photography
- Outdoor Flash Photography For a Natural Look
- Dramatic Outdoor Flash Photography
When to Use Flash in Outdoor Photography
Outdoor flash photography can give the user full control over the quantity and quality of light. However, using flash outdoors is not always necessary or optimal. We cover this in detail in our article, When to Use Flash (and Why) in Your Photography, but here’s a quick summary.
Here are a few times you may want to use flash:
- In low light to illuminate the subject.
- In unflattering light to clean up the light.
- For a dramatic look to make your subjects pop off the background.
- To add fill light to the shadows on a subject, especially under the eyes.
On the other hand, here are a few situations when you may want to avoid using flash:
- When you are short on time.
- When you already have the ideal light on your subject(s).
- When you are going for an organic, authentic look and vibe.
Outdoor Flash Photography For a Natural Look
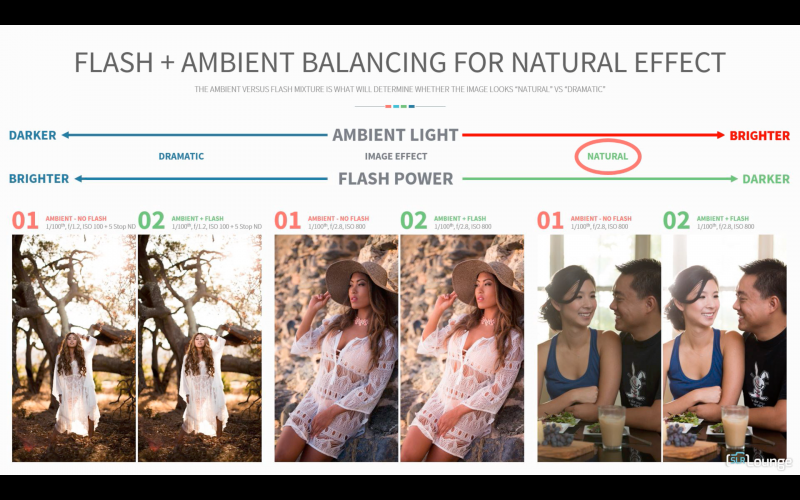
When balancing flash and natural light, you can swing it in either direction, toward the flash for a dramatic look or toward the natural light for a subtly lit look. In fact you can get both looks with either if done right. Both have their uses and their place.
Many people prefer a natural light look, but if you’re only using what’s available you’re leaving yourself at the mercy of nature, who can be fickle and often operates on a whim. Not only that, you’re playing against a powerful force when you schedule your shoot: the sun. For natural light photographers, adding flash will let you take command of aspects of your shoot that you otherwise would have no control over. By learning how to use flash, you are empowered to shoot regardless of time of day and weather.
The balancing act is simple in theory: lower flash power combined with longer shutter speeds offer a more natural look, and higher flash power with shorter shutter speeds will create something more dramatic looking that no one would ask, “did they light that?”
Tip 1: Consider Flash Sync Speed and Outdoor Flash Photography
If you are new to flash, you are probably used to being able to shoot at any shutter speed you want. 1/8000? No problem! But when you introduce flash, you will be working with your camera’s flash sync speed, which is likely around 1/200. This means that if you shoot faster than 1/200th (or whatever your camera’s flash sync speed is) with your flash, you will run into issues, like black bands appearing in your image. But, when it’s bright you’ve got to do something to shoot at those slower shutter speeds and not blow out your image, and that something is put a neutral density (ND) filter on your lens.
*Of course there’s high speed sync as the caveat to all of this, but that’s for later.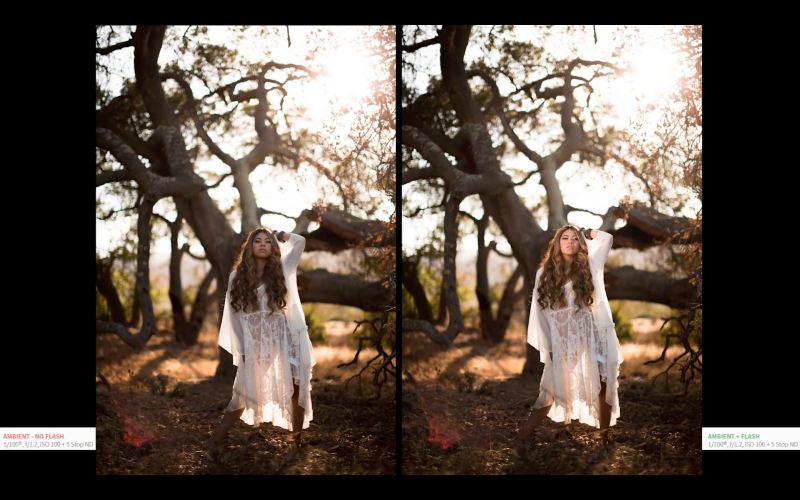
Neutral density filters reduce the light that enters your lens by a designated amount without adding a color cast. Though, it’s worth noting that not all ND filters are created equal, and some of the bargain options will, in fact ,not be truly neutral and will require some color-finessing in post.
If you are shooting in light that fits within your flash’s sync speed for your desired exposure, you can skip the ND filter and move on to the next step.
Tip 2: Dial in Ambient Exposure First
When doing outdoor flash photography, loook at the scene in which you’ll be shooting and think of how you want the background to look, without paying as much attention to how the subject will be exposed, again working within the parameters of your camera’s flash sync speed. Once you’ve got that look dialed in, we can go on to the next step – adding the flash.

Tip 3: Add in the Right Flash Power
A quick primer for those who aren’t familiar – when working with flash, your aperture will determine how much of the flash gets to the sensor. This means that if you’ve chosen a wide aperture for your desired background look, you will need less flash power to get your ideal exposure.
Now, if you’ve added a 5 stop ND filter in order to shoot with that wide aperture, you will need to add some flash power to compensate for that. The same goes for ISO, which increases or decreases your sensor’s overall sensitivity to light. If you are shooting in the evening and have bumped up your ISO to get your desired background exposure but your subject still needs a kiss of light to stand out, that raised ISO will cut down on how much flash power is required for your desired exposure.
Tip 4: Consider Flash Modifiers for Light Control

For these example images, we’ve used a reflector to bounce flash onto our subject, but whatever modifier you choose, make sure that you are paying attention to where it is aiming your flash. Wherever your flash hits will be made brighter, and you want to make sure that’s only hitting where you want it.
Another consideration with the light is color temperature. Flashes are more or less daylight balanced, which refers to mid-day light, so if you are shooting during golden hour, a CTO gel will help keep your flash looking “believable.” It will mimic the golden light found during that time of day.
Dramatic Outdoor Flash Photography
For more dramatic outdoor flash photography, follow similar steps as above but bring down your exposure and increase your flash power. Let’s illustrate this concept with an actual shoot below.
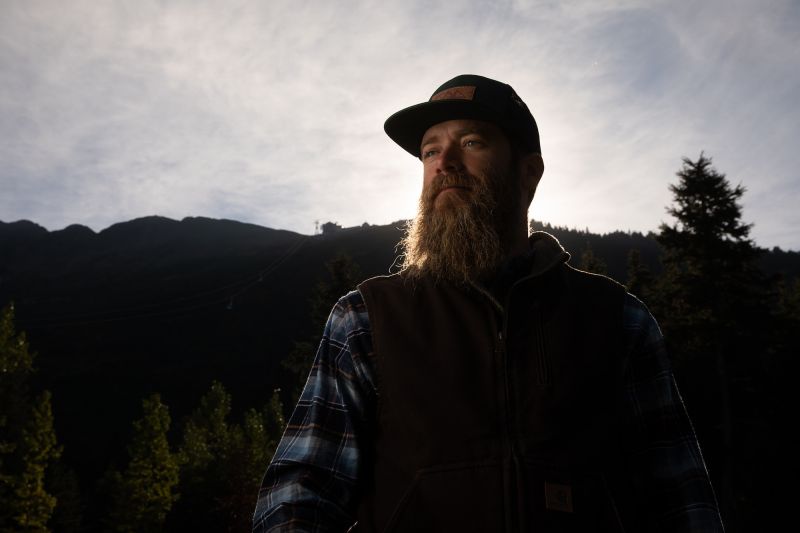
Shot #1: The Headshot
For the headshot, the process was quite simple. As is true in most of my shoots, I started with the background.
Step 1. Choose the Background

I chose to use the trees reflecting in the water as my background and I took the photo above. In the image, you can see that the pine trees extend down farther on the left and the right, leaving an open space for Brian’s head right in the middle of the frame. With my framing dialed in, I needed to set my exposure for the background.
Step 2. Expose for the Background
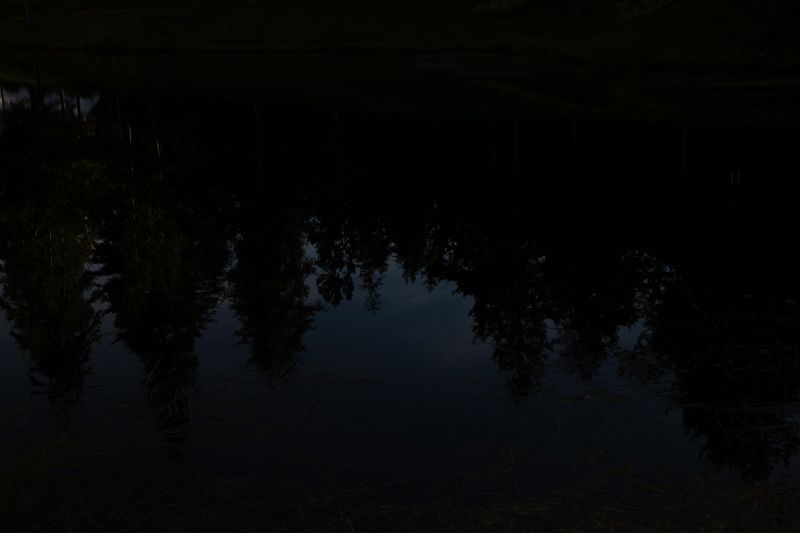
In the above image, you can see that the exposure for the background has been pulled down dramatically. Once I determined my background settings, all I had to do is place my subject and add light to him.
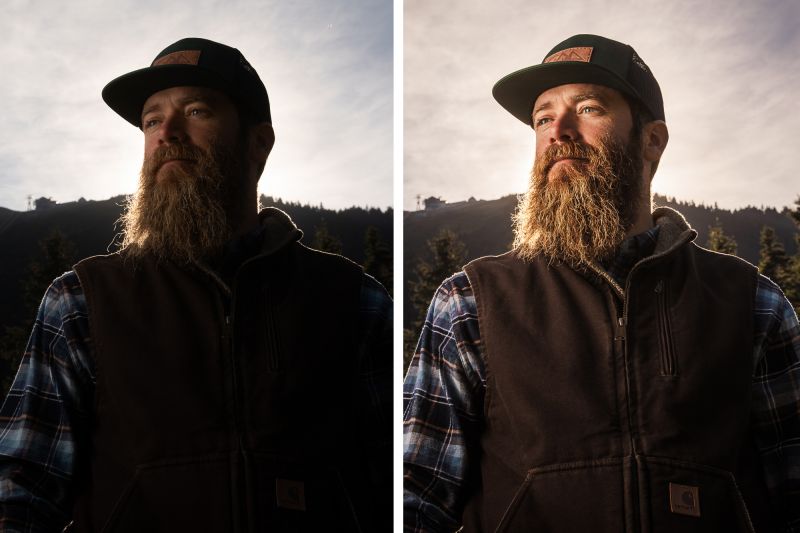
Step 3. Pose the subject
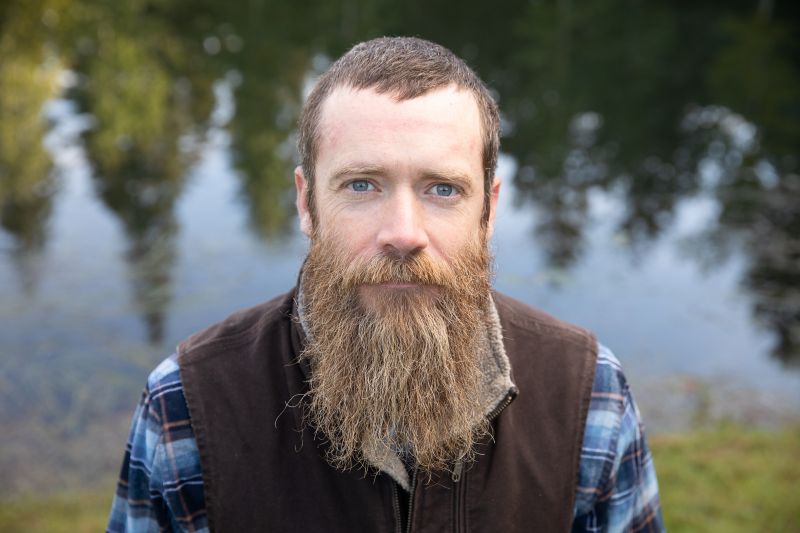
As I mentioned in step one, I intended to place Brian in the middle of the frame with the reflection of the trees extending down on both sides. I kept the pose simple and directed Brian to look directly into the camera. In the image below, you can see what it looks like before and after we pull down the exposure.

Given how underexposed Brian is in the image, we need to add light. A lot of light.
Step 4. Add Light

To light Brian, we positioned the Profoto B10 as a butterfly light directly above his head firing at about 1/4th power using the Profoto OCF Beauty Dish. Can you do this with any flash? Absolutely. I love using Profoto gear, but in capturing this image, the light will be mostly the same, regardless of what piece of gear you’re using.
For those not using a Profoto B10, know this. On a B10, 1/4th power is equivalent to about 50-60 watt seconds. This means you can get the same amount of light that I needed for this image using a standard flash at full power.
Here is the final headshot:

Study #2: The Hero Shot
For the hero shot, I chose a different composition. There are several things happening within this frame. We have a leading line from the tram that leads the viewer’s eye into Brian. At the same time, Brian is facing camera left rather than directly toward the camera to add a bit of grandeur to the image. It’s not something that I normally do, but in this instance, it made sense.
Step 1: Choose Camera Angle
I took a low angle to give Brian a sense of presence in the shot. I also wanted to capture the pine trees and highlight the tram going up the mountain, which leads nicely back into Brian. The low angle allowed me to capture all of these elements.
Step 2: Expose for the Background
After I established my composition, all I needed to do was dial in my exposure settings for the background. Like the headshot, I chose to darken the background for dramatic effect.
Step 3: Place the Subject in Front of the Sun
When I positioned Brian within the frame, I placed him directly over the sun. The sun is the brightest place in the frame and I’ve placed it right behind his head. This does a couple things. First, it creates a natural vignette that automatically pulls the viewer’s eye into Brian. Also, the sunlight creates a perfect rim light, which you can see highlights Brian’s arms and shoulders, and it fantastically brings out his amazing beard.
Step 4: Add Light
To light Brian, I placed the Profoto B10 camera left at full power with an OCF Beauty Dish. The light is actually placed just to the left and behind Brian to create a slight shadow and add dimension to his face. If the light were placed directly to the left, his nose wouldn’t be in shadow as you see in the image above.
Step 5: Pose the Subject
As I mentioned earlier, Brian is facing camera left rather than directly toward the camera to give the image an epic, heroic feeling.
Here is the final hero shot:

Study #3: The Adventure Shot
Finally, we have our adventure shot with Brian and his dog, Fundy.
Step 1: Choose Camera Angle
For this image, I positioned the camera very low to the ground to once again give Brian presence and strength in the frame. I wanted this image to focus on Brian, the adventurous mountain man, as well as the trusty companion by his side.
Step 2: Expose for the Background
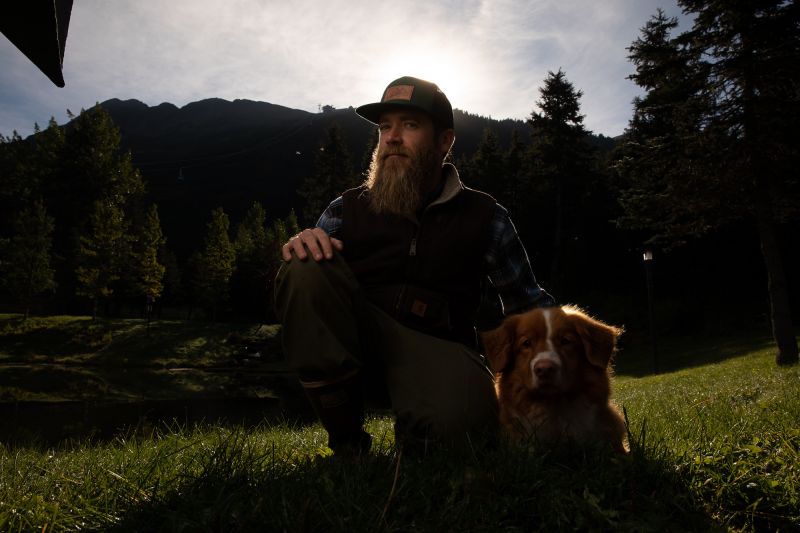
When the scene is exposed for natural light, it loses its editorial punch. I chose to darken the exposure for dramatic effect. Below, you can see another angle. This image is unedited, straight out of camera, to show exposure and dynamic range.

Step 3: Position The Subject in Front of the Sun
Brian is once again the center of attention because I’ve placed him directly in front of the sun, which creates a natural vignette and highlight. Our eyes are naturally drawn to the brightest point.
Step 4: Add Light
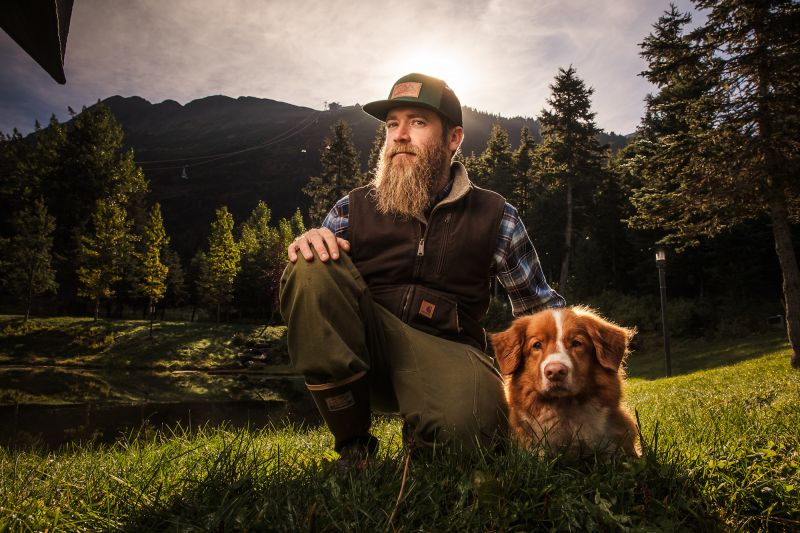
To light Brian, I used the same settings as the hero shot, but I chose to use a wider angle. In the top left corner of the image, you can see the Profoto B10, which was placed camera left at full power with OCF Beauty Dish.
Normally, I would shoot a plate shot and create a composite to remove the softbox. In this situation, however, time was extremely limited. I handheld the camera and saved time by not having to set up a tripod. Because the softbox is only visible over the clouds, I knew it would be easy to clone out in Photoshop using the content-aware fill tool.
Step 5: Pose the Subject(s)
You can see in the images above that Brian had been looking directly into the camera. In the final image, I asked Brian to look off to the side to once again create a sense of adventure. Fundy laid down at Brian’s side, and I used a ball to hold his attention.
Here is the final outdoor flash photography adventure shot:

Gear list
Here’s a list of the gear used for the 3 outdoor flash photography image above, along with acceptable budget alternatives.
Lighting
- Profoto B10 OCF Flash Head (or substitute below)
- Substitute 1 to 1.5x: Godox AD200 TTL Pocket Flash
- Substitute 5x: Yongnuo Speedlight YN600EX-RTII or other flashes
Lighting Modifiers
- Profoto OCF Beauty Dish (or substitute below)
- Substitute: MagMod MagBox
- Substitute: Westcott Switch Beauty Dish
Camera & Lens
Conclusion
It’s a funny thing how there is a tendency for those who consider themselves to be ‘natural light photographers’ will often express a “fear” of using flash. What’s even funnier is that there is an equal and opposite reaction from the other side. Those well-versed in flash photography will often become so comfortable controlling all the aspects of lighting that they get nervous when they must rely solely on what lighting is available. We hope this article gives you a clearer idea of outdoor flash photography, including how and when to use it.
I hope you enjoyed this entire lighting series. You can find more educational content, including our complete training systems, in our store and in Premium.


Get Connected!