For some photographers, flash only comes out when the light fails — a last resort for dark reception halls and dim venues. But using flash outdoors, in broad daylight or during golden hour, opens up creative control that purely natural light shooting can’t offer. You get to decide where the light falls, how dramatic the image looks, and how your subject separates from the background — regardless of where the sun happens to be.
This guide covers the core concepts for outdoor flash photography: when to use it, how to balance flash with ambient light for a natural look, how to push it for a dramatic look, and how to use an ND filter to shoot wide open when sync speed would otherwise force you to stop down. We’ll walk through three complete outdoor portrait case studies with full camera and lighting settings.
When to use flash in outdoor photography

Outdoor flash isn’t always necessary or even desirable. Here’s a quick framework for deciding.
Flash tends to help when you’re in low light and need to illuminate the subject, when the available light is unflattering and you want to clean it up, when you want subjects to visually separate from the background with a dramatic look, or when the shadows under the eyes and chin need filling — particularly in harsh overhead midday sun.
Skip the flash when you’re already in ideal light, when you need to move fast and setup time isn’t available, or when the shoot calls for an organic documentary feel where any artificial light would read as intrusive.
For a deeper look at the decision, see our full article on when to use flash and why.
Outdoor flash for a natural look
Balancing flash with ambient light outdoors comes down to one simple principle: the more you lean toward ambient, the more natural the result; the more you lean toward flash, the more dramatic. You can get either look from either direction if you understand what’s controlling each side of that equation.
Lower flash power combined with longer shutter speeds keeps ambient light prominent and the flash subtle — a kiss of fill that most viewers won’t consciously notice. Higher flash power with a shorter shutter speed pulls the ambient down and makes flash the dominant source, which is when you get that unmistakably lit look.
Tip 1: Understand flash sync speed — and what to do when it limits you
If you’re new to flash outdoors, sync speed is the first thing that will catch you off guard. Most cameras sync with flash up to around 1/200 — shoot faster than that and you’ll see a black band creeping into the frame from the shutter curtain. In bright outdoor conditions, 1/200 at a usable aperture often means your ambient exposure is blown out before you’ve added any flash at all.
There are two solutions. The first is high speed sync (HSS), which allows flash at shutter speeds above the native sync limit. We cover that in detail here. The second — and the one worth mastering even if you use HSS regularly — is a neutral density (ND) filter.

An ND filter reduces the light entering the lens by a fixed number of stops without adding a color cast. Fit one to the front of your lens and you can shoot at wider apertures in bright conditions while staying within your camera’s sync speed — which means you keep shallow depth of field without having to push your flash to its power ceiling to compete with the ambient.
The technique is straightforward. Set up your lighting as you normally would without the ND filter. Then attach the filter and open your aperture by the same number of stops the filter blocks. A 3-stop ND filter means you open up three stops from wherever you were. The filter cuts ambient and flash equally, so your flash-to-ambient ratio stays the same — you’ve just shifted the whole exposure to allow a wider aperture.
In the video below, Zach Gray demonstrates this technique for outdoor strobe-lit portraits:
Honestly, it’s one of those techniques that’s easier to try than to fully explain in the abstract. Set it up once, fire a few test frames, and the relationship between the filter, your aperture, and your flash power will click immediately. If you shoot with manual strobes regularly, this belongs in your standard toolkit alongside HSS — the two cover different situations and are genuinely complementary rather than competing approaches.
One note on ND filter quality: not all ND filters are truly neutral. Budget options can introduce a color cast, usually a slight blue or green shift, that requires correction in post. If color accuracy matters on the shoot, invest in a quality variable ND or a fixed-stop filter from a reputable brand.
Tip 2: Dial in ambient exposure first
Before thinking about the flash at all, look at the scene and decide how you want the background to look. Set your shutter speed, aperture, and ISO to expose the background the way you want it — working within your sync speed limit. Once that’s locked, the subject will likely be underexposed. That’s expected. The flash handles the subject; the camera settings handle the background. Keep those two jobs separate in your head and the process becomes much more systematic.

Tip 3: Add flash power to match
With ambient dialed in, add flash and adjust power until the subject is exposed correctly. A few variables to keep in mind. Aperture controls how much flash reaches the sensor — wider aperture means more flash, so you’ll need less power at f/2.8 than at f/8 for the same subject brightness. If you’ve added an ND filter, you’ll need to compensate with more flash power since the filter cuts flash output along with ambient. And ISO affects both sides equally — raising it amplifies ambient and flash sensitivity together, which can reduce the flash power needed in low-light evening setups.
Tip 4: Choose your modifier carefully outdoors

Outdoors, wind and distance complicate modifier choices in ways that don’t apply in the studio. Large modifiers catch wind and require stands with solid sandbag weighting. Umbrellas spill light in all directions, which matters less outdoors than indoors but still affects the image. A reflector used to bounce flash gives you a portable, wind-resistant option that doubles as an ambient fill tool when the sun cooperates.
Color temperature is also worth considering outdoors. Flash is daylight-balanced for mid-day light. Shoot during golden hour without a gel and your flash will read cooler than the warm ambient, creating a mismatch that’s visible on skin. A CTO gel on the flash brings it into range with the ambient golden light and keeps the overall image feeling cohesive. For more on this, see our guide to using flash gels for creative and corrective effects.
Dramatic outdoor flash photography
For a dramatic look, the approach mirrors what’s above — but you pull the ambient exposure down intentionally and let the flash do the heavy lifting on the subject. The background goes darker than natural, the subject pops forward, and the overall image reads as deliberately lit rather than documentary. Below are three complete case studies shot on location in Alaska with Brian, demonstrating how this plays out across different compositions.
Case study 1: the headshot
Step 1: Choose the background

Pine trees reflecting in water provided the background — with the tree line dipping in the center of the frame, leaving a natural negative space for the subject’s head. Framing decisions like this one pay off later: once the composition is locked, all that’s left is exposure and light.
Step 2: Expose for the background

The background exposure is pulled down dramatically from what it would look like naturally. At 1/200, f/7, ISO 100, the scene goes dark and moody. The subject is now severely underexposed — which is exactly what we want before adding flash.
Step 3: Pose the subject


Brian is positioned in the natural negative space in the center of the frame, looking directly into the camera. Simple pose, simple direction — the lighting and composition carry the image.
Step 4: Add light

A Profoto B10 at 1/4 power with a Profoto OCF Beauty Dish, positioned directly above as butterfly light. At 1/4 power, the B10 outputs roughly 50–60 watt seconds — equivalent to a standard speedlight at full power. Any flash capable of that output at the needed distance will achieve the same result.

Case study 2: the hero shot
Step 1: Choose camera angle
A low angle gives the subject presence and scale within the frame. The composition captures pine trees, a tram ascending the mountain, and Brian — the tram line functioning as a leading line that draws the eye back to the subject. Brian faces camera left rather than into the lens, which adds an epic, outward-looking quality to the image.
Step 2: Expose for the background

At f/13, the background goes dark and the scene takes on an overcast, dramatic quality even in what was originally brighter light.
Step 3: Place the subject in front of the sun
Brian is positioned directly in front of the sun — the brightest point in the frame sits right behind his head. This accomplishes two things simultaneously. It creates a natural vignette that pulls the viewer’s eye inward, and the backlight produces a rim along his arms, shoulders, and beard that adds separation and dimension without a second flash.
Step 4: Add light
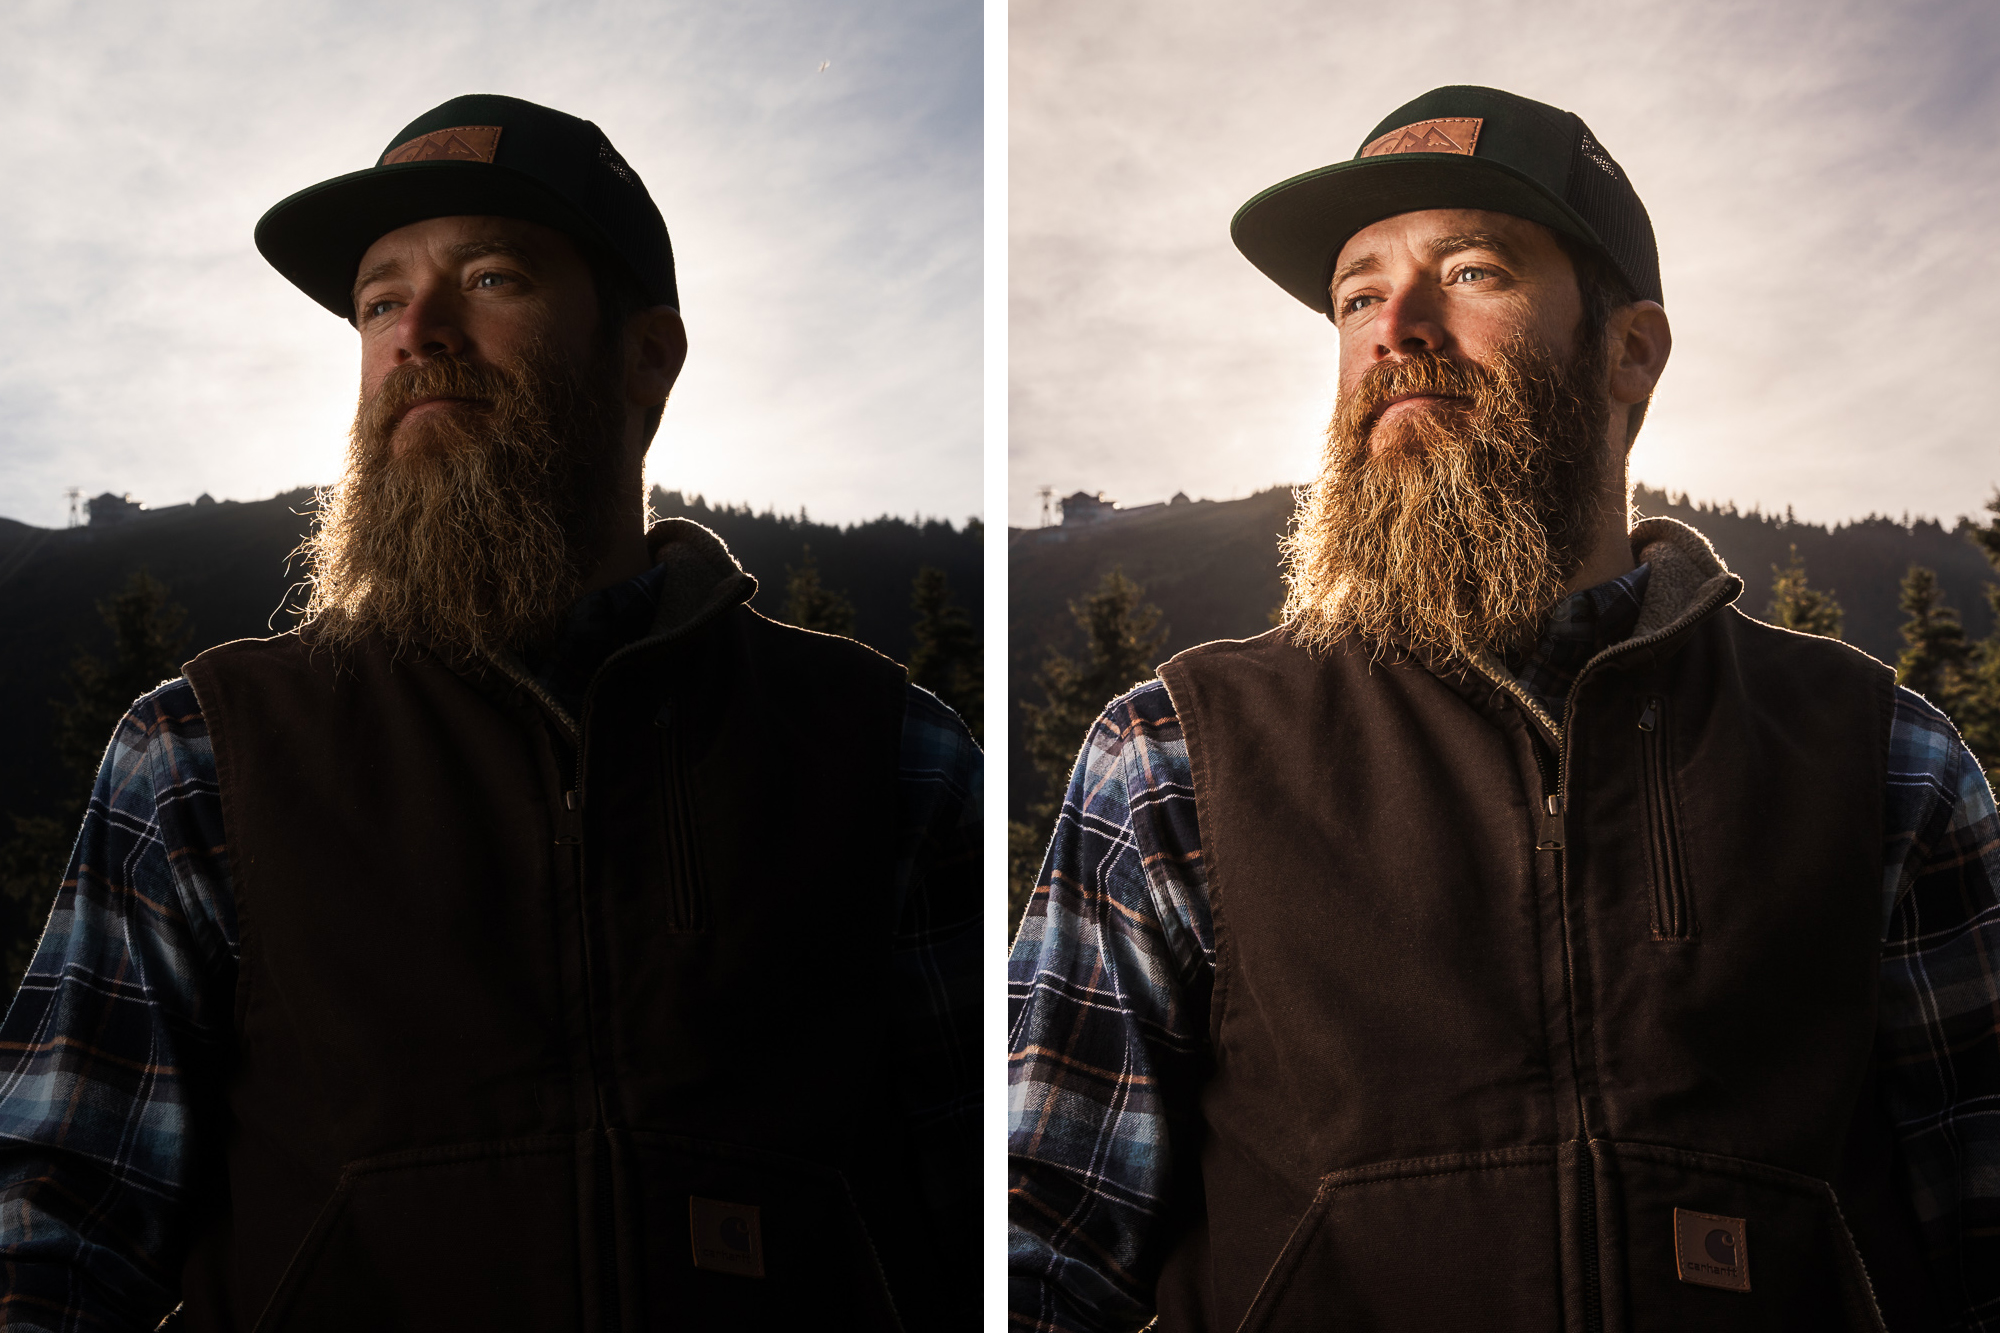
The Profoto B10 is positioned camera left at full power with the OCF Beauty Dish — but placed slightly left and behind Brian rather than directly to the side. That placement introduces a subtle shadow on the nose and adds face dimension. Direct side placement would have left the nose fully lit and lost that depth.
Step 5: Pose the subject
Facing camera left rather than into the lens reinforces the heroic, expansive feel of the image. The subject looks like he belongs in the landscape rather than posed in front of it.

Case study 3: the adventure shot
Step 1: Choose camera angle
Camera positioned very low to the ground — lower than eye level by a significant margin — to give Brian height and presence in the frame. The goal was to feature Brian as the central figure while including his dog, Fundy, as a supporting element rather than an equal subject.
Step 2: Expose for the background


The natural light exposure loses the editorial quality entirely — the scene looks pleasant but flat. Pulling the exposure down recovers the drama. The straight-out-of-camera shot above shows the dynamic range available and confirms the exposure relationship before flash is added.
Step 3: Position the subject in front of the sun
Same approach as the hero shot — Brian positioned directly in front of the sun to create a natural vignette and backlight rim. The sun behind the subject does much of the separation work for free.
Step 4: Add light

Same settings as the hero shot — Profoto B10 at full power with OCF Beauty Dish, camera left — but with a wider angle on the lens to include more of the environment. The flash is visible in the upper left corner of the frame over the clouds. Rather than stopping to set up a tripod and composite it out in camera, the decision was made to shoot handheld and clone the flash out in Photoshop using content-aware fill. The clouds made it a straightforward removal.
Step 5: Pose the subjects
Brian looks off to the side rather than into the lens — again reinforcing the adventure narrative. Fundy was positioned at Brian’s side and held in place with a ball just out of frame to maintain his eyeline and attention.

Gear used across all three case studies
Everything below has a budget alternative listed — the lighting principles are the same regardless of which flash you’re using.
Lighting
- Profoto B10 OCF Flash Head
- Substitute at 1–1.5x cost: Godox AD200 TTL Pocket Flash
- Budget substitute: Yongnuo YN600EX-RTII Speedlight
Lighting modifiers
- Profoto OCF Beauty Dish
- Substitute: MagMod MagBox
- Substitute: Westcott Switch Beauty Dish
Camera and lens
For a deeper dive into flash techniques including modifier selection, multi-light setups, and how to replicate these looks across different shooting environments, our Flash Photography Training System covers the full workflow from one-flash fundamentals to complex multi-light outdoor setups.
Related reading in the lighting hub: our lighting modifiers cheat sheet covers how to choose the right modifier for outdoor work, and our guide to portrait lighting patterns shows how placement decisions like the ones above translate across different setups.