If you don’t fully understand masking in Photoshop, then you don’t fully understand Photoshop. Masks are one of the most powerful tools in Photoshop. Seriously, if you don’t know all of these techniques, then you are missing some significant knowledge from your editing arsenal. Thankfully, I’m here to help you along the way and tell you about five of my favorite methods for masking in Photoshop.
Layer Masking In Photoshop | Technique #1: Focus Area
Focus Area is a relatively new addition to Photoshop, although when it was actually introduced I don’t remember. It’s exceptionally simple, as most of these techniques are, and essentially is exactly how it sounds. You are able to select the in-focus areas of your images.

To access this, navigate to Select > Focus Area. Once there, you will be presented with a screen similar to what you see above. Using the drop down menu at the top of the window you can select how you want your selection to be displayed. I like to use the one called “Overlay,” which displays the unselected areas in red. The other settings include sliders for “In-Focus Range,”(self-explanatory), and “Image Noise Level” which is useful if your image contains a lot of noise. Finally, to the left of the panel, there are brushes which can be used to add or remove from the selection.
I don’t use this technique too often, but it can come in extremely handy. For example, when I recently had to create some catalog-style, white background images, I used Focus Area to produce an accurate selection very quickly. It wasn’t usually perfect (notice the front of the shoe above) but it saved me a great deal of time compared to only using the pen tool.
Once the selection is created, you can then apply that to any layer by clicking the “Add A Mask” button at the bottom of the Layers panel. In my example, I used it as a starting point to masking out the shoes. However, the same mask could be used for many others purposes. As always, the only real limit is your imagination.

Masking In Photoshop | TECHNIQUE #2: Color Range
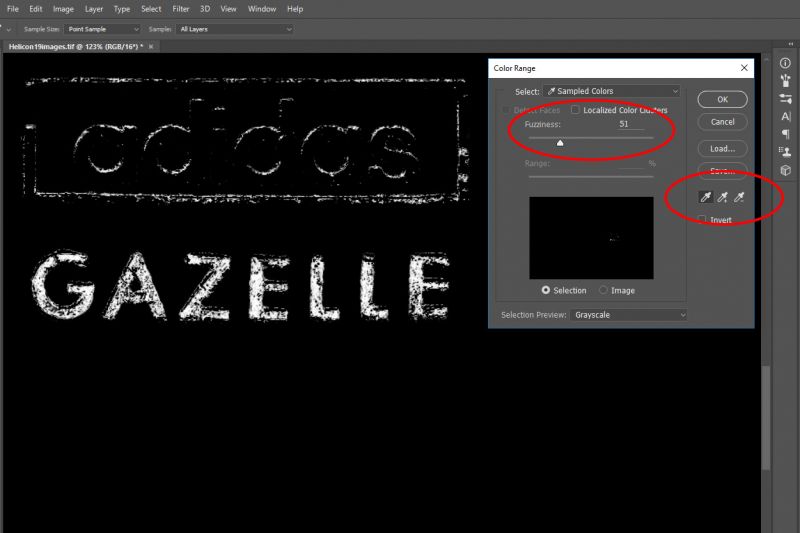
Color Range is another excellent technique. You will find it just above Focus Area in the Select menu. Navigate to Select > Color Range. This method is used to select a particular color in your image (big surprise there). As such, it’s often used to do things like select skies. However, it can also be used for other things. Take the image above. It’s a SOOC (aside from using Helicon Focus to stack focus) of a product photo I’m currently working on. One of the things I will be adjusting here is the logo. Specifically, the bottom half which was very tricky to light.

Having navigated to Color Range, you will see the screen above. Use the eyedropper to select the color you want to adjust. Having done so, you then use the + and – eyedroppers to add or remove colors / Hues from your selection. Finally, you can control how wide your selection is by using the Fuzziness slider.

Once you exit this screen, your selection will be displayed as marching ants and can be applied to any layer you want. In this example, I decided to edit the mask a little further, which is an important thing to note. Your job of creating accurate masks is not necessarily done after exiting these screens. You can, and often should, further refine these masks. I usually Alt-click on the mask (this displays just the mask to you) and then edit whatever I see. Here, I did two things. By pressing Ctrl-M, I applied a curve directly to the mask. I then made a rough selection around the word “Gazelle,” inverted it and deleted the excess. The result being a precise selection which was extremely easy to create. An example of the final result is below.

Masking In Photoshop | TECHNIQUE #3: Luminosity Masks
Luminosity Masks are the daddy of masking in Photoshop. Don’t get me wrong, every other technique here has its place, but Luminosity Masks can be used in more images (depending on what you shoot) and are one of Photoshop’s most powerful tools. Sadly, they are also quite long and somewhat complicated to explain. The video below by Jimmy McIntyre does a great job of explaining them and showing a simple application of the technique. You will also find a link to some free Photoshop actions within the video, too. Look out for my upcoming review of Raya Pro, Jimmy’s very useful Photoshop panel.
Masking In Photoshop | TECHNIQUE #4: Apply Image
Apply Image and Luminosity Masks are similar in many ways, but personally, I prefer using Luminosity masks for convenience and speed. I’m sure there is a way, but I also don’t know how one would go about selecting the mid-tones using Apply Image.
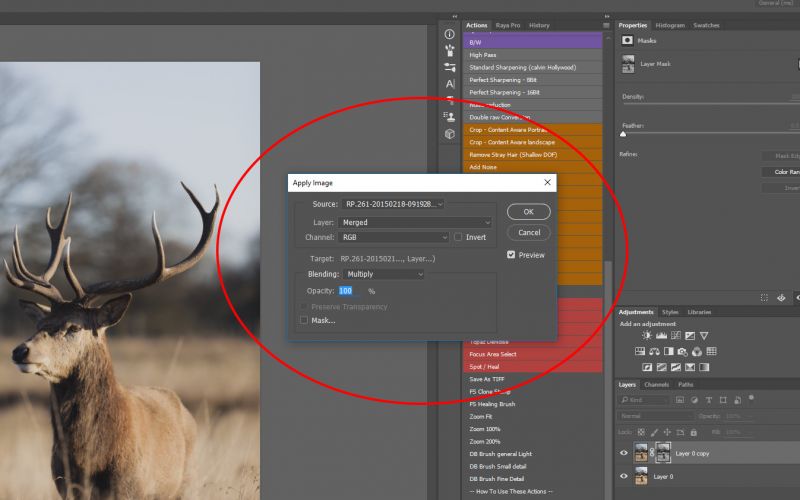
When using Apply Image, you can create a mask of either the Highlights or Shadows in your image. Photoshop does this by selecting everything either above or below 50% gray. I find that the real usefulness of Apply Image comes when you further refine the mask.

To access Apply Image, navigate to Image > Apply Image. If the settings you see differ from the image above, adjust them where necessary. If you select “Invert,” the selection outputted will be of the shadows rather than the highlights.

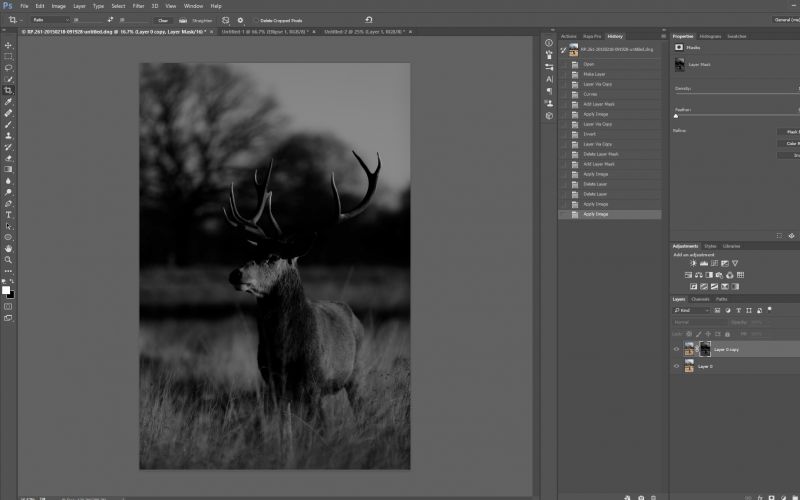
The image here shows a simple selection which Apply Image has created. If you don’t already know, when looking at a selection, pure white is selected and pure black is not. Everything in between the two represents varying degrees of selection. If we briefly rewind to the logo on the Adidas shoe, that selection was vastly different to the one we see above of this Stag. It was far more targeted, whereas this selection is much broader. So broad that it’s not too useful.

So what can we do to narrow down our selection? You can either repeat the Apply Image process multiple times, the result being a more targeted selection (see photo above). Or you could hit Ctrl-M for the curves and adjust your mask that way.
Our ultimate goal when creating masks is to select one area and exclude another, thus allowing us accurate control over every aspect of our image. As such, I tend to use Luminosity Masks rather than Apply Image as I find the masks generated can be more targeted and the mask creation is far quicker.
Masking In Photoshop | TECHNIQUE #5: Manually Painting Layers
Fingers crossed this method is very familiar to you. If not, this whole article may have been quite confusing. While I love to utilize all the techniques mentioned here, it is often appropriate to revert to the basics: manually painting on layer masks. However, just because we’re using a basic method does not mean we can’t add some additional control points. For example, Blend If and Gradient masks. I’ve already written an entire article on Blend If, which you can find here.
Gradient masks can be created by using the Gradient Tool, found with the Paint Bucket, and are perfect for doing simple things like evening out the exposure across an image, darkening a sky, etc. As I have mentioned, the only limit to how you use these techniques is your own imagination.
Summary
The masks we create can be used to adjust contrast, color, sharpness, exposure and so on; literally anything you currently do in Photoshop and then some. That’s the beauty of Photoshop over other programs like Lightroom – precise, pinpoint control. If you already use Photoshop but don’t regularly use the techniques I’ve covered, then please take the time to become familiar with them. It could bring your editing to a whole new level.
Photoshop can be a little complex for some, especially beginners. My journey started with Lightroom and then eventually progressed into learning Photoshop and other programs. Every program I have learned has a use, and I still use every one. If you’re new to all this then start with Lightroom, become familiar with that and then progress to Photoshop and beyond. Don’t try to run before you can walk. For fantastic education on Lightroom, Photography and Lighting, check out everything on offer in the SLR Lounge Premium.


Get Connected!