-
Term: Layer Mask
Description: A layer mask is a feature in image editing software, such as Adobe Photoshop, that allows for the selective editing and manipulation of specific areas of an image. It is a grayscale image that is associated with a layer, and it determines the transparency of that layer in certain areas. A layer mask works by allowing the user to paint on the mask using black, white, and shades of gray to determine the opacity of the corresponding layer. Black areas on the mask are fully transparent, white areas are fully opaque, and shades of gray represent varying levels of opacity. This allows for precise control over which parts of the image are visible or invisible, and which areas are affected by various editing tools and adjustments. In essence, a layer mask acts as a non-destructive and flexible way to edit specific areas of an image, without affecting the rest of the image or its original data. It is an essential tool for professional graphic designers, photographers, and artists who need to manipulate images with precision and accuracy.
Layer Mask
Layer Mask Advanced Tutorial
In general, use “Blend If” to merge two layers that have extremely intricate edges between them. The sample image we’ve chosen to use gives us a very intricate challenge because you can see the sky through the tree. It would be completely impossible to accomplish this blend with selection tools alone!

Above is the before image and the image we’re going to create. As before, first perform the necessary image checks: the images are both relatively telephoto, tight compositions, and the light in both is very similar.
STEP 1 | OPEN AS SMART OBJECTS IN PHOTOSHOP
In Lightroom, right click the two images and select “Open as Smart Objects in Photoshop”. We’re going to use this option instead of “Open as Layers in Photoshop” because we may need to perform additional editing on one or both of the images separately, and it is preferable to do any color correction in the Camera Raw environment. Even though the cloud image is already a JPG, Camera Raw is still a fantastic tool.
Note: If you simply copy and paste the cloud image onto the main image, it will no longer be a Smart Object. Instead, simply drag-and-drop the cloud layer itself onto the other.
STEP 2 | ALIGN & RESIZE THE CLOUD LAYER

Lower the opacity of the top layer to somewhere between 40% and 60% so that you can see through the bottom layer, and hit CMD-T or CTRL-T to transform the cloud layer and adjust the image size and placement until it lines up and looks natural Don’t forget to bring the layer opacity back up to 100% when you’re done!
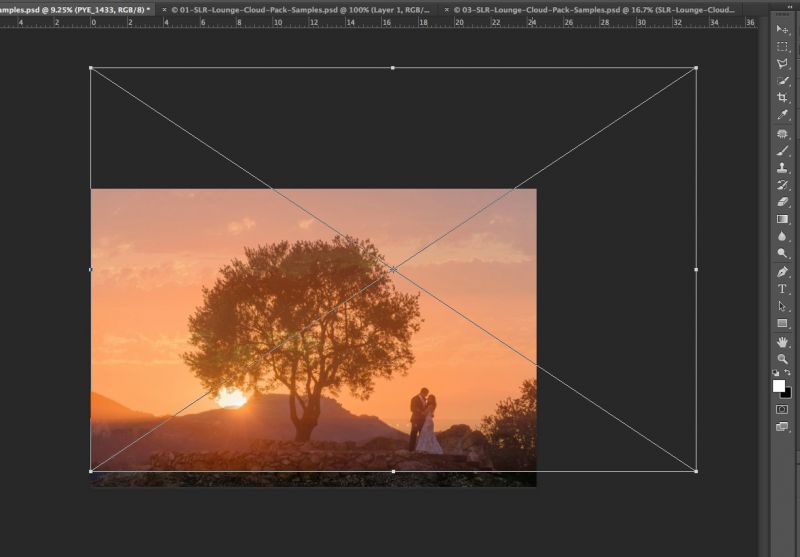
STEP 3 | USE BLEND-IF
Right-click on the cloud layer and click Blending Options. You can also click the little FX icon at the bottom of the layers panel.
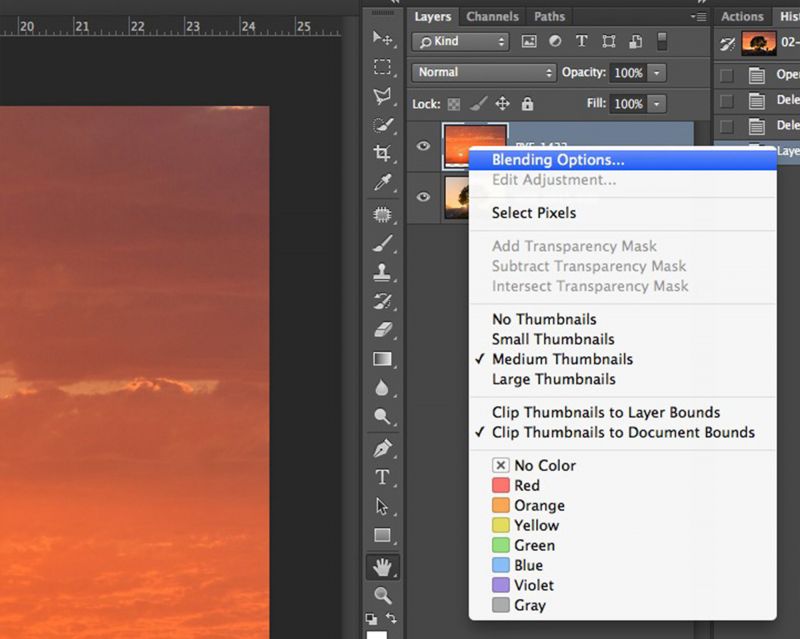
The objective of this blending method is to reveal the darker parts of the image on the bottom layer but not the light-toned sky. At the bottom of the Layer Style/Blending Options panel, look for the “Blend If” box. There are two sliders, one for “This Layer” and one for “Underlying Layer”. Click and drag the left-hand (blacks) tab for “Underlying Layer” to the right. You should see the darkest parts of the layer beneath begin to reveal themselves.

The edge between the tree and the background will probably appear very hard and sharp at first, so we need to create a softer edge. We can do this by using a feathering technique. To feather the transition between layers, hold down Alt/Option and drag the same black tab of the Underlying Layer slider as before. It will split in two, and create two different sliders that form a graduated transition. This will make the edges between the tree and cloud layer more natural looking, with a realistic foreground-background transition. However we still need to make sure that the transition looks natural everywhere. Zoom in closely to various parts of the tree, and fine-tune the two halves of the slider for the best overall effect. For now, don’t worry about the other edges around the sun and the subjects.
STEP 4 | CLEAN UP USING LAYER MASK AND BRUSH
The Blend-If method may work amazingly well for masking dark-to-light edges, however, it often leaves mid-tone areas unmasked. To hide any other parts of the cloud layer that shouldn’t be visible, we can create a layer mask for the cloud layer and brush away anything that doesn’t belong. Create a layer mask by clicking on the layer mask icon at the bottom of the layers panel.

Hit “B” to select the brush tool, and brush on the mask (not the layer!) in the areas of the foreground you want to hide. In this case, gentle, broad brush strokes with a very low Opacity (15-25%) should do the trick.
However, it should become apparent that the cloud layer and the foreground layer have some issues because of the differences in brightness. Don’t try and use masking to fix this, we’ll adjust it next.

STEP 5 | USE CAMERA RAW TO EDIT A SMART OBJECT
To brighten up the cloud layer, use the Camera Raw interface by double-clicking the layer since it is a Smart Object. This will allow you to work on the layer in a non-destructive, familiar environment. For anyone who is used to a Lightroom workflow, the adjustment sliders will appear nearly identical in the Camera Raw interface.
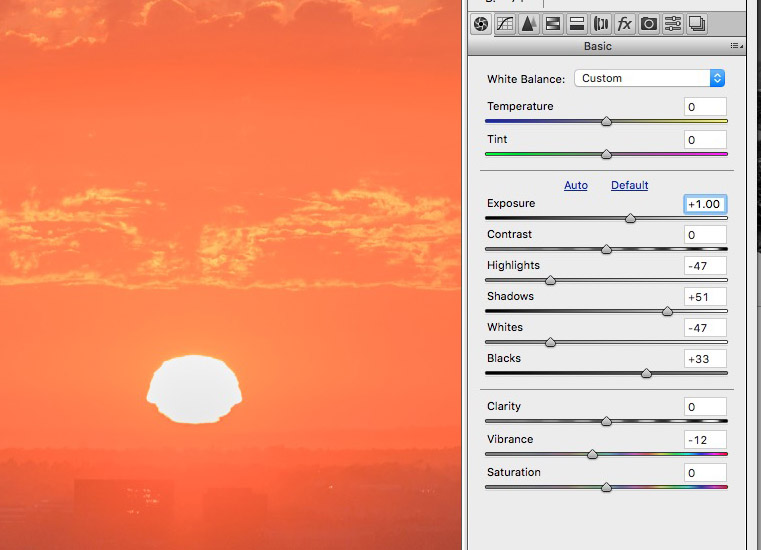
STEP 6 | USE PHOTOSHOP TO EDIT THE FOREGROUND LAYER
We edited the cloud layer using Camera Raw because we needed to perform multiple adjustments at once, which would have been a bit more complicated to do in Photoshop. However to bring the two separate layers even closer together so they appear natural and seamless, the foreground layer could also use a bit of darkening. This should be less complicated, though, so we’re going to use a simple Curves Adjustment Layer in Photoshop. At the bottom of the Layers panel, click on the little circle icon (a drop-down menu) and select “Curves”.
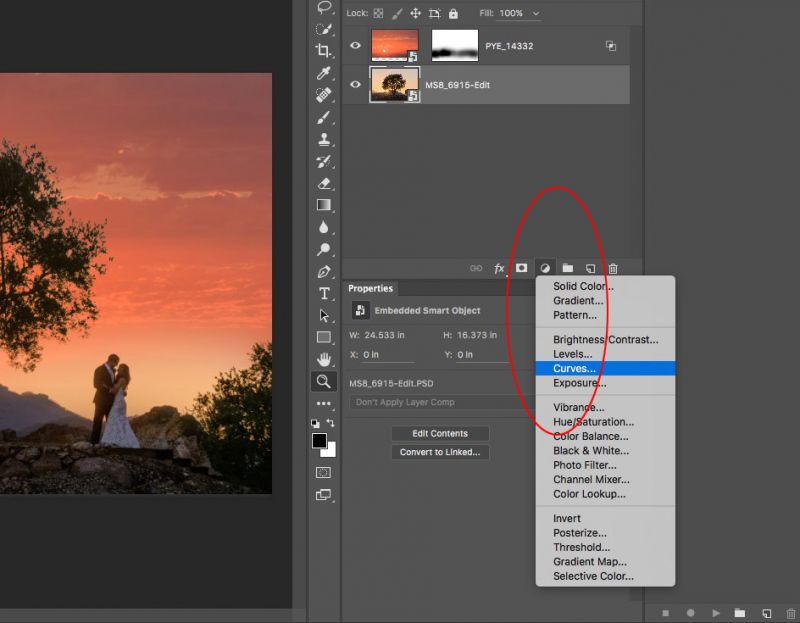

Make sure the Properties window is open, (Window > Properties) so that you can see and change your curves adjustment on-the-fly. If necessary, you can also fine-tune the adjustments made to the cloud layer by double-clicking on the layer again.
STEP 6 | MAKE ADDITIONAL ADJUSTMENTS TO COLOR
Even if the brightness of the layers can be matched, the colors may still not go well together. In this particular case it is very clear that the sunset is more orange-red, and the sky in the foreground is more yellow.
As before, adjust the cloud layer and the foreground layer separately by creating two separate Adjustment Layers.
(Skip over to the Layer Color Correction for a detailed tutorial on Advanced Blending.)
You don’t want either adjustment to affect both layers, however, so we need to link each adjustment to its proper layer. To link an Adjustment Layers to the layer just beneath it, hold down ALT or Option, then hover your mouse over the line between the Adjustment Layer and the layer below, and click when the cursor changes to a little black arrow with a white box. This will turn the Adjustment Layer into what is called a Clipping Mask; a Clipping Mask will only affect the layer it is attached to.

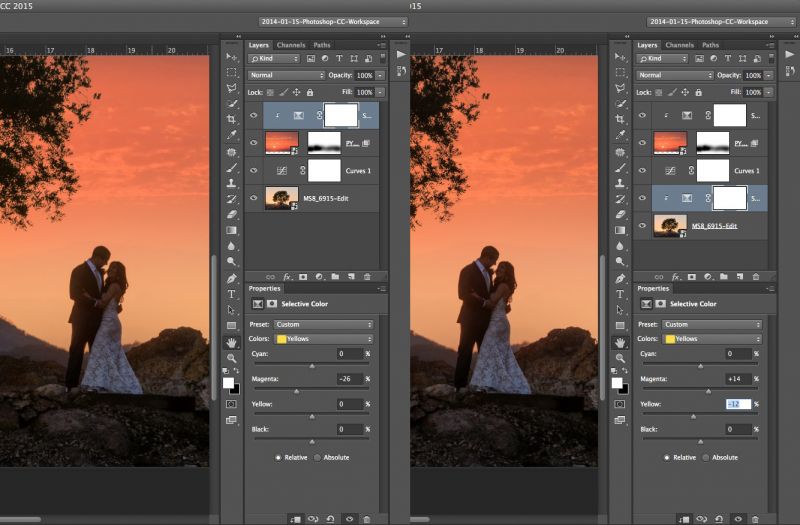
The best Adjustment Layer for both the foreground and the background is Selective Color. In this instance, we want to decrease magenta for the clouds, and increase magenta for the foreground.
All in all, we now have a total of four adjustments applied to our layers, all of which can be fine-tuned as much as you want without hurting the image. Collectively, this should be more than enough flexibility to create a great image! Once you have the overall image the way you like it, click Save (CMD/CTRL-S) and bring the final PSD file back into Lightroom.
STEP 7 | FINALIZE IN LIGHTROOM
We recommend taking the PSD or TIF image back into Lightroom for any final minor adjustments to overall contrast or color especially if your overall workflow begins and ends in Lightroom.
Sometimes it helps to give the entire image a very faint hue, tint, or contrast adjustment, to both the clouds and the subjects, so that it appears just a little bit more natural and cohesive. You may also choose to take the image in a stylized direction.

Advanced Layer Masking | Part 2

STEP 1 | DECIDE BETWEEN MASKING AND “BLEND IF”
This tutorial will be great practice for using the “Blend If” technique we just learned in the previous tutorial. The sample image, a portrait of a couple with balloons, has a perfect light blue sky that ought to be very easy to mask, however, there are trees in the image which would make simple brushing or selection techniques very difficult.
STEP 2 | OPEN IMAGES IN PHOTOSHOP
Open (import) the sample images into Lightroom, if you haven’t already, and locate the original NEF file of this engagement portrait as well as the 059.JPG file from the Cloud Pack. Next, open these two images as layers in Photoshop by right-clicking on one of the two images in Lightroom and selecting “Edit In > Open As Layers In Photoshop”.
STEP 3 | USE “BLEND IF”
Access the cloud layer’s Blending Options by right-clicking on the layer, or clicking the little FX icon at the bottom of the Layers panel. Next in the “Blend If” section, drag the black end tab of the Underlying Layer slider up to start an approximate blend. Release, and then hold down ALT / Option and drag the slider again to split it in two for a feathered transition. Zoom in for closer inspection to various areas of the image, but mainly the tree leaves.

STEP 4 | FINE TUNE BLEND
Fine-tune the two halves of the slider until the cloud layer looks like it is naturally blended, at least with regard to the outer edges of the tree leaves. Even if some of the highlights (the “shine” on the leaves) still show the clouds, this can be fixed with surprising ease using a layer mask.
Normally the adjustments in the “Blend If: Gray” option of the Layer Style panel will be able to give you the desired result. However, note that you can adjust the Blend If options for RGB colors separately if necessary. In this case, since we are trying to hide the blue sky of the underlying layer, clicking on Blend If: Blue: and dragging up on the black tab of the Underlying Layer slider may help hide the blue sky while leaving the green trees visible.

Focus more on avoiding halos at the very edges of the trees only. Even if inner areas are not perfect, they are easier to mask with a Layer Mask and a brush.
STEP 5 | CREATE LAYER MASK & USE BRUSH TOOL
Once there are no hard edges on the tree areas, and the cloud layer is mostly blended, create a layer mask for the cloud layer and use your Brush tool with a Hardness of 0-50% and a Flow of 25-75% to hide anything that doesn’t look right.
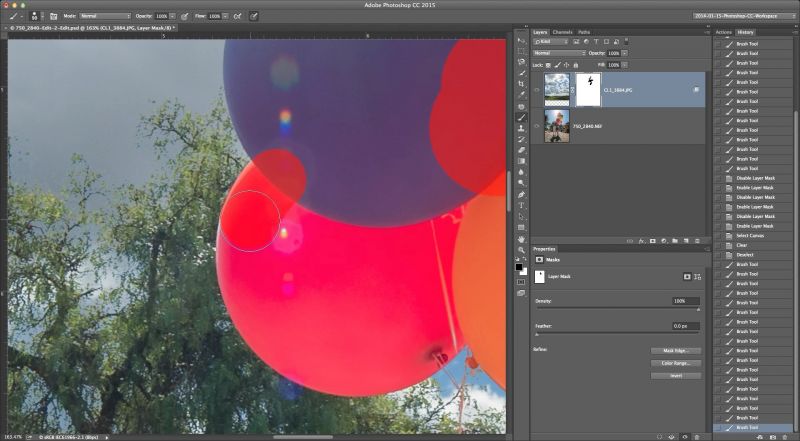
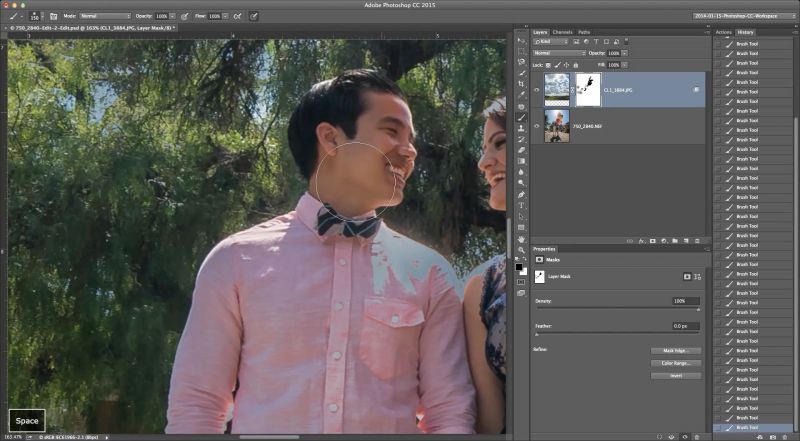
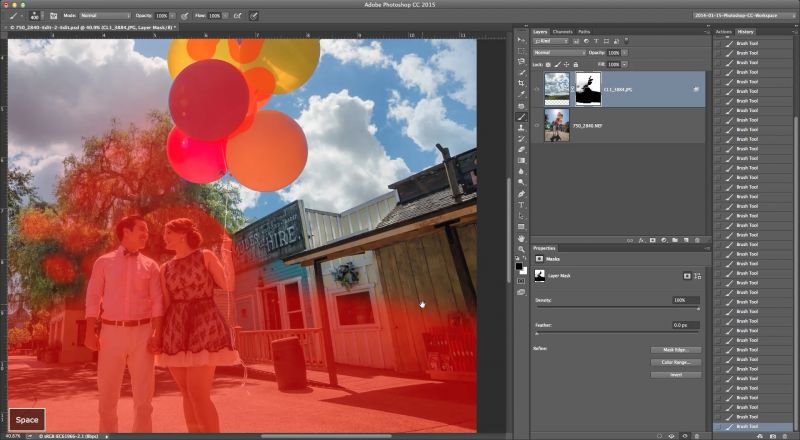
STEP 6 | CLEAN UP CLOUD LAYER
Sometimes when focusing on getting the Blend If process perfect for one area, (like trees) it can cause another area to actually mask / hide too much of the clouds other areas. This sometimes occurs in the top corners of an image, especially if there is heavy, un-corrected vignetting from your lens.
The quickest way to correct this is to brush these problem areas back in manually. First, duplicate the cloud layer by hitting CMD/CTRL-J. This will create a copy of the cloud layer, including its mask and Blend If settings. The Blend If settings are what created the problem in the first place, so be sure to reset them. To do this, right-click on the second cloud layer, click on Blending Options, and then drag the black tab of the Underlying Layer slider back to the left.
Next, create a new mask for this un-blended layer, and invert it to black by selecting the mask and hitting CMD/CTRL-I. Now, you can use a white brush to reveal the second cloud layer, just in the top corners, and create a perfectly blended image.
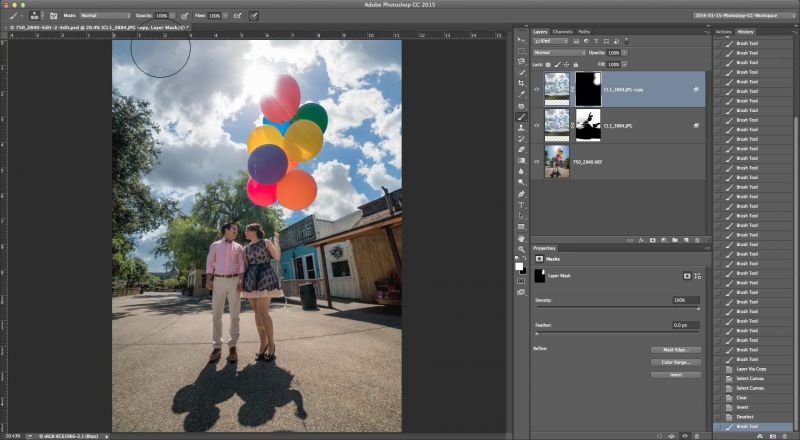
Once the image is finished, consider a final boost in contrast or exposure to the PSD or TIF in Lightroom.
Related Articles to Layer Mask Definition
How to Create Clouds in Photoshop
Clouds are one of nature’s most breathtaking and awe-inspiring displays. They come in all shapes and sizes, and their constantly…
Photoshop Tips | Advanced Hair Masking
It’s not as difficult as you think, and this shows how.
How Much Do You Know About Masking In Photoshop? You May Be Surprised
If you don’t fully understand masking in Photoshop, then you don’t fully understand Photoshop. Seriously, if you don’t know all of these techniques, then you are missing some significant knowledge from your editing arsenal.


Get Connected!