
Softboxes are an essential tool in photography, allowing photographers to control the direction and intensity of light, resulting in a more professional and polished image. Whether you are a portrait photographer, product photographer, or headshot photographer, knowing how to use a softbox is critical to achieving the desired results. In this article, we will explore common lighting techniques, different types of softboxes, and how to use them in various types of photography.
Understanding Lighting Techniques
Before diving into softboxes, it’s important to understand basic lighting terminology and techniques. There are three types of lighting setups:
- The key light is the primary source of light and provides the main illumination of the subject.
- The fill light is used to fill in the shadows and provide even lighting.
- The back light, also known as a hair light, is positioned behind the subject to create separation from the background and add depth to the image.
Choosing the Right Softbox
There are different types of softboxes, including rectangular, octagonal, and strip softboxes of varying sizes. Each has its own advantages, and choosing the right type depends on the specific photography needs. When selecting a softbox, it’s essential to consider the size, which should be proportionate to the size of the subject, and the light source, which can be either strobes or continuous lights.
A manageable size and weight are important if you’re an on location photographer, such as a wedding or event photographer. The portability factor is less important for studio photography, such as in-studio fashion and headshot photography.
How to Use a Softbox
A staple in many lighting kits, the softbox is versatile and flattering, widely used, especially in the glamorous world of portrait and fashion photography. This light shaping tool will give you wide diffused light and can be used in many different ways. Most photographers use the softbox the same way, but the video below seeks to show you that you can be more creative with your softboxes.
Profoto challenged fashion and beauty photographer Andrea Belluso to “Think Outside Of The Softbox,” and come up with four creative ways to use the popular modifier. In the 7-minute video, Belluso sets up these four different fashion photography shots with different light setups using softboxes.
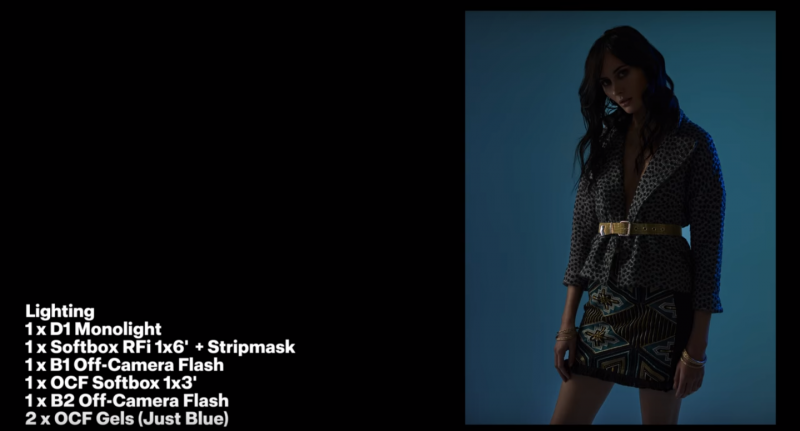
Softbox as Silhouette Light
- Side Light: Profoto B1, OCF 1×3 Softbox with a blue gel
- Main Light: Profoto D1, 1×6′ RFi Strip Softbox
- Background: Profoto B2 with blue gel
In this first setup, Belluso uses two softboxes – one large and one small – to create a silhouette. The large softbox (key light) will create a much softer light, and he adds a strip mask to narrow the light spread. The second softbox (side light) is smaller, and therefore will be more focused. He also adds an additional strobe in the background with a blue gel so that it will be balanced with the Key Light, which also has a blue gel, so both softboxes create a rim light on both sides, giving the image a more creative look.

SoftBox As Hard Light
Typically a softbox is used to soften light, hence the name, but in this setup, Belluso demonstrates how to use a softbox to get a very hard light by placing it far from the model. This makes the light source smaller which makes the edges of the shadows sharper and more defined. He then takes off both the internal and external diffusers and places the second B1 in the background with a gel.

SoftBox As Top Light
- Top Light: Profoto D1 Monolight with RFi 3×4′ Softbox with soft grid
- Background: Profoto B1 with OCF Gel
Belluso uses an RFi Softbox for this third shot, which has a recessed edge which helps control the light spread. A lavender gel is then used on the background B1 and Belluso shoots from the floor, using the lights to create a melancholic mood with heavy shadows.

Softbox With Cage
- Background: Profoto D1 Monolight with 4×6 RFi Softbox
- Side Light: Profoto B1 with gel
In the final setup, Belluso builds a cage to place in the background. The background is the main light source in this shot and it is bouncing inside the cage, made of polystyrene. No direct light is on the model creating a very soft light as it reflects back onto her. A side light is placed with a gel to add to the mood and cast some color onto the image while a diffusing panel is used in front of the softbox to clean up the background.
See more from Andrea Belluso on his website here and more from Profoto here.
Softbox as a White Backdrop
Shooting against a white background is usually a safe bet for headshots. It’s clean, simple, and makes cutting out your subject and placing them over another background in Photoshop fairly simple. The downside, of course, is actually have to set up a white seamless backdrop. Typically, setting up seamless paper on background stands takes up a lot of space and honestly, can take a lot of time and effort that you might not have when in the field. So, what’s one to do if they need to shoot in front of a white background, but don’t have the space or time? Bust out a large softbox!
In the Adorama video below, Gavin Hoey shows you how to use a softbox create a clean white backdrop for headshots while in a small space.
Gavin keeps it simple with a very large square softbox behind his subject, metered one stop above his main light to create an all white background. From there, it’s just simple lighting with a main light in a octabox, camera right, about 45 degrees to the subject and metered for f/11, giving Gavin the depth of field that he wanted. This creates a simple white background, and great lighting for his subject.

Now, you might think he did some crazy Photoshop magic to achieve the final image, but honestly he didn’t. To achieve an all white background using a RAW file, he increased his white levels, making sure the background was indeed pure white. Next, he cropped the image tightly and finally, he converted the image to black and white, making contrast adjustments to suit his taste. Simple and beautiful!
Softbox Accessories
Next, let’s discuss the various softbox accessories that photographers can use to shape the light. The best video on this topic is by Karl Taylor and Urs Recher, who put together a video on how to use Broncolor soft box modifiers. The model is lit with two lights, a 75cm octabox which is situated camera right of the subject and a 30 x 120cm strip box on camera left to provide a kick of light.
Soft Grid Accessory
Next, Karl attaches a soft grid to the octabox to demonstrate the changes made with one simple accessory. The light becomes just a bit more harsh and contrasty, and spill on the background is cut significantly. Soft grids are a great investment for photographers who shoot in small spaces because, in a larger space, one could simply move the subject farther from the background to eliminate spill, but in a small space where you don’t have that option, grids will do the job.
‘Third’ Diffuser Accessory
The next evolution in the lighting demo is used primarily for shiny objects. It’s a “third diffuser” that attaches to the outside of the soft box with a gap between the third diffuser’s surface and the softbox’s surface. It has a sharper, cleaner edge for a more pleasing and professional looking reflection in objects. Since it adds another layer between the light and subject, about 1/3 of a stop more power is needed to maintain the same exposure.
Karl has the model put on some sunglasses to illustrate the effect of this accessory and then goes back to the original setup for one shot. After, he puts on the third diffuser for comparison. In the sunglasses we see a crisper, cleaner reflection with the addition of the third diffuser.

Edge Mask Accessory
The last modifier exhibited is called an Edge Mask. It is a mask that goes over the front of a rectangle soft box and creates a dark field, in this case large enough to become both the background and a light source for a model. The center of the soft box is black, which becomes the background, and all the way around the soft box there is an edge where the light can shine through and provide a rim light. Finally the octabox key is reintroduced and we have a portrait on black with a rim light which uses only two lights and no actual backdrop. Karl mentions that exchanging the soft octabox for a point light source would be more of a fashion look.

The Edge Mask is also great for product photography in that it is essentially a ready-made dark field set-up for accentuating the edges of a product dramatically.
If Broncolor isn’t in the budget there are more affordable alternatives. Most manufacturers have some sort of medium octabox and strip box. The edge mask is easy to create using black foam core and a soft box. There are also third party modifiers available with interchangeable mounts to match different strobes which are a very affordable option.
As always, Karl has a bevy of great videos that are both informative and easy to digest, so check out more from Karl Taylor here.
Conclusion
Using a softbox is an excellent way to achieve professional-quality images in portrait photography, product photography, and headshot photography. By understanding lighting techniques, choosing the right softbox, and experimenting with different setups, photographers can create stunning images that capture the essence of the subject. Remember to be patient, practice, and experiment to find the perfect setup for your specific needs. With time and effort, the results will be worth it.


Get Connected!