First off, we’re giving one away! Click here to Enter our Sony a99 Giveaway!
The feedback from my Extensive Field Review on the Sony A99 has been tremendous, to say the least, and so I thought I follow it up with a short post on the studio test that I did with my make-shift still life set from my hotel room in Carmel. I believe that on top of the images that I have in my review, this short test will reveal a quite a bit about the ISO performance of the Sony A99.
White Balance and Color Checker Accuracy
The lighting that I used for this test was nothing more than a tungsten bulb. According to Lightroom 4, the Tungsten White Balance (WB) preset on the Sony A99 is set at 2700K color temperature with a +1 on Green-Red tint. This is how the X-Rite Color Checker looks under the Tungsten WB preset.
![Test Default-Tungsten-WB-SLRLounge-[M1295]-Sony-A99 Test Default-Tungsten-WB-SLRLounge-[M1295]-Sony-A99](https://cloudfront.slrlounge.com/wp-content/uploads/2012/10/Test-Default-Tungsten-WB-SLRLounge-M1295-Sony-A99.jpg)
At first glance, it looks like that under this tungsten light, the A99’s Tungsten preset is a little warm, so I used Lightroom 4’s White Balance eyedropper on the neutral gray square under the yellow square on the bottom half of the Color Checker. The temperature went from 2700K to 2450K. The Green-Red tint stayed the same at +1.
![Test Tungsten-vs-WB-Eyedropper-SLRLounge-[M1295]-Sony-A99 Test Tungsten-vs-WB-Eyedropper-SLRLounge-[M1295]-Sony-A99](https://cloudfront.slrlounge.com/wp-content/uploads/2012/10/Test-Tungsten-vs-WB-Eyedropper-SLRLounge-M1295-Sony-A99.jpg)
If you have read my review on the X-Rite Color Checker Passport, then you may recall that you can use the Color Checker to not only check the accuracy of the white balance, but to also see how each camera interprets individual colors. As you can see from the before and after image below, the A99 is fairly accurate. There is a noticeable shift in some of the blues (Column 1/Row 3, Column 2/Row 2, Column 6/Row 3), as well as the marble countertop behind the Color Checker.
![Test Tungsten-vs-ColorChecker-SLRLounge-[M1295]-Sony-A99 Test Tungsten-vs-ColorChecker-SLRLounge-[M1295]-Sony-A99](https://cloudfront.slrlounge.com/wp-content/uploads/2012/10/Test-Tungsten-vs-ColorChecker-SLRLounge-M1295-Sony-A99.jpg)
Now, if we compare the picture above after the WB has been corrected by the eye dropper, we get the image below. The temperature is 2450K for both, but the Color Checker version has a +5 on the Green-Red tint versus the original +1 tint. There is still a color shift in the deeper blue color, but the change in color for the marble top is less pronounced. It looks that based on this test, just by correcting for white balance in Lightroom 4 you can get very accurate colors on the Sony A99 that is fairly close to the calibrated colors from Color Checker Passport profile.
![Test WB-Eyedropper-vs-ColorChecker+Eyedropper-SLRLounge-[M1295]-Sony-A99 Test WB-Eyedropper-vs-ColorChecker+Eyedropper-SLRLounge-[M1295]-Sony-A99](https://cloudfront.slrlounge.com/wp-content/uploads/2012/10/Test-WB-Eyedropper-vs-ColorChecker+Eyedropper-SLRLounge-M1295-Sony-A99.jpg)
Here is the comparison image with all four variations side-by-side. You can also click on the links below to see each variation in full-size resolution.
Tungsten Preset corrected with Lightroom 4 WB eye dropper
Tungsten Preset corrected with X-Rite Color Checker Passport
Tungsten Preset corrected with both Color Checker and LR4 WB eye dropper
ISO Studio Test
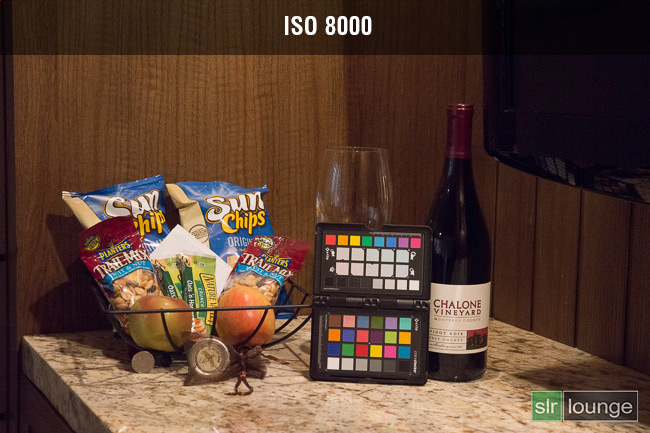
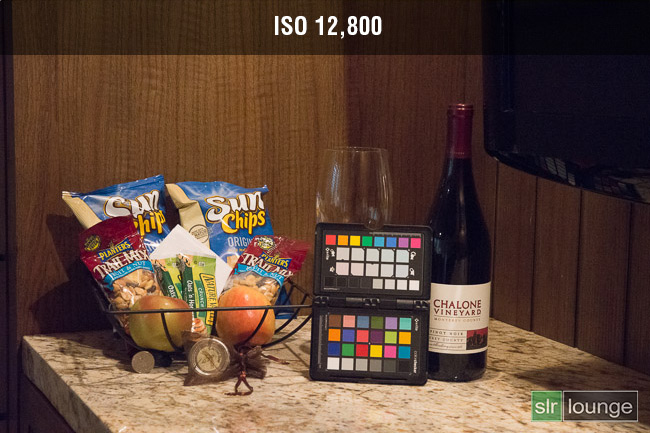
Ok, so now that we know that the A99 is capable of capturing really accurate colors, let’s see what happen when we go through its ISO range from ISO50 to ISO25, 600. You can also click on each image to see the full-size resolution.
The low ISOs are clean and very much in line with any professional-spec full-frame sensor in this price range. If you worry about any noise issue that may have been present because of the semi-translucent mirror, I think you can rest easy.
Although signs of noise start to come in around ISO 1600, it is well controlled even up to ISO6400. The wood grain in the shadow of the basket has lost detail at 6400, though. As demonstrated with my low-light, high-ISO photos from my Sony A99 review, the A99 performs well in real life environment even up to ISO6400. Color looks accurate until around ISO8000, as well.
ISO12, 800, when shrunk down for web-size images, is still pretty good. ISO25, 600, however, should be reserved for extreme low-light situations because at this point, color accuracy and noise control is pretty much out the door.
Overall, except for the most habitual pixel peeper, most photographers should be satisfied enough with the performance of the A99 even in low light. In low ISOs, there is no question that the A99 is a high-end full-frame camera.
Here are some 100% screen-grabs for some more direct comparisons.


So folks, what do you think of the A99 performance in this ISO Studio Test? Don’t forget to check out my extensive field review of the A99!


Get Connected!