
The following is a sponsored education post.
You love that beautiful twilight blue, but it’s only available to you for a fraction of the day. In less than two minutes, we’ll show you how to create that look at any time of day.
Click to Subscribe!
It’s all possible with one simple lighting modifier and a little creativity. Here’s the gear you’ll need to create this look:
On-Camera Flash: ideally you want to invest in an on-camera flash that has an in-built trigger system. Pocket wizards will also work but in order to cut down on gear consider converting to a wireless trigger system. In this tutorial we use a Canon Speedlite 600EX-RT on-camera to trigger our off-camera flashes (also Canon 600s).
Light stand: We suggest investing in high quality light stands for longevity and durability. Our all-time favorite is the Manfrotto Black Nano Stand that extends up to 60″.
CTO Gel: The effect we are going for requires us to find a balance between the creative color temperature we choose to dial in-camera and the color of our added light. We love using the MagGels specifically because they are easy to swap out and build upon if you need a higher concentration of orange or blue.
Now, let’s break down the process into three simple steps:
step one: underexpose & dial in white balance
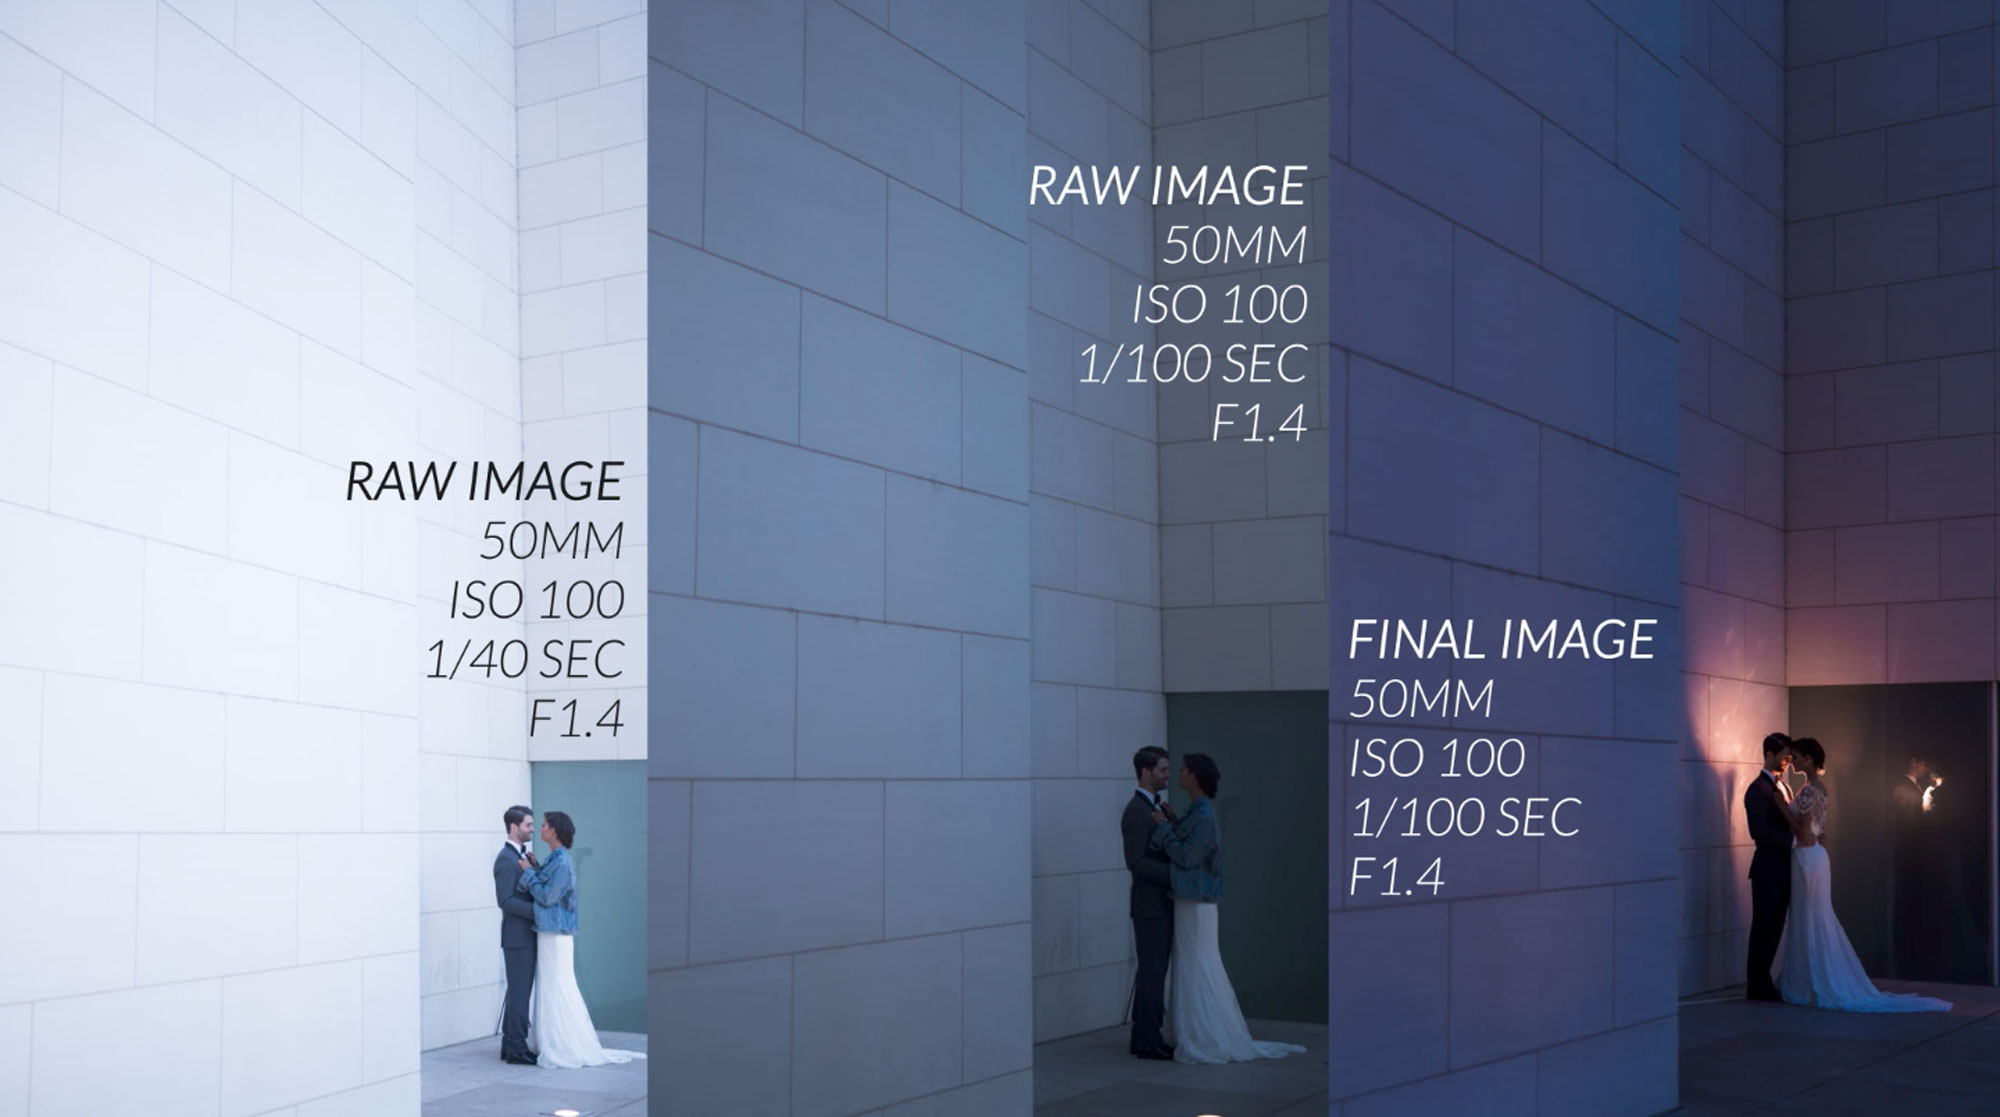
The goal here is drama and our first step in creating a more dramatically lit image is to underexpose our background. Since our shutter speed must be at 1/200th of a second or slower (due to flash sync speed), we need to adjust our ISO and aperture to arrive at the proper exposure for our scene.
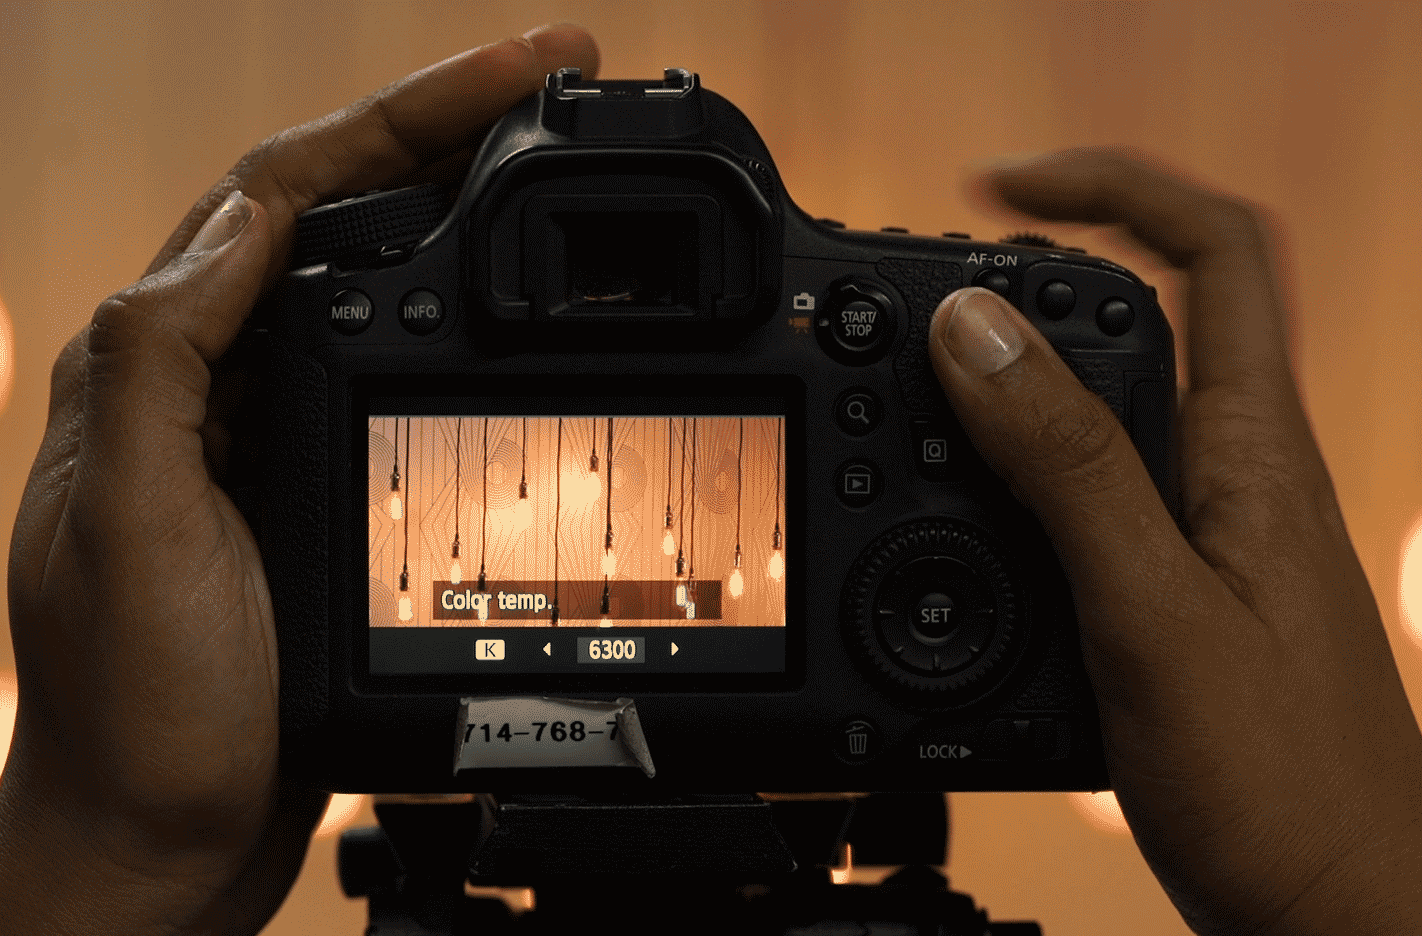
Then set your white balance to 3600K as a rough starting point and adjust if you want your image to be warmer or cooler. Remember that the lower the Kelvin number, the cooler the temperature of the image.
[REWIND: How To Create Better Reception Photos With Your Flash]
step two: position your flash & add a gel

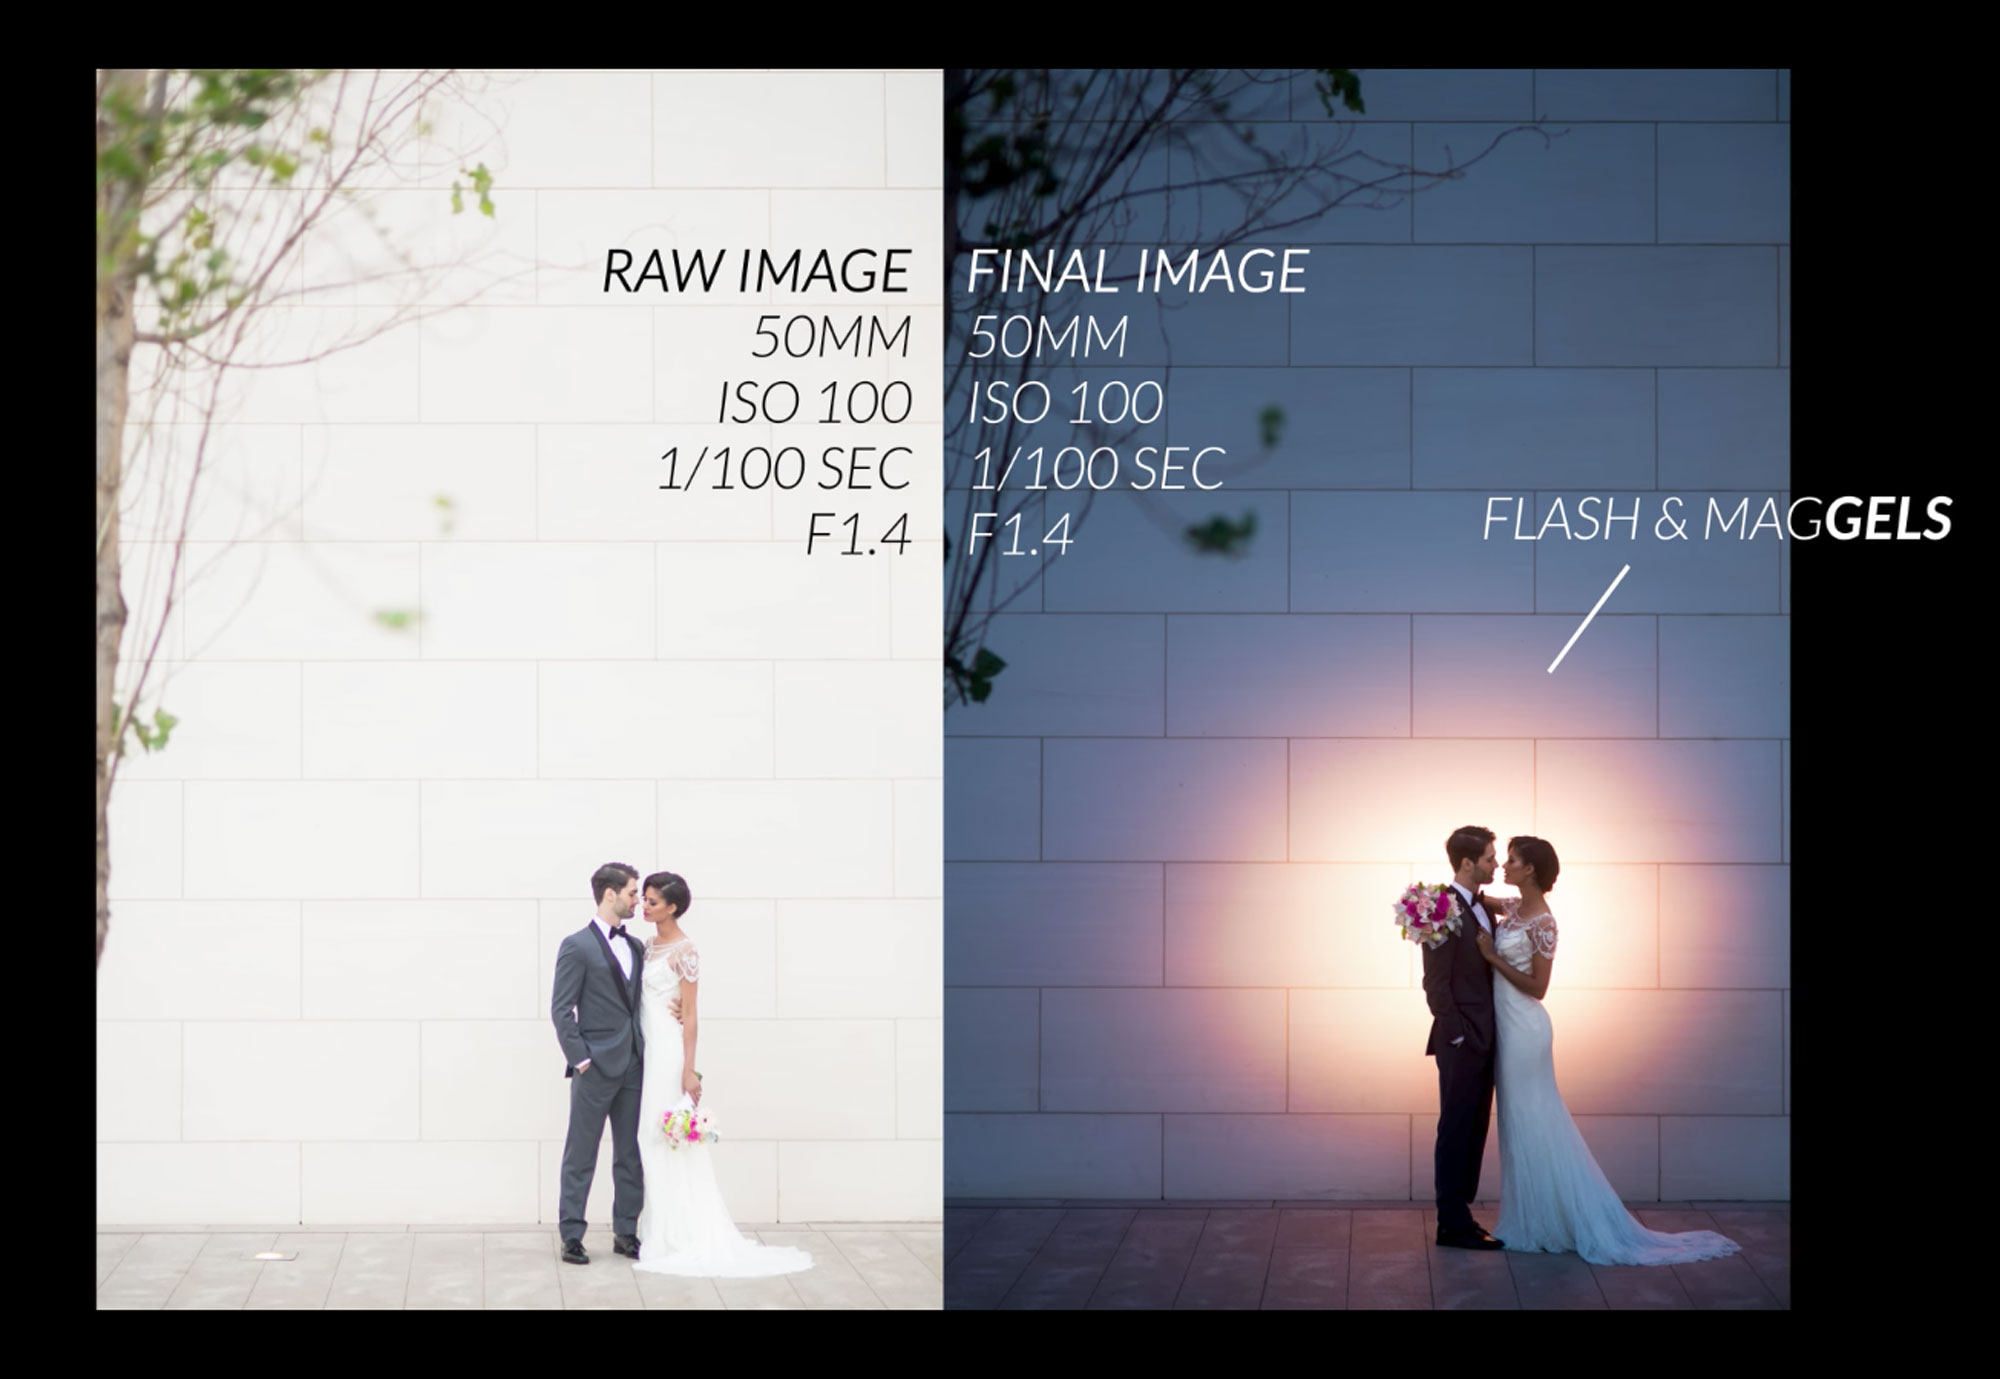
Adding a full CTO (color temperature orange) MagGel to your flash now helps you creatively alter the white balance in your scene since it works in opposition with the camera’s cooler white balance temperature. In this scene we are using the flash to backlight our couple so we placed the flash behind them and pointed it at the wall. Position your flash depending on the type of image you are trying to achieve.
step three: adjust the flash power

To achieve the look of twilight or nighttime during the day, you’ll need to adjust your flash power to portray that ambiance. A rough starting point is at 1/4th flash power since your ambient exposure is so dark, you can then adjust accordingly from there. You can see the progression in the photo above taken during our latest Premium release, Wedding Workshop: Photographing The Couple.
Join Premium
For more tips & tricks join the Magmod and SLRL Photography Community on Facebook and learn more about these incredible lighting modifiers here!
It’s all possible with one simple lighting modifier and a little creativity. Here’s the gear you’ll need to create this look:
On-Camera Flash: ideally you want to invest in an on-camera flash that has an in-built trigger system. Pocket wizards will also work but in order to cut down on gear consider converting to a wireless trigger system. In this tutorial we use a Canon Speedlite 600EX-RT on-camera to trigger our off-camera flashes (also Canon 600s).
Light stand: We suggest investing in high quality light stands for longevity and durability. Our all-time favorite is the Manfrotto Black Nano Stand that extends up to 60″.
CTO Gel: The effect we are going for requires us to find a balance between the creative color temperature we choose to dial in-camera and the color of our added light. We love using the MagGels specifically because they are easy to swap out and build upon if you need a higher concentration of orange or blue.
Now, let’s break down the process into three simple steps:
step one: underexpose & dial in white balance
The goal here is drama and our first step in creating a more dramatically lit image is to underexpose our background. Since our shutter speed must be at 1/200th of a second or slower (due to flash sync speed), we need to adjust our ISO and aperture to arrive at the proper exposure for our scene.
Then set your white balance to 3600K as a rough starting point and adjust if you want your image to be warmer or cooler. Remember that the lower the Kelvin number, the cooler the temperature of the image.
[REWIND: How To Create Better Reception Photos With Your Flash]
step two: position your flash & add a gel
Adding a full CTO (color temperature orange) MagGel to your flash now helps you creatively alter the white balance in your scene since it works in opposition with the camera’s cooler white balance temperature. In this scene we are using the flash to backlight our couple so we placed the flash behind them and pointed it at the wall. Position your flash depending on the type of image you are trying to achieve.
step three: adjust the flash power
To achieve the look of twilight or nighttime during the day, you’ll need to adjust your flash power to portray that ambiance. A rough starting point is at 1/4th flash power since your ambient exposure is so dark, you can then adjust accordingly from there. You can see the progression in the photo above taken during our latest Premium release, Wedding Workshop: Photographing The Couple.
Join PremiumFor more tips & tricks join the Magmod and SLRL Photography Community on Facebook and learn more about these incredible lighting modifiers here!


Get Connected!