If you’ve never seen a total solar eclipse before, and if you’re lucky enough to be in the path of totality this coming April 8th, then you are in for a real treat! A total solar eclipse is one of nature’s most breathtaking events, and it is absolutely worth the effort just to witness it. In this article, we are going to discuss how to photograph a solar eclipse, for those who are ambitious enough to attempt such a goal!

In this complete guide, I will cover everything you need to know, from the camera gear and settings, extremely important safety precautions, and of course the creative thought process and inspiration.
First and foremost, however, I want to recommend one thing: Aside from safety, the most important thing you can do is to just make sure you enjoy the eclipse itself. Don’t spend the entire time with your face glued to your camera! If the moment arrives and for any reason you find yourself flustered with your camera settings, just remember to sit back, relax, soak in the moment, and don’t worry about capturing the perfect image.
Of course, this article should provide everything you need to ensure that doesn’t happen. If you follow these guidelines, you’ll be able to accomplish the ambitious goal of not only enjoying the experience, but also documenting it in stunning detail.
How To Photograph A Solar Eclipse | Camera Gear You’ll Need

If you’re just now reading this guide with only a few weeks or days left before the eclipse, then you probably will be glad to hear this good news: It doesn’t matter what camera or lens you have; they’ll all do the job just fine!
There are a few things that are actually important, however, but they’re very simple: You’ll want to use a big, heavy, sturdy tripod, and you’ll want a dedicated solar filter. (No, a regular ND filter is not acceptable! More on this next…)
WARNING: DO NOT LOOK AT THE SUN! (Use SAFE solar filters & glasses)

First and foremost, I must admonish everyone with this obvious yet very necessary disclaimer: DO NOT assume you can get away with “just glancing” at the sun a little bit here and there! Not with sunglasses on, nor with an ordinary ND filter on your camera lens. Just don’t do it. Either use your dedicated solar glasses, and/or a solar filter on your camera, …or just don’t look at the sun, PERIOD. Even during the last minute before totality, when the sun is just a small crescent behind the moon, your eyes can still be permanently damaged. So, do not look at the sun!
Do Not Use a Regular ND Filter To Photograph The Sun!

This requires additional clarification, indeed: it is NOT SAFE to substitute a very dark ND filter instead of a dedicated solar filter. Even a 10-stop ND filter, which might make it seem as if it does “not hurt your eyes” to look at the sun, …will still cause SERIOUS INJURY to your eyes; it merely does so with less initial pain and suffering.
This is because only a legitimate solar filter has the adequate UV ray (ultraviolet RADIATION) protection necessary to actually block the sun’s most harmful rays. All other types of ND filters merely darken the light level in general; they’re not doing anything to block the harmful stuff.
NOTE: in fact, looking at the sun with a regular ND filter will likely cause WORSE damage to your retinas. This is because the darkening effect of the ND is causing your eye’s iris to open up more, because of the dimmer environment, which will in turn allow even more UV rays to penetrate into your retinas. You will, quite literally, fry your eyeballs.
Make no mistake: there is the very real risk of permanent eye injury, permanent damage to your vision, even blindness.
So, as I said earlier, either use correct solar glasses, or don’t look at the sun at all, or point a camera at the sun, until the exact moment of eclipse totality.
Set Up Your Camera Ahead Of Time (Sit Back And Enjoy The Eclipse!)

With those disclaimers out of the way, I do want to strongly encourage everyone to make photo/video capture their second priority. Your first priority should be to actually enjoy the eclipse with your own two eyes, whether through solar glasses before/after, or with the naked eye during totality.
It’s an absolutely magical experience, and you’ll regret it if you spend the entire time with your face/eye glued to a digital LCD screen. So, first and foremost, do this: Click your photos, and then sit back and enjoy the eclipse.
We’ll get more into this later, but, the best way to do this is to completely set up your camera head of time, and be so well-prepared that all you have to do is hit the shutter on your camera (or, preferably, a remote release or self-timer) …so that you are barely distracted at all.
As the saying goes, “experience your first eclipse; photograph your second eclipse…” …personally, I opted for a more ambitious goal in 2017 when I photographed my first eclipse; I collaborated with four other friends so that we could collectively have a dozen different cameras running simultaneously, with minimal distraction from the eclipse itself. We set up wide-angle time-lapse cameras well ahead of time, and mostly just let them run during the moment of totality, with a bit of tweaking to exposure compensation (EV comp) during totality. Then, we also ran a few cameras with telephoto lenses, again doing as much as we could to set them up well in advance, and make minimal adjustments during totality itself.
What Is The Best Lens For A Solar Eclipse? (Hint: ANY Lens!)

The biggest question I’ve been asked is (spoiler alert!) …not actually the most important one. That is, “what lens do I need?” The answer to this question might be disappointing: virtually any lens, and any focal length, is useful!
Simply put, a total solar eclipse can look stunning whether you are using an ultra-wide focal length, or a 500mm or longer super-telephoto lens. It all depends on what creative inspiration you are feeling, and what your options are as far as a general location/surroundings. (More on this later…)
Solar Eclipse With an Ultra-Wide Lens

Although the 2024 solar eclipse will take place rather high in the sky, it can still be interesting to capture an ultra-wide image of the entire scene. Any wide-angle focal length will do, but an ultra-wide lens such as a 16-35mm, 14-24mm, or even 12-24mm etc. will all give you excellent creative opportunities.
If you have a specific scene in mind, then you may need to look up the exact angle of view that your widest lens offers, and consider the angle (above the horizon) that the eclipse will take place at your particular location.
For me, a 12mm focal length (on full-frame) was just barely enough to frame this 2017 photo, as the eclipse was rather high in the sky, and I wanted a sweeping view of a lake that included a relatively low-angle foreground.
NOTE: Many folks who photograph such astronomical events will choose to “augment” the size of the sun/moon in the frame, that is, use Photoshop to make it appear larger than it actually is. Personally, I choose not to do this because I actually prefer to always see celestial objects with their correct scale relative to the landscape scene that I’m photographing them in. This is a personal, subjective & creative decision, but I believe that part of the impact of PHOTOGRAPHY as a craft is its accuracy in documenting real-world events, and this admittedly limits my “creative liberty” which I am totally okay with.

Alternatively, the above 14mm angle of view ended up being rather tight, due to the foreground positioning, and I would have liked to capture a panoramic view. However, doing that much work (creating a panorama, moving the camera and capturing bracketed sequences) …is strongly DISCOURAGED for most photographers, including myself; I’d much rather just sit back and enjoy the eclipse…)
Do You Need A Solar Filter For Ultra-Wide Solar Eclipse Photos?
Here is where I must say, “do as I say, not as I do!” …because I’ve captured many wide-angle photos with the sun in the frame, including hours-long time-lapse photos where the sun could have potentially burned the camera and/or lens. I got away with doing something that is absolutely NOT advisable.
How did I get away with this? Usually, it was because I was only pointing the camera at the sun for a fleeting moment, and/or because I was using an extremely wide-angle lens such as 14mm or 12mm. (On a full-frame camera…) Anything less wide, even just 20mm or 24mm (full-frame) …and I would have been significantly more cautious.
So, can you get away with this type of risky behavior too? I can’t say yes, but, …wink wink… Just make sure your camera gear is insured. And also, if you’ve rented a camera or lens, keep in mind that they’ve probably made specific and clear EXCLUSIONS for solar eclipse damage, for obvious reasons.
So, when in doubt, either don’t do this at all, or practice extreme caution. All I can say is, I captured a 36-hour long time-lapse of the 2017 solar eclipse, including hundreds of photos with the sun directly in the image frame, and things turned out just fine. However, anything even remotely similar should be done with full knowledge of the risks you’re taking.
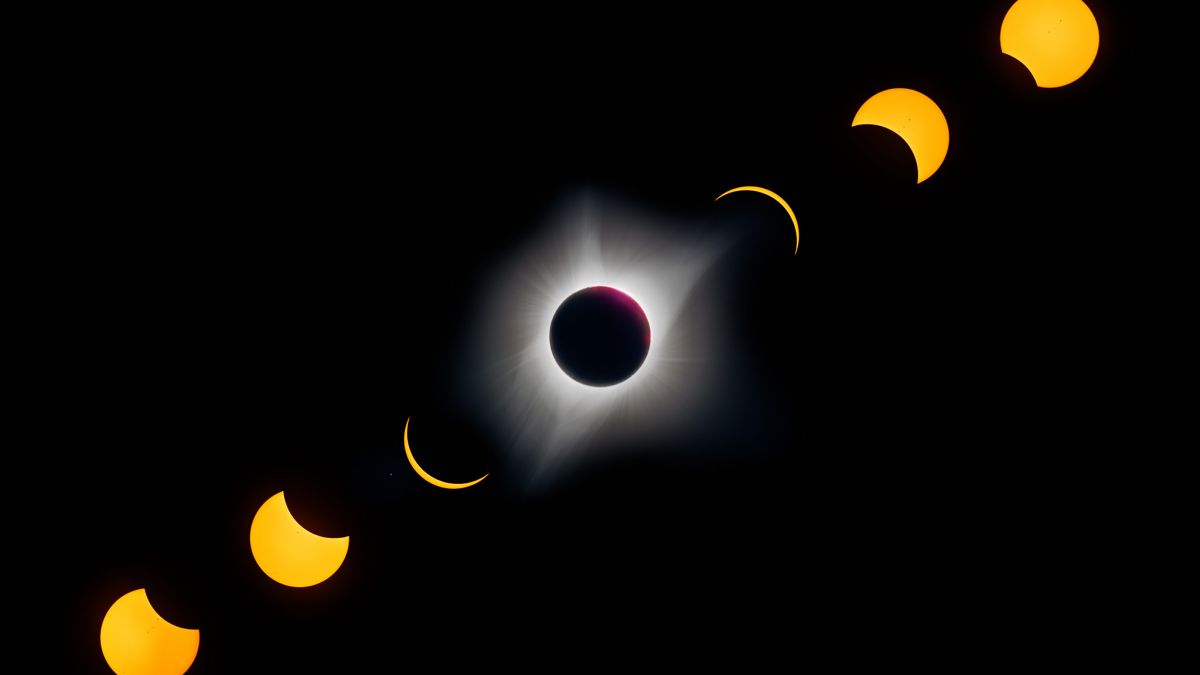
Solar Eclipse With A Super-Telephoto Lens

I’ve also photographed the total solar eclipse with various telephoto focal lengths, including 200mm, 500mm, and 1000mm. It turns out, approximately ~600mm is optimal for seeing the solar corona. Reaching all the way to 1000mm did, in fact, crop away some of the corona, as you can see above, although it was useful for capturing highly detailed images of the sun before and after totality.
All in all, if I had to choose just one focal length, it would be anything in the range of 400mm to 600mm. (Or, say, 300-400mm for APSC cameras, or 200-400mm for Micro Four Thirds sensors.)
Especially considering how common high-megapixel camera sensors are these days, especially 40-60-megapixel full-frame sensors, I don’t think it’s necessary to reach 800-1000+mm; even if you do, you’ll end up wishing you could zoom out to ~500mm for capturing the solar corona!
Whatever you do, DO NOT try and change lenses during the eclipse totality, or even zoom in/out. Get your camera set up, dial in focus, and don’t mess with it! As I said before, you should be enjoying eclipse totality first.
Do You Need A Telescope To Photograph A Solar Eclipse?
Simply put, no. Unless you’re already an astronomer with a telescope that you’re very familiar with, (and have a solar filter!) …don’t worry about it. Today’s telephoto lenses are more than good enough for a total solar eclipse. Their optics are sharp enough, and their focal lengths (zoom range, AKA “magnification”) will absolutely get you enough close-up detail. (See above…)
Do You Need An Astro-Tracker To Photograph A Solar Eclipse?
Once again, thankfully, the answer is no, not really. It is true that during totality, your shutter speed can drop pretty slow, and if you’re using a super-telephoto lens, the earth’s rotation can become a factor. For example, in the above bracketed HDR image, the slowest shutter speed was 1/4 sec, and at 1000mm that is certainly at the very edge of “getting away with it”. However, the reality is this: whatever subtle sharpness you might gain from using a tracking device is likely going to be lost to the optical aberration of daytime atmospheric turbulence, and the general lack of optimal conditions for achieving the maximum resolution of your sensor. In other words, the faint, barely visible benefits won’t be worth the potential drawbacks and complexities. So, unless you’re already an experienced astronomer who can use a tracker as second-nature, I wouldn’t recommend diving into such a challenge at the last minute.
The results you get with simple techniques outlined above and below will be more than enough to capture stunning detail at almost any focal length.
NOTE: One exception to this recommendation is, if you’re hoping to capture video of the eclipse. Depending on how long you’d like to “keep the camera rolling”, having a tracker to keep the sun perfectly framed could be absolutely necessary. However, this is an incredibly ambitious endeavor, and I would instead recommend only capturing fleeting, 5-10 second clips of video here and there, such as capturing Baily’s Beads.
How To Achieve Sharp Results At Super-Telephoto Focal Lengths (Tripods)
This topic deserves its own entire discussion, aside from lens selection. Here’s the deal: you’re going to need as big, heavy, and rock-solid of a tripod as you can find. That flimsy CF travel tripod you bought online for $99 is probably not up to the challenge of achieving tack-sharp results at telephoto focal lengths even as modest as 200mm. The slightest breeze will slash your megapixels in ½ or ¼, the slightest bump from your hands (or legs) will reverberate in the tripod legs for up to a minute, or worse.
By the time you get to 600mm or beyond, only the most burly tripods (and heads) will deliver sharp results to a 40+ megapixel camera sensor. Furthermore, I’ll strongly recommend using a fully electronic shutter, of course, as well as some form of shutter delay or external trigger, whether it is Nikon’s dedicated “exposure delay mode” (usually this can be set for up to 2-3 seconds) …or most camera’s self-timer which comes in 2 and 5-second delays.
Depending on which tripod and head you have, you’ll need to do some testing. Under normal conditions, focus on a distant object and test your setup to see which shutter release settings give you the sharpest results.
Of course, keep in mind that my topmost recommendation will be to pre-set your camera’s built-in time-lapse mode, so that you can just let it click photos on repeat (at 1-3 second intervals) for the whole time of eclipse totality, so that you can pull your face away from the camera and actually enjoy the eclipse with your own eyes.
Solar Filters

Again, I don’t want to leave any doubt whatsoever: A SOLAR FILTER IS ABSOLUTELY NECESSARY. Especially if you’re going to be using any focal length that counts as “normal”, let alone telephoto or “super-telephoto”, then you need a solar filter to protect your lens and camera.
Otherwise, you are virtually guaranteed to “fry” your camera sensor as well as the iris (aperture) of your lens. So, even just for one second, DO NOT point your camera at the sun before or after the eclipse totality.
The best option is a dedicated, hard filter for (the front of) your lens; any popular brand is adequate as long as it clearly states that it is a SOLAR filter, and not just a “10-stop ND” or “16-stop ND” filter. There are a lot of different types of ND filters out there, and unless the title clearly specifies it is “ISO certified for solar viewing”, …don’t buy it.
There are some “Universal” solar filter options that you can buy for certain odd-sized lenses or cameras, these are just the thin solar filter material which is the same as you’ll find with solar glasses. These types of filters are acceptable for some types of images, but they will definitely cause a loss of sharpness/detail if you try and use them on high-end super-telephoto lenses.
Camera Bodies
This topic will be easy: Literally any modern camera will work! All of today’s mirrorless cameras have one huge advantage built-in: that is, of course, the lack of a mirror flopping up and down, causing camera shake.
So, whatever camera you already have, if it’s mirrorless, just make sure your shutter is set to be either fully electronic, or in some rare cases with older cameras, “electronic first-curtain” shutter can offer slightly better image quality for the oldest mirrorless cameras.
If you are using a DSLR, then you’ll need to be a lot more careful. Some DSLRs offer a live view mode and/or an electronic first-curtain shutter, and many Nikon DSLRs will have a feature called “exposure delay mode” where the mirror itself flips up a few seconds before the shutter actually opens, thus reducing “mirror shock” and significantly increasing the sharpness of super-telephoto results.
(Keep in mind that this is almost a non-issue for those of you who will be capturing wide-angle landscape scenes with the eclipse!)
Interval Timers / Remote Shutter Releases

Whether you are capturing wide-angle or telephoto imagery of the solar eclipse, my strongest recommendation that goes above everything else is this: try to automate the process as best you can, and leave the camera(s) untouched so that you can actually enjoy the eclipse with your own two eyes, especially the totality itself.
If you’re creating wide-angle imagery, you should be able to get away with not worrying about filters at all, and just leaving the camera in Aperture Priority or P mode the entire time. You might need to glance at the camera for a moment during eclipse totality, and dial in just a bit of exposure compensation, but that’s it. Just set the camera up before the eclipse begins, make sure the battery and memory card are good to go, and let ‘er rip!
If you’re working with a telephoto lens, then of course you’ll absolutely need to be using a solar filter before and after eclipse totality, so as to avoid “frying” your camera sensor. Then, during totality, you’ll need to remove that solar filter, which will inevitably alter your camera’s required exposure.
If you are feeling brave, you can potentially set your camera to capture both a time-lapse and bracketed exposures. Nikon cameras in particular have the ability to use their built-in interval timer to capture multiple frames per interval, which would allow you to capture sets of 5-7 images every 3-5 seconds, for example. Just keep in mind that your camera won’t stop clicking, before, during, or after totality, and this can create a lot of stress (and inevitably at least one or two ruined bracketing sequences as you’re removing/replacing the solar filter, but that’s OK!) …If you can achieve this ambitious technical goal, then again all you may need to do is leave your camera in Aperture Priority mode, maybe also with auto-ISO on, and then just remove the solar filter at the moment of totality, and replace it a moment before totality ends.
If you’re feeling less brave and ambitious, then it’s a much more reasonable goal to merely capture a few telephoto frames of the different phases before totality, remove the solar filter for totality and capture a few bracketed frames during the first few seconds of totality, and then replace the solar filter so you can sit back and enjoy the eclipse without worrying about capturing more photo/video content.
Battery Power
It is important to note that while most cameras will be more than capable of capturing the entire day’s activities before, during, and after the eclipse, you may need to consider additional options if you’re trying to capture longer time-lapse sequences, or video footage.
The good news is that your camera’s rated battery life is meant to encompass a lot of additional activity using the camera. What this means is that if you’re just setting your interval timer and letting the camera run throughout the course of the eclipse, you’ll easily be able to capture 3-5X more photos than most cameras’ rated battery life. In my experience, even if a camera’s spec sheet says that it is rated to 300 clicks of battery life, I can easily get over 1,000 clicks out of a single battery if the camera is just running a time-lapse.
Of course, for an all-day or overnight time-lapse sequence, you’ll need some form of external battery power, so check to see if your camera either accepts direct USB power, (not just USB battery charging) …or if a “dummy battery” is required.
Memory Cards
Believe it or not, but you’ll probably fill your camera’s buffer if you’re blasting away with your shutter to capture fully bracketed raw image sequences during eclipse totality. So, while you don’t necessarily need the most expensive, blazing-fast memory cards, it’s a good idea to make sure you aren’t using an older, slower card, either. Especially with the latest 50 and 60-megapixel cameras; a bracketed sequence of 5 or 7 frames, at 14-bit lossless raw, can eat through your camera’s buffer in just a few seconds.
Just be sure to do some testing prior to the eclipse. If you discover that your memory cards aren’t fast enough to keep up with sustained clicking, you have a few options besides rushing out and buying new memory cards. Most cameras will let you set your raw files to 12-bit and/or lossy compressed, which is more than enough for fully bracketed dynamic range sequences. Nikon cameras in particular can double or even triple your buffer capacity when using 12-bit compressed NEF files, and you don’t even have to worry about reducing the actual resolution (megapixels) of your images!
Exposure Settings For a Solar Eclipse

Now we get to the really important details! A solar eclipse is a truly unique event, indeed, so it is very smart to wonder what exposure settings should be expected. Thankfully, such celestial events should have relatively identical measurements in terms of brightness, so, all we need to do is look back at past events! Unlike how every sunset and sunrise is different in terms of brightness and dynamic range, a solar eclipse is a relatively fixed, known scenario.
It is mainly important to fully understand the exposure triangle. It should be second nature to dial in your exposure, check your histogram for clipped highlights or shadows, and make any necessary fine-tuning adjustments.
Also, keep in mind that your lens’ and cameras’ constraints may be different depending on the make and model. For example, lenses these days have all kinds of fastest apertures, from f/1.4 or f2.8, to f/5.6, f/6.3, or even f/8 or f/11.
Thankfully, as I mentioned, virtually any camera and lens will be acceptable for photographing a solar eclipse, because everything will fall within a reasonable range in terms of both aperture and ISO.
Here are the exposure settings for various images that you might want to capture. Keep in mind that depending on the ND rating of the solar filter you’re using, you might need to vary these exposure settings by quite a bit:
With a Solar Filter, With a Telephoto Lens, Before/After Eclipse Totality:
1/60 sec, f/11, ISO 400 (Solar surface detail, single exposure)
Without a Solar Filter, With a Telephoto Lens, During Eclipse Totality:
1/4000 sec, f/11, ISO 100 (Baily’s Beads, single exposure)
1/1000 to 1/4000 sec, f/11, ISO 1600 (Solar Corona, darkest exposures of a 5-EV bracket sequence)
1/4 sec to 1/250 sec, f/11, ISO 1600 (Solar Corona, brightest exposures of a 5-EV bracket sequence)
For the Solar Corona, if I had to choose just ONE exposure to keep things simple, it would be 1/500 sec, f/11, ISO 1600. Of course, if your lens offers a faster aperture without compromising sharpness, then the aperture could be opened up from f/11 and the ISO could be dropped accordingly, to increase the level of dynamic range in the single exposure. So, for example, 1/500 sec, f/5.6, ISO 400.
Without a Solar Filter, With a Wide-Angle Lens, Before/After Eclipse Totality:
1/100 sec, f/8, ISO 100 (Darkest exposure of a 5-EV bracket sequence)
1/3 sec, f/8, ISO 100 (Brightest exposure of a 5-EV bracket sequence)
Without a Solar Filter, With a Wide-Angle Lens, During Eclipse Totality:
1/15 sec, f/11, ISO 100 (Darkest exposure of a bracket sequence)
1 sec, f/11, ISO 100 (Brightest exposure of a bracket sequence)
Use Maximum Exposure Bracketing

A single exposure from any modern digital camera will give you more than enough detail in your highlights and shadows, in most scenarios. However, a solar eclipse is a truly impressive phenomenon, and if you want to capture the incredible dynamic range of a bright solar corona to the faint shadowy detail of the moon itself, (if you’re lucky!) then bracketing will be very helpful.
Also, bracketing will be useful for wide-angle images, if you wish to capture detail of a foreground and yet also not completely blow out the highlights of the eclipse.
Can You Photograph The Solar Eclipse With a Phone Camera?
Yes, however, don’t expect to get high-quality close-up photos, unless you have a super-telephoto add-on lens. Even then, the level of detail captured will only be good enough for social media. This may be more than enough for most viewers, of course, who don’t plan to make a large physical print of their imagery.
As with the rest of the advice given here; if you’re using an add-on lens for your camera phone, look for a telephoto lens focal length equivalent that is at least 200-300mm, or preferably in the range of 400-600mm.
Avoid iPhone / Android phone add-on lenses that omit a focal length equivalent spec and just have a “2X” or “4X” magnification; this is a relatively meaningless spec, and also, it’s probably just not good enough anyways…
Create A Time-Lapse Of The Solar Eclipse

The ultimate way to sit back and just enjoy the eclipse, in my opinion, is to completely reconsider your goals. This can greatly depend on your creative inspiration, (which we’ll get to next) …but here’s the truth: setting up your camera to run a time-lapse and just leaving it alone during the entire eclipse might be your best option.

Especially if this is your first eclipse, and especially if your passion has usually been focused on wide-angle, astro-landscape imagery, and not telephoto astronomy in particular. To be totally honest: why change your style?
Creative Inspiration For A Solar Eclipse | Choosing A Location

The artistic creativity is the most exciting part of witnessing and photographing a solar eclipse! You may have only thought about capturing telephoto imagery, however, in my experience, the magical changes in your surrounding environment are the best part of the experience. For those few seconds of totality, it feels like the blue hours of dawn/dusk, from the faint stars visible in the dim sky, to the calm of the landscape and even the reactions of wildlife.
So, with that in mind, I do strongly encourage all viewers to find a serene surrounding, and to consider documenting the whole moment, even if it is just with your phone and a wide-angle video while your “actual camera” clicks telephoto images or captures telephoto video. Having said that, literally every location will undergo an amazing transformation as eclipse totality occurs, so, the creative options abound…
- A serene lake or other natural setting makes an excellent foreground.
- A vertical framing/composition is probably a little more useful than a horizontal one!
- An urban scene can provide just as many opportunities, especially if there is a skyline or any other object to juxtapose near the eclipse itself.
- Capturing images from a fixed angle, before, during, and after the eclipse, will create the opportunity for unique content.
With this being said, I’m going to assume that you only have one camera, and that one camera is likely to be set up with a telephoto lens. If this is the case, I’d simply recommend putting your phone on its own stand or tripod, and rolling some video of you and your surroundings. This will have the added benefit of forcing you to sit back and just watch the eclipse, instead of fiddling with your phone during totality…
If you’re ambitious enough to run two cameras, then the 2nd camera would be the one with a wide-angle lens, and either capturing video or photos of the entire scene. If you can’t include the eclipse itself in the frame of your image, that’s OK, it’s still wonderful to have BTS content of you enjoying the moment.
Creative Inspiration For A Solar Eclipse | Storytelling

Indeed, after the moment has passed, I can guarantee you that the most valuable photos and videos will turn out to be the “BTS” (behind the scenes) imagery of you and your loved ones enjoying the moment. I can virtually guarantee you that if we see any 2024 solar eclipse photos that win any landscape photography contests later this year, they will most likely include some sort of context, a foreground element of some kind, whether human, mountain, skyscraper, or anything, really.
But, again, I cannot stress this enough: set up as many cameras as you can, even if some of them are just phones/tablets; and then sit back and just watch. If something doesn’t turn out, but you were able to witness the moment and fully experience it, that will create a much better memory than if you spend the entire time with your face glued to your camera screen(s), and capture technically good photos of a moment you never really experienced.
So, good luck! I can’t wait to see your images!


Get Connected!