[Related Reading: The Ultimate 3-2-1 Data Workflow with the GNARBOX 2.0]
In this video tutorial, Elena Jasic is going to be demonstrating one of the most important things in photography, and that’s workflow. She’ll show you how Import, backup, and organize images using Adobe Lightroom for a successful workflow.
We’ll start off by plugging in our memory card reader, with our memory card and navigate to the images on the card as you can see right here;

Next, we are going to create a folder on the desktop by right-clicking, and going to new folder.
The folder structure we are going to be using is year/month/date followed by the client, project, location, or event name. Then we are going to create two folders within that;
- The first folder we are creating is the one that will hold all of the images. This folder is going to be called 0 – RAW
- The second folder we are going to create will hold our Lightroom catalog. This folder will be called 1 – LR

Now we are going to click on our Raw folder, navigate to our card reader, click an image, press command A to select all, and drag these images into our newly created Raw folder and then create a new Lightroom catalog.
We are going to do this by opening up Lightroom, clicking choose a different catalog, go down to create a new catalog. We are going to navigate to the Lightroom folder that we created on our desktop called 1 – LR and we’ll call this Barcelona.
Once we have created our new catalog, we are going to go to import our files.
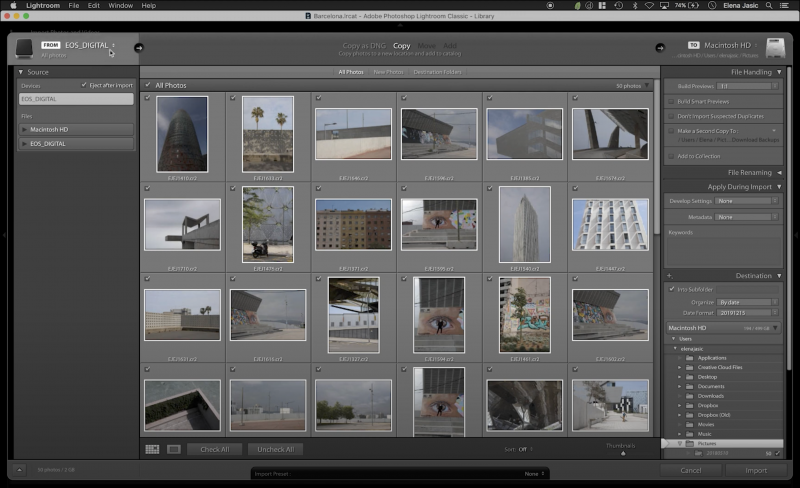
Now Navigate to the top right corner, and under “build previews”, we are going to select 1:1.
When selecting 1:1 Lightroom will render previews, standard previews, and thumbnail previews all at the same time. After we have selected build 1:1 we will go to the bottom right and select import.
Once your images have imported and rendered, go back to the desktop and we’ll show you an example of how to use a color-coding system to organize your workflow, and keep track of progress on projects.
So what I’m going to do is since these are new images I have not looked at yet, I have not sorted them, I have not color corrected them, I am going to mark this folder the color red. The color yellow would represent a project that is currently being worked on, and the color green would be a project that is finished.
The next and arguably most important thing we are going to do as a photographer is to BACK. UP. YOUR. FILES.

[Related Reading: The Ultimate Data Storage And Backup Strategy For Photographers]
If you are a hobbyist, aspiring professional, or working professional, regardless of the level of photography, it is an absolute must to back up your files.
Once we have transferred our files, we can now safely begin working on the project.

[Related Reading: How to Use Lightroom Classic and Luminar 4 Together in Your Workflow]
Once we’ve gotten the import and backup created the next thing to do is to get to work on the new image set by going through every image and check for sharpness and focus. Since we have already rendered 1:1 previews, we are now able to look at each image at 100% quickly and easily and can start culling and editing our preferred files.
And that’s it! We hope this video and write up gives you some good starting points for your own workflow and data organization. Be sure to check out the related posts for more details on backup strategy and workflow tips. Be sure to let us know in the comments below if you have any questions or suggestions for your own workflow improvements.


Get Connected!