In January, the latest iteration of Capture One, Capture One Pro 10, was released. As usual with a new release such as this, a host of new features and improvements were added; Output Proofing, new input and output sharpening tools, Halo suppression, Diffraction correction, improved performance and many more. One of the features which has had a huge impact for me, is diffraction correction and here’s why.
[RELATED: IS IT TIME TO SWITCH FROM LIGHTROOM TO CAPTURE ONE PRO? HERE’S WHY IT MIGHT BE]
What Is Diffraction?
For those that don’t know about diffraction, this is the logical place to start. For those that do, skip this section.
We shared a video from Steve Perry a little while ago but it’s the perfect explanation of diffraction. That said, if you’re anything like me, most of this stuff goes in one ear and immediately out the other; I have far more important things to remember, like film quotes, TV show plot-lines and song lyrics. For those like me, with limited free memory space, just remember this; as you stop down your aperture, your image will tend to lose sharpness. Different lenses and cameras begin to show this at different points but that’s the bare bones.
[REWIND: GUIDE TO TETHERED SHOOTING USING CAPTURE ONE PRO]
Where Is Diffraction Correction In Capture One And How Does It Work?
So now we know what diffraction is, here comes Capture One Pro to save the day. Found inside the lens correction panel (CTRL+3 / CMD+ALT+3) is the new magical tick box ‘Diffraction Correction‘. I don’t pretend to know exactly how it works but, let’s be honest, that’s not really necessary, but diffraction causes a loss of sharpness and this tick box magically improves that.

The one thing I do find quite odd is that the diffraction correction is not reliant on lens profiles. It would seem logical to assume that, as diffraction varies from lens to lens, this correction would only work with lenses that have had lens profiles added by Phase One, but that’s not the case, and it just works with any lens and all COP needs is the aperture.
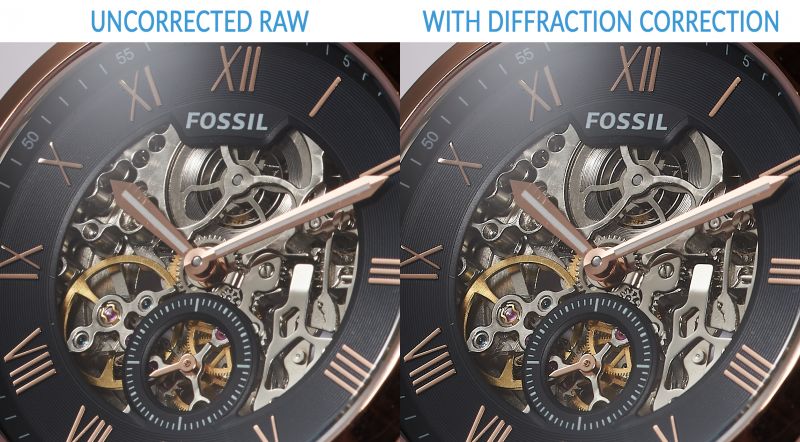
In the photo above you can see a 100% crop of a watch I recently photographed. On one side is the RAW image and on the right diffraction correction has been turned on.
Right click the image and open it in a new tab to see this at its full size. Look at the detail brought back on the mechanical elements of the watch, the grooves surrounding the face, scratches, brushed metal. It’s pretty amazing for a one-click lens correction solution.
What Are The Limitations And Why Is This So Great?
I can see some of you reading this and shrugging “and?” For those photographers that tend to take all images wide open, the bokeh hunters amongst you, this may not make a big difference to your life, but on the other hand, for product photographers like me, this has a dramatic impact. I’m often shooting large quantities of products where speed is a critical factor, and sometimes that extra stop can make the difference between having to focus stack and not.
Even if you do end up having to focus stack, by having the ability to stop down further your stacks need fewer images, which means less processing time and an easier life overall. I can’t speak for other photographers, as I primarily shoot still life (find my work here), however, I’m fairly certain this will also be a big help for landscapes and architecture.
[REWIND: THREE OF MY FAVORITE FEATURES IN CAPTURE ONE PRO]
In terms of limitations, diffraction correction is not a magic bullet. It will not bring back details which have been totally lost due to diffraction. Phase One state that it will give you roughly one extra stop. Meaning, let’s say you’d usually stop at f11 due to diffraction, now you can confidently go to f16. While one stop may not sound like much, believe me, it makes a big difference.
Final Thoughts On Capture One’s New Diffraction Correction
Wherever possible I use Helicon Focus and focus stack my images (find my review of Helicon focus here), and that method will always give you a higher quality image. That said, the difference, especially now we have this diffraction correction tool, will be negligible. For images where focus stacking is an absolute necessity no matter what aperture you’re using, this diffraction correction tool makes a big difference. I can’t tell you how happy I was the day after this was released and I saw the difference in both my images and time spent creating them.


Get Connected!