Welcome to Time Out with Tanya, where I’ve put my fast paced graphic design career on hold in favor of adventures in motherhood. I’m capturing every moment on camera, and you can come along if you’d like. Sign up for my weekly email here so you’ll never miss a Time Out.
If I learned how to do anything valuable and relevant to my photography career during my Graphic Design education, how to resize photos in Photoshop in a variety of ways and for various purposes is right up there at the top. At least when it comes to technical know-how, anyway. My design experience actually influences everything I do as a photographer. If you’ve ever wondered how to properly resize photos in Photoshop for different tasks, this is your go-to guide.
The Five Most Common Methods to Resize Photos in Photoshop
1. Crop Tool

I use the crop tool when I want to change the actual ratio of the image. For example, if it was shot at a 2:3 ratio and I want it to be square instead (a 1:1 ratio) using the crop tool is the best way to do this.

To use the crop tool, select the tool, choose a pre-set ratio from the drop box or type a custom number.

Then drag the area on the image you wish to crop. Super simple, quick, and easy. Keep in mind you might want to save a copy, so you don’t lose your original image.
2. Image Size

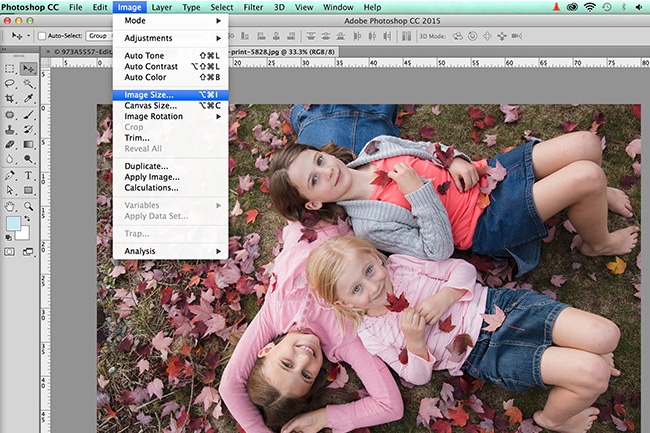
The image size dialog box is used when you need to change the pixel dimensions, usually without changing the ratio or canvas size of your image. I use this to size down my images for a website or blog. You’ll find the Image Size dialogue box under Image in the menu, or use shortcut keys Command/Option/I to pull it up.

In the dialogue box, you can enter the desired dimensions for your image. Be careful not to accidentally stretch your image here. Click the chain link icon to maintain the proper ratio. The best thing about the chain link is that it automatically does the math for you, so if you know the image needs to be 650 pixels wide, you can just enter that number and the computer will calculate the other dimension for you. Yay for no math!

Make sure you choose the proper unit of measure for your image. Pixels, inches, picas, etc. 650 inches is definitely different than 650 pixels. I used to make this mistake a lot in the past if I was in a hurry, so I wanted to make sure to point it out to you.

For the resampling box, I generally just choose Automatic. There are some preset options for you to use, depending on what you’re doing with the image. If you decide to make your images larger, keep in mind the computer will interpolate pixels for you and you might lose image quality. Depending on the final use of the image, that might not be a big deal. Billboards and large-scale graphics which will be viewed from far away can have some pixelization without anyone noticing, but if you’re sizing up a tiny image you pulled from the internet to be used as a full page magazine spread, you’re probably out of luck (that’s violating copyright laws anyway. Don’t do it!).
3. Canvas Size

Where the crop tool is generally used to crop away from an image, the canvas size tool is most often used to add more space around an image. I often use this tool when I want to expand the background of a photo. This tool will make your image larger without affecting the actual photo’s size.

The first thing you’ll want to do when expanding your canvas size is to make a copy of your layer and either hide or delete the original locked layer. This will ensure you have a transparent background when you expand the canvas. Next, select Canvas Size from the Image menu (or use shortcut keys Command/Option/C).

The first thing I do when the dialog box comes up is choose the correct anchor point in the grid box to dictate which direction I want the canvas to expand. In this case, I want the canvas to expand out to the left of my image. The arrows show the direction the image will expand. If I wanted it to expand on all four sides, I would select the middle square.
Next, enter the new dimensions of the canvas. In this case, I wanted the canvas to expand out to 40 inches wide on the left side. For the canvas extension color, choose Background if you want the background to be transparent, or you can choose other options from the drop-down menu. Here’s what the canvas looks like after it’s expanded:

Now I can add in a colored background for use behind text on a blog header or billboard or whatever. Obviously this image is way too big to be used on the internet, so after expanding the canvas I would probably crop it down or export it as a smaller size for web (see #5 below).

Beware, if you put a smaller number in the dialog box, your image will be clipped. This is why I generally only use Canvas Size to expand images. I would use Image Size to downsample an image or the Crop tool to crop out specific parts of the image.
4. Save for Web

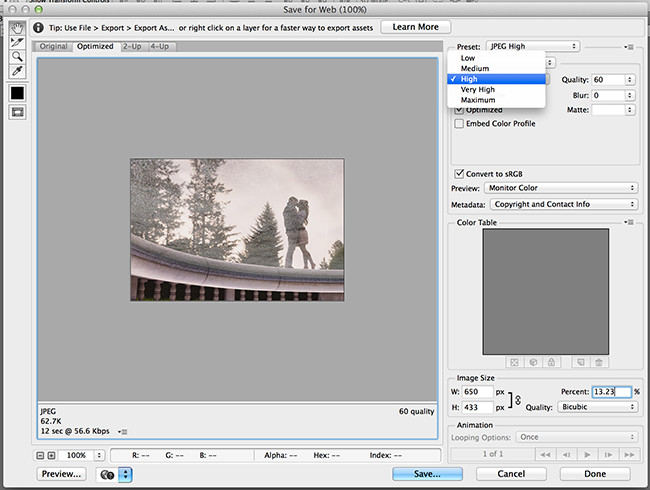
Save for Web is now labeled as a “legacy” function in Photoshop, which I’ve noticed usually means it’s a dialog that will likely be phased out in an upcoming version of the software. I still use this for exporting images for web, though. It’s super handy. You can change the size upon export without actually having to downsize your original file. Just save a new, smaller version from the Save for Web dialog box, which you can access from the File > Export > Save for Web menu (or keyboard shortcut Command/Shift/Option/S.

There are some handy preset size options available to you, or you can create your own based on settings you use often. Just click on that little arrow menu next to the preset field and save your settings.

A few factors will affect the final size of your image. From a web image standpoint, the smaller the file size, the better, but you want to maintain a certain image quality depending on what you’re using it for. The Save for Web export window allows you to preview what your image will look like at different files sizes.
You can change the image quality and the actual pixel dimensions within this dialog and get a visual preview and it will tell you how large the file size will be (bottom left corner under the image preview).
5. Export As

Export As seems to be the new replacement for Save for Web. It’s a simplified dialog box for exporting images for various formats, print or web, without having to resize your original image. It’s a much cleaner interface than Save for Web, and I find myself using it more and more.

Notice Export As has an Image Size and Canvas Size function built right in, so you can just skip all those other steps I showed you earlier if you just need to resize before saving. And it still shows you a visual preview and the projected file size depending on the file format, pixel dimension and image quality you select. Super cool!
[REWIND: PHOTOSHOP TUTORIAL | SECRET TIP FOR NAILING WHITE BALANCE WITH EASE]
Those are the five most common ways I use to resize photos in Photoshop. Which do you use the most and which one are you going to try out on your next project? I hope you learned something new. If you did, will you share this article?
Ok, time to get back to my “real” job. Dishes be damned; I wish I could just teach you about Photoshop all day. I need a housekeeper!
CREDITS: Photographs by Tanya Smith are copyrighted and have been used with permission for SLR Lounge. Do not copy, modify or re-post this article or images without express permission from SLR Lounge and the artist.


Get Connected!