How to Fix a Water Damaged Camera

Gavin Hardcastle

Updated on:

Water damage can spell disaster for photographers, turning prized equipment into pricey paperweights. Whether it’s a result of a sudden downpour or an accidental dip in a pool, the risks associated with water damage to cameras are significant. Acting swiftly can mean the difference between a minor setback and a major loss, emphasizing the need for prompt and effective response to salvage your vital photography tools.

Understanding Water Damage

Water exposure to cameras can vary significantly, ranging from splashes to full submersion. Each scenario poses unique challenges and potential damages to the sensitive electronic and optical components of your camera.  Keep in mind that most cameras are weatherproof, so they can withstand light splashes and a little bit of drizzle.  However, if you’re worried about too much water exposure, take these immediate steps:

  • Turn off the camera immediately to prevent short circuits.  Do not turn the camera back on until you’re confident that the camera is dry.
  • Remove the battery, memory card, and lens if possible. This reduces the risk of damage to these essential components.
  • Wipe down any external water with a soft, lint-free cloth to minimize moisture ingress.
  • Avoid using heat sources like hair dryers, which can warp components or seal in moisture.

Initial Damage Assessment

Before proceeding with any repairs, assess the extent of the water damage. This involves carefully inspecting the camera for visible signs of moisture and damage.  Here’s what to look for in your inspection:

  • Lens and Sensor – Water in the lens or sensor area can indicate that moisture has penetrated critical internal components.
  • Battery – Check the battery compartment for signs of corrosion or water entry, as this can affect the camera’s power supply and functionality.
  • Salt Water – Salt water poses a considerably higher risk to camera equipment than freshwater due to its corrosive and conductive properties. When salt water comes into contact with the intricate electronic circuits and mechanical components of a camera, it can lead to more severe and rapid deterioration.
  • Ice –  Ice can be removed and defrosted safely.  See this article to learn how.

Drying Techniques

Proper drying techniques are essential to salvage your camera without causing additional damage. Here are a few methods to try:

  • Use silica gel packs to absorb moisture effectively. Place the camera and gel packs in an airtight bag for several days.
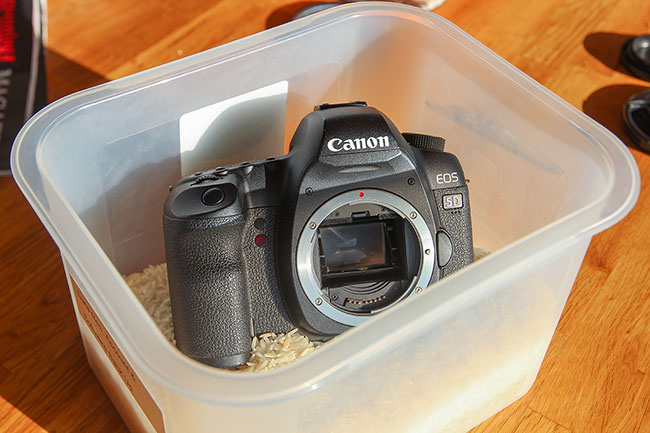
  • Place the camera in rice inside of a sealed container to absorb the moisture.
  • Store the camera in a low-humidity environment to aid the drying process.
  • Avoid direct sunlight and heat, which can cause further damage.

After the camera has dried, thorough cleaning is crucial to remove any residue and prevent corrosion.  Use a good camera cleaning kit to clean your camera as you normally would.

How I Fixed My Water Damaged Camera

It was bound to happen, the inevitable calamity of my Canon 5D Mark II meeting its demise on one of my many death defying photo adventures. Did it get dropped from a treacherous cliff edge or mauled by a cantankerous grizzly bear?  No, nothing so glamorous.

My beloved camera met its maker due to a faulty telescopic leg in my tripod while standing unattended for just two seconds in the icy waters of Oneonta Gorge, Oregon. It took a dive in four feet of water, hit a rock and had to be pronounced dead after I tried resuscitation by toweling it off and attaching a different lens.

To say that I was mortified would be an understatement, especially when I exited the canyon to witness one of the most majestic sights I’ve ever seen as 100 ft rays of light chased me out of the glowing canyon walls, teasing me with what could have been.

As I drove home with a heavy heart, a flicker of hope ignited as I recalled a story I’d heard on a radio show a couple of weeks earlier. I remembered that a boy had found a lost iPhone in the Ocean and successfully managed to bring it back to life by slowly drying out the phone in a bag of rice.

Could this work for my poor, drowned DSLR that was currently exhibiting signs of interior condensation and completely failing to power up? We’re talking blue lips and zero pulse here. I had nothing to lose by trying it out.

rice_trick1_small

Here’s What I Did:

  1. As soon as I got home I made sure there were no traces of moisture visible on the camera and set about finding a container big enough to house both the camera and more than its own bodyweight in dry rice.
  2. I found the ideal Tupperware container, half filled it with two different kinds of rice (it’s just what was in the cupboards) and then placed the perished camera body on top of the rice with the mirror facing down.
  3. I then poured more rice on top of the camera until it was completely covered with about 1 inch of rice above the top of the camera body. This effectively sandwiched the camera in between two super dry layers of rice just itching to suck out the moisture in the camera.
  4. I placed a tightly fitted lid on the container and stashed it on my office drawer for about 6 days.

rice_trick2_small

It Worked!

After about 6 days of drying out in the hermetically sealed ‘rice box of resurrection’, I was able to switch on the camera and scroll through all the menus. It’d gone from a complete dead loss to a chance of survival just by using a bag of rice.

Rice Won’t Fix a Smash

I was amazed that the camera now had its electronics back in full working order. Sadly the mechanical damage from when the camera and lens collided with a rock underwater meant the camera was a complete loss.

So the moral of the story is, if your camera goes for a swim, there’s a good chance you could save it by using the simple rice trick. If it goes for a swim and collides with a rock, you’ll be calling up the insurance company like I eventually did.

Conclusion

Understanding the steps to address water damage promptly and effectively can save your camera and your photography practice. Always weigh the severity of the damage against the cost of repairs or replacement. For those uncertain about the extent of damage, consulting a professional can provide clarity and prevent further losses.

RELATED POSTS

Which Is Better? Strobes Vs Speedlights For Product Photography

Best Lighting for Product Photography

December 03, 2024

Gear is a necessary evil in our profession. I say 'evil' as...

Black Friday Deal Tracker 2024 Announced

December 02, 2024

Get ready to save big this holiday season! The Black Friday Deal...

car photoshoot ideas

Photography Challenge: Portraits in a Car

December 02, 2024

Scrolling through Instagram you'll come across some creative and unique shoot concepts...

winter photography tips ideas examples

7 Winter Photography Tips, Ideas, and Examples

December 01, 2024

If you think wintertime is an excuse to put your camera away and stay...