
I’ve come to realize over the course of my relatively short and fortunate life, that often I don’t know what I want until I’m given it. That has been true in my dating life no doubt, but in education, too. In fact, it’s not really just about wanting, but about suitability and a better way of doing things, and in that sense, I run into this issue during my retouching all the time.
As Photoshop has developed over time, its processes have become ever more clever, and features more robust, and the list of features ever longer. Frankly, I can’t keep up with it all nor could I remember them all if I did. So, it may be a large assumption but I’m rather certain this holds true for many of you also, and I’d like to bring you all a few of the things I feel you’ll want and may not yet know you do. Here’s the first:
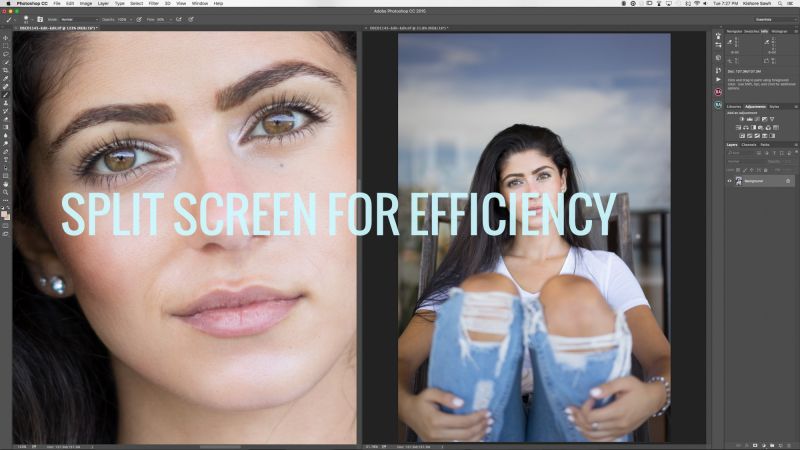
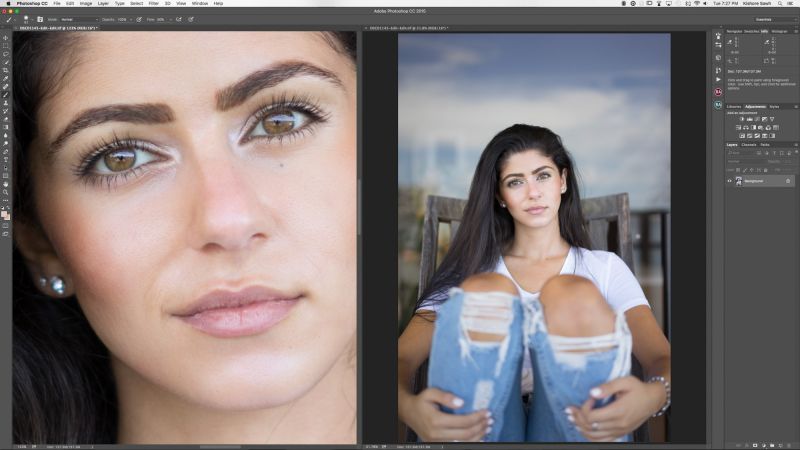
If you’re retouching in Photoshop, and you’re zeroed in and doing local adjustments versus global, you’re more than likely going to be zooming in a lot. If you’re doing skin retouching, for instance, you’re likely going to be living at 100% or even more for much of the time. The problem inherent to this is that you can become so engrossed in the precise portion you’re working on, you can’t get a feel of how it’s all meshing with the overall picture – losing the forest for the trees, and all that. As such, you may find yourself zooming out, taking a look, taking note, and then zooming back in to adjust. This is typical, but there’s another option to save a lot of that.
Using dual monitors is what you’re thinking? No, not quite, but you will be maximizing the one you do have. Photoshop has the ability to take your image, essentially duplicate/mirror it on screen, and sort of allow you to work on the image (in either frame) and see the effects within the other. So, how I tend to operate is to set it up, have one panel showing the image in its entirety, then in the other, I’ll be doing the retouch work at 100% or more. It gives me the best of both worlds as I can do my micro level work, and also see in real time how it’s affecting the image on a macro scale.
Here’s how to get it up and running:
Step 1: Open Your Image In Photoshop
Open your image in Photoshop either from Photoshop’s menu, dragging and dropping, or from Lightroom, whatever suits.
Step 2: Duplicate Your Image
At the top of your screen from the Menu bar, go to Window > Arrange > New Window For [whatever your filename is]. As you select this, you will immediately see a second tab showing your duplicated/mirrored image.
Step 3: Set-Up For Your Orientation
It’s entirely your prerogative which orientation you choose, but I tend to choose whatever orientation the image what shot in so you see the screen split equally, and neatly. So, head back up to the menu bar, then to Window > Arrange > 2-Up (Vertical or Horizontal). What should now have appeared on your screen is something resembling the screenshot below, where you’re looking at 2 identical images side by side or atop one another.
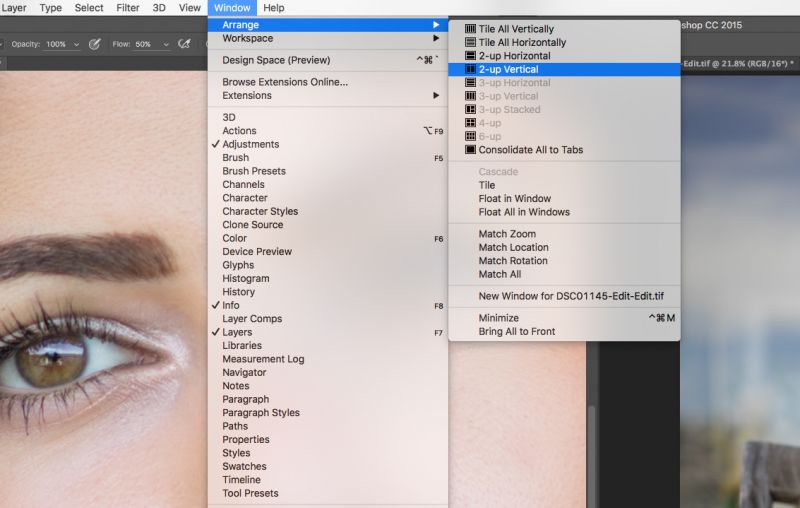
Depending on your Photoshop setup, in order to control each independently in terms of movement and zoom, you’ll need to ensure that the box marked ‘Zoom All Windows’ is unchecked, otherwise what’s done to one in terms of zoom will be done, clearly, to the other, defeating this particular purpose. Once unchecked, you will be able to maneuver them independently. That’s it really; it’s that easy. Just test it out by grabbing a brush, making an adjustment on one, and you’ll see it (the adjustment, not the brush) appear in the other side.
[REWIND: HOW TO MOVE IMAGES FROM ONE LIGHTROOM CATALOGUE TO ANOTHER]
Of course, this is simply to show you that this option exists, and you can do with it what you like. Sure it’s not the biggest gun, but one worth firing.Hopefully, this will serve you well in saving time, and allow you to work more without breaking flow and concentration. But I don’t need to sell the idea to you, as I’m sure you’ll see its merits. After all, ‘dope’ sells itself.
Kishore Sawh
48 Comments
Leave a Reply Cancel reply
You must be logged in to post a comment.
It will be interesting to see if I can make this work with the iPad pro and pencil (put the zoomed image on the ipad pro for editing and the “big picture” image on the monitor for viewing the changes overall….
I’d love to know if that works, since I’m considering picking up a Pro. Let us know Walter. Cheers!
Nice & another good one.
This is such an excellent tip, I agree photoshop really does just keep getting better. I have not been using this software for long, I have previously used other editing software but so glad I made the move. I really appreciate all these tips and tricks that get posted as sometime I feel I am not using the software to its full potential. I have been looking into doing some advanced photoshop training which hopefully will develop my skills too
Excellent tip! I’m adding this to my workflow TODAY ! ! ! Thanks
Can I do this in PS Elements?
Hi Debbie, I’ve actually never used Elements so I’m not fit to answer. Perhaps go into the help section and search for the same menu options and see if anything arises.
Can I do this in PS Elements?
Hi Debbie, I’ve actually never used Elements so I’m not fit to answer. Perhaps go into the help section and search for the same menu options and see if anything arises.
Tx!
Tx!
Good thing to know.
Good tip. I look forward to trying this with dual monitors, although I get the feeling the colours might vary between the two screens…
That’s an interesting point. If you’re using two identical monitors and have them equally calibrated shouldn’t be an issue theoretically.
Now if only I could afford two of these I’d be sorted! http://www.eizoglobal.com/products/coloredge/cg318-4k/index.html
Thanks, Kish!!
Glad to be of help Gabriel
Thanks, Kish!!
Glad to be of help Gabriel
Does lightroom support something similar to this?
Neat setup, I’ll have to play around with it! Thanks for sharing.
This is a great tip and always helps. However, “Duplicate Image” is an actual menu item in Photoshop. I think using this phrase in your instructions will create confusion.
Does lightroom support something similar to this?
Nice tip
Neat setup, I’ll have to play around with it! Thanks for sharing.
This is a great tip and always helps. However, “Duplicate Image” is an actual menu item in Photoshop. I think using this phrase in your instructions will create confusion.
Been doing this for a while, it’s excellent to see the overall effects of finely detailed retouching and far more efficient than zooming in / out all the time. It’s possible to create a similar setup by going to Window > Navigator and resizing the Navigator window to suit – with the added bonus that you can use the navigator window to control and reposition your zoom. I find a dual-monitor setup (or a 4/5K one if you’re lucky enough to have one) works better for the setup I describe.
so good, thanks for this tip!
Nice tip
Dude, I had no idea this existed. I need a larger monitor, STAT.
Especially a great idea with a very large monitor
Been doing this for a while, it’s excellent to see the overall effects of finely detailed retouching and far more efficient than zooming in / out all the time. It’s possible to create a similar setup by going to Window > Navigator and resizing the Navigator window to suit – with the added bonus that you can use the navigator window to control and reposition your zoom. I find a dual-monitor setup (or a 4/5K one if you’re lucky enough to have one) works better for the setup I describe.
Cool!
Thanks
so good, thanks for this tip!
Dude, I had no idea this existed. I need a larger monitor, STAT.
Especially a great idea with a very large monitor
Cool!
Thanks