
Welcome to part two of “Understanding Exposure.” The purpose of this series is to go beyond the basic understanding of the exposure triangle and help photographers utilize all available tools, like the histogram, highlight alerts, camera profiles, and more, in order to get the best possible image quality, with the most amount of detail, in any scene.
In part one, we demonstrated that what you see on the back of the camera often doesn’t match what you get in your RAW file once you’ve loaded the images onto your computer. To help, we covered three critical tips and in-camera tools for getting proper exposures:
- Manually select LCD brightness setting
- Turn on highlight alert
- Adjust picture style to flat profile
In this second video, we’ll teach you about “Exposing To The Left” (ETTL) and how that can help ensure maximum image quality and dynamic range compared to “Exposing To The Right” (ETTR).
Exposing to the Right Vs. Exposing to the Left & How to Do It
The first step in understanding “exposing to the left” (ETTL) and “exposing to the right” (ETTR) is to look at a histogram, with shadows on the left and highlights on the right. The terms ETTL and ETTR are simply referring to shifting exposure to the left or right to preserve the details in the highlights or the shadows.
It’s as simple as below:
- Exposing to the Right – Capturing an image with a histogram/exposure that does not blow out any of the highlights. Depending on the camera and scene, some shadows may clip when exposing to the right.
- Exposing to the Left – Capturing an image with a histogram/exposure that does not clip any of the shadows. Depending on the camera and scene, some highlights may blow out when exposing to the left.
The problem with ETTR
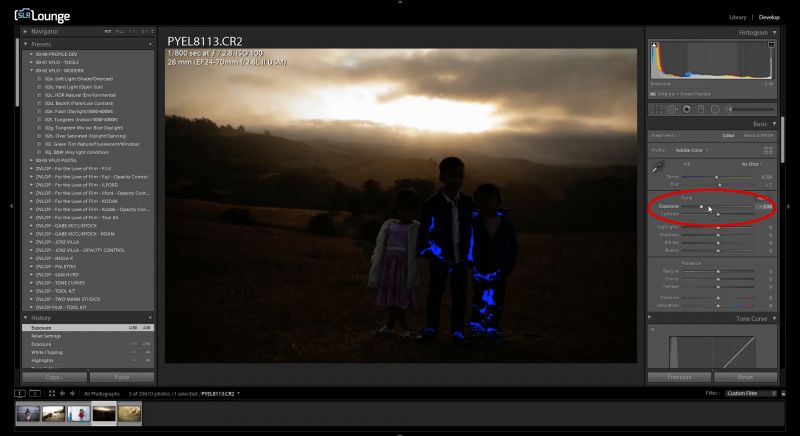
When we expose to the right, we’re trying to avoid blowing out our highlights. To problem is that with a high dynamic range scene like the image below, this could result in a very underexposed image, since we are trying to avoid blowing out that very bright highlight in the sky. This might not be a problem if you are shooting Sony or Nikon cameras that have an extreme amount of recoverable shadows. But with many cameras, lifting shadows in such a dark exposure would yield a lot of grain and muddy tones making the image undeliverable.
Why Expose to the Left (ETTL)
The alternative is exposing to the left, i.e. preserving your shadows. Simply put, do not let your shadows clip against the left side of the histogram. When we expose to the left, we are preserving all shadow detail and allowing the camera to pick up as many highlights as possible. This is where some cameras that boast a broader dynamic range will excel compared to others. Other cameras may lose some image detail within the highlights, however having a few blown highlights is something that looks natural. In contrast, muddy shadows from an overly underexposed image does not. This is where ETTL shines, it yields maximum image quality on any camera, while allowing stronger dynamic range performers to excel.
Why There’s No Such Thing As A “Perfect” Histogram or Ideal Histogram Shape
Depending on the lighting conditions and the colors in a scene, histogram shapes will vary. In the examples below, some of the images represent an environment in which the lighting is controlled while other scenes would be well-suited for HDR and include a much higher dynamic range. Notice the different curves in the histograms, which illustrates how we can arrive at vastly different histogram shapes while effectively exposing to the left for each image. Again, the best general rule is simply to expose as far to the left as possible without clipping shadows.
Understanding the Benefits of Exposing to the Left
Why does this all matter? Because highlights vary so dramatically, ETTR techniques can often leave us with wildly different exposures that make post-production more cumbersome, and in some cases, we’ve shadows that are just unrecoverable. However, ETTL techniques give us a much more consistent exposure that remains rather uniform when shooting in similar lighting conditions. By using ETTL techniques, you can build in a standard amount of exposure adjustments into your images based on the lighting condition which can dramatically speed up your overall post-production workflow.
This is precisely what we did with Visual Flow presets which are based on Lighting Condition-Based Development. As long as you follow ETTL exposure techniques, Visual Flow presets will compensate and add back in the appropriate amount of exposure based on statistical sampling methods from each lighting condition. While we’d love for you to check out the system, you don’t need to purchase them to build such an adjustment into your own workflow. For example, the image below shows the exposure adjustments that are built into an image that was following an ETTL exposure based on the “soft light” lighting condition. One click and the image has all the necessary color, exposure and contrast adjustments built-in.
This just wasn’t possible utilizing ETTR methods, and the ability to recover shadows was completely dependent on the camera used for capture.
Re-Cap and Final Thoughts
Here’s a quick recap of the points we covered over the course of this two-part series:
- Manually Select LCD Brightness Setting
- Turn on the Highlight Alert
- Adjust Picture Style to Flat Profile
- How to Expose to the Left and the Benefits Thereof
Using these techniques, you’re going to optimize your workflow and reveal image quality that you never thought possible because you’ve already set the exposure to maximize dynamic range based on your camera’s make and model. That is the beauty of getting the right exposure in camera and maximizing your dynamic range. While some techniques, such as exposing to the right, only works for some cameras whose dynamic range exceeds most other brands, dialing in your settings with the LCD, flattening your picture profile, and exposing to the left will allow you to improve your productivity and get the most out of your images.
If you’re interested in more of our Premium photography education, be sure to check out SLR Lounge Workshops to gain access to over 30+ courses on everything photography.
Pye Jirsa
20 Comments
Leave a Reply Cancel reply
You must be logged in to post a comment.
You don’t even know your left side from your right so the rest is just as trustworthy https://media1.giphy.com/media/3oEjHBa34dVLv0jnoc/giphy.gif
You should try understanding the concept better! It makes perfect sense, and the problem isn’t the use of the words “left” or “right”, the problem is your understanding of the word “TO” in the expression, “expose to the…”
Canon cameras seem to expose nonlinearly, where if you use ETTR you get slight color shifts, dessturation and some slight wonkiness going on. I don’t like ETTR at all on Canon cameras that I’ve owned. I have no idea if this is the same on non Canon cameras.
I’ve seen color cast “flicker” on all cameras, including Nikon and Sony, when using the ETTR exposure philosophy for timelapse shooting and then recovering shadows in post-production. It seems that ALL bayer sensors have a huge issue with TINT consistency, in shadow recovery, once you get to a certain point, and once you start comparing hundreds of nearly identical images in a sequence (in my case a timelapse)…
So, for landscapes and wherever you want to get the absolute most dynamic range out of a scene, it is true of all sensors that there is more recovery available in shadows than highlights, due to the nature of how photons are collected and counted in each pixel on a sensor.
However, if you are like MOST photographers, and you’re shooting in scenes where the camera already has plenty of dynamic range for the SUBJECT itself, (disregarding if the whole scene has a couple small highlights or shadows that do clip) …then the ETTL mindset does get your portraits etc. to a better, more consistent post-production position right off the bat.
And there is no set amount that is ETTR, it is any amount that shifts your histogram so the biggest hump shown is on the right, maybe a little, maybe a lot. So claiming ETTR leaves you 2.5 stops under exposed is completely wrong. I use ETTR to over expose by between 1- 3 stops depending on my subject, lighting conditions and picture profile.
Love to have a friendly debate/discussion here. What Matt and I are referencing in this technique is exposing to preserve shadow detail (keeping histogram close to left as possible without clipping shadows) versus exposing to preserve all highlight detail (keeping histogram as close to the right without losing highlights). These two terms are frequently debated, and maybe there’s an easier way to describe this practice. When exposing dark as possible without clipping shadows, we allow the camera make/model to pick up as much highlights as possible. It yields generally better results than exposing to preserve all highlights, since often times in bright scenes retaining highlights means clipped shadows. In general having some blown highlights looks more natural than pulling clipped shadows (although some cameras will do better than others). Is there a better way to say this?
“When exposing dark as possible without clipping shadows, we allow the camera make/model to pick up as much highlights as possible.”
This is the problem when you explain, your are avoiding state that the highlights will be clipped.
It does depend on the scene. If there was a very flat scene, say a light-skinned subject standing in the shade against a light colored wall, then the histogram would be a single, narrow blip, and you’d expose that blip all the way to the right in order to get the best overall clean (noise-free) image quality from that exposure.
But, you wouldn’t “over-expose” it to the point of totally clipping anything, either, would you? You wouldn’t need to, because there wouldn’t be any particularly “hot” highlights to clip.
So, it sounds like we’re confusing the truest definition of “over-expose” versus “ETTR”. To me, an over-exposed image is one that has clipped highlights, and an ETTR image is one that just barely saves the brightest highlight, even if that means that other chunks of the histogram are well away from the right edge of the histogram.
These are, of course, definitions that are not scientifically specified, though.
With pretty much all recent Sony sensors that I am aware of that are aps-c or larger (which are are found in Nikon and Pentax cameras, as well as those manufactured by Sony) there is a tremendous amount of shadow recovery that can be applied – usually around 4 stops. When I moved from Canon to Pentax I completely changed my exposure technique because of this. I don’t understand the logic behind not “clipping” in the shadows when shooting in RAW using one of these Sony sensors – there is information there that can be recovered and can look very clean, especially near base ISO.
Yes, I’m confused. Did you get the left and right crossed?
See comment below. Feel free to chime in.
You know expose to the right (ETTR) is about over exposing – not under exposing? Your video is exactly wrong on ETTR. it is literally pushing all the data in your histogram to the right (higher exposure). You have it backward in your video. ETTR is NOT under exposing. Seriously – you take your exposure slider in LR and go to the RIGHT – it gets brighter, not darker.
When first glancing at a histogram, you’d be right. “ETTR” implies that the “biggest chunk” of histogram should go to the right, or brighter.
However, the strictest version of this overall idea is, specifically, about preserving highlights, not just moving the bulk of the histogram to be bright or dark.
If you compare the vast majority of other ETTR tutorials out there, they should specifically focus on the rightmost tip of the histogram, not the center of whatever bell curve looking thing the histogram might be.
This is definitely something that can be seen both ways, though. As a portrait photographer who usually cares the most about a subject’s face, and not the background highlights or shadows, the exposing that central bulk of the image to a medium or bright exposure is probably the most efficient way to work, the best way to get all your in-camera exposures as close to “done” as possible. Because at the end of the day, the thing that matters most is being able to edit your shots quickly and with good detail in the subject, whether it’s a face or something else.
Interesting idea, but not for every lighting situation. If the highlights happen to be on the subject’s face in a high dynamic range photo, the result will be unusable because of blown highlights. Sure, I care less about the sky, but this advice to ETTL needs to include some caution and common sense. I’ve also read that it’s generally easier to recover details from shadows than highlights. And only shoot RAW so as not to lose any more detail than necessary.
Yes. In certain scenes when shooting creatively for highlights/shadows, there will be adjustments needed, this is just a general guide that works for most cameras, where as exposing for highlights and recovering shadows only works well for cameras that can cleanly recover shadow detail (I.e. not canon)
Hi Pye, so if I understand you correctly, if I am shooting with a Nikon D810 or D850, which captures a large dynamic range in camera for both highlights and shadow, I can ETTR and not worry about losing any detail in the shadows or highlights? I’m coming to this conclusion based on your comment that Sony and Nikon capture great dynamic range and can recovery detail in the shadows better than Canon.
Yes. If you are already comfortable with your camera’s abilities, you can ETTR and continue business as usual. The system of ETTL is meant as a general guide that will work for an ideal exposure regardless of the camera make/model. In essence, it’s to say capture everything pushed left as far as possible without clipping any shadow details, but just touching the left of the Histogram. From there, allow the camera to pick up whatever highlights it can. ETTL doesn’t require any knowledge of your camera to achieve good results, where as ETTR can yield varying quality and results depending on the make/model.
You’re right, Phil, if you’re shooting landscapes or any number of other things, then preserving BOTH highlights and shadows becomes very important.
And due to the way modern sensors collect and count photons, focusing on saving your highlights will give you more dynamic range in any exposure on any camera, as opposed to focusing on saving your shadows.
The thing is, with portraits and weddings and stuff, ETTL works very well for setting a baseline exposure from which to consistently post-produce your images quickly and with good image quality on the subject’s face.
Thanks for mentioning this! Now other readers have this record of caution and common sense, hopefully. Haha!
I’m no pro, but I thought there was always more detail captured in the right/light side of a photo. So exposing to the left and getting the dark tones correct – as there is less data, would then allow for more ‘correction’ at the lighter end where there is more data to push and pull?
That’s a good point to bring up, Steve. the right-hand half of any histogram’s data has “cleaner signal” compared to the left-hand half. So, if you do have a scene that fits WELL within the histogram, a whole image that is just one single spike on the histogram, then of course you would not expose that single “spike” all the way to the left of your histogram. That would just look like a terribly under-exposed image.
But, neither would you expose that one tiny little histogram blip allllll the way to the right-hand edge of the histogram, either, if you were trying to make the image look “right” relative to how it was captured. Actually, you’d expose it somewhere in the middle of the histogram, maybe just a little to the right or left of dead-center.
Either way, the point is that all modern cameras these days have more than enough dynamic range to handle flat, low-contrast scenes. The problems arise when you have just a few highlights or shadows that are going to clip one or the other no matter how you set your exposure.
In this situation, for many photography subjects from portraits and weddings to general candids and action, (though maybe not landscapes, for example) it’s actually a good idea to focus on consistently saving your shadows, since most of the time your main subject of the scene is not going to be that near-white highlight, it is going to be something that falls somewhere in the middle, or even towards the left.
In conclusion, yes, if your biggest chunk of the histogram is juuuuust barely to the right of dead-center, then that will give you the cleanest image quality over all. But, at the edges of the histogram, you’re more consistently likely to run into problems with shadow recovery than highlight recovery, for the majority of photography subjects.