
When wall space and budget allows, it’s great to go big with large photo prints. Large prints, which can reach up to 96” wide (that’s eight feet!), allow your clients to preserve their special moments on an epic scale, and they also serve as the ultimate showcase for quality photos. For photographers who’ve made print sales a part of their business model, large photo prints also serve as a means to provide a notable boost in income. So long as you partner with a reputable pro lab and take advantage of available tools to bring large prints to life, there’s really no reason to not make large prints a key part of your arsenal. In this article, we’ll share the types of photos that work well for printing in larger sizes, cover the most popular options on the market, and include some tips for preparing and ordering large photo prints.
Let’s get to it!
Which Images Work Best for Large Photo Prints?
Some images work better than others when it comes to large photo prints, and it depends on more than image resolution (although we’ll cover that in more detail below).
Epic Moments

A large photo print will likely serve as the centerpiece in a room, or certainly on the wall on which it hangs. Like the art itself, the moment or scene captured should carry an inherent wow factor. When you go big with an inspiring photo, that’s when the magic happens.
Small Subjects

Once, during a workshop on selling prints, the photographer running the workshop noted, “If you want to sell large prints, shoot small subjects.” In other words, make your subjects small relative to the size of the frame. Epic portraits typically include a lot of scenery, and the subjects’ size in relation to the overall grand scale of the frame usually falls on the smaller side. When the photo is printed in a larger format, the subjects then appear decently sized with plenty of detail, and they don’t overwhelm the frame.
Popular Options for Large Prints
While you can find countless options for creating epic wall art with large prints, we’ll look at three popular choices from a well-established print lab, Bay Photo, that lend themselves well to a larger format with superior materials for ultra-crisp imagery. We’ll also look at alternative solutions such as clusters and collages. It’s worth noting that all of the options below are customizable to fit any space up to 96”. Also, metal prints and acrylic prints are available in clusters and splits, which is an easy way to fill walls with pre-configured designer arrangements.
A Quick Note About Bay Photo
Since they opened for business in 1976, Bay Photo has earned a stellar reputation for producing top-quality wall display products, and their vast selection of customizable display options in all sizes, including up to 96” wide in large format prints, separate them from other professional labs. You can read more about them in this article from our company feature series.
Metal Prints

Let’s kick things off with one of our in-studio (and in-home) favorites: metal prints. Metal prints offer a unique printing surface that delivers uniquely rich colors and intense resolution. It’s also worth noting that metal prints can stand up to direct sunlight with minimal fading much longer than their paper counterparts. For those concerned that metal might prove too glossy, you’ll be happy to know that metal prints come in a wide range of finishes, including everything from glossy down to a matte finish. We’ll cover the various finishes and their attributes in more detail below. Whichever option you choose, these prints in large format are guaranteed to stop viewers in their tracks, and for all the right reasons.
Style
Your clients decor will vary, from casual to elegant, and it’s important that the wall art your clients purchase fit their style. Metal prints, like other options on this list, can be hung and displayed in a number of ways, including everything from single metal prints to double float (stacked) or clustered collections, each of which gives its own unique vibe.
Surface
Here’s a closer look at the finishes you can choose from for metal prints. The range offers solutions that can accommodate a variety of lighting conditions to deliver the best viewing experience. To preview Bay Photo’s options, don’t miss this video demo.
- High Gloss: Glossier prints tend to show more details and the colors are generally vibrant
- Mid-Gloss: Lower gloss level means less glare, yet the details and colors are similar
- Satin: Glare is less of a factor and the details and colors are sharp but subtle in comparison to the glossier options
- Sheer Glossy: Metal shows through the image with the sheer option
- Sheer Matte: Matte finish presents less glare than a glossier surface material
- Textured: Non-Refective surface with a fine, stippled texture for a softer, more organic look
Cost: $$ (8×10: $20-$60+)
Acrylic Prints

Another one of our favorite vehicles for large photo prints, and one of our most popular in-studio, are the acrylic prints. If you’re unfamiliar with acrylic prints, they are prints that have been mounted to polished plexiglass, resulting in added radiance and visual depth thanks in part to the plexiglass, which ranges anywhere from 1/4” thickness to 1” blocks (the latter for tabletop displays, not wall art).
Style
Acrylic prints exude a modern vibe and appeal to all sorts of clients. When you see these prints in person, especially the larger sizes (they can be made as big as 43”x96”), you’ll quickly understand why these rank among the most popular options on the market.
Surface
Acrylic prints feature an acrylic treatment that comes in glossy or non-glare finishing options, and they can be used with special lustre or metallic surfaces. One acrylic print option, Bay Photo’s Fujiflex Acrylic prints, uses Fujiflex photographic paper that is face-mounted behind polished acrylic, resulting in incredibly dynamic prints.
Material and Mounting

With acrylic prints, you can choose from different display options, which typically include an aluminum dibond or white paper backing. For large photo prints, you’ll likely opt for the aluminum dibond option and a thinner plexiglass option mounted to the front due to the weight of the larger print. Mounting options for acrylic prints include French cleats or stainless steel posts (see above for the latter).
Cost: $$ (8×10: $50+)
Epic Prints

It may be cliché to say, but for epic prints, the name says it all. Epic prints represent the ultimate go-to for large photo prints. These fine art collector-level, large photo prints are made using Fujiflex silver halide photographic paper with up to 610 dpi resolution (four times the resolution of a standard photo print), resulting in “high-precision clarity” that is really second to none.
Style
Epic prints, because of the materials used (covered below) and the resulting dynamic resolution, offer a sleek profile and look that would give viewers pause in a fine art gallery.
Material and Mounting

Bay Photo’s Epic Prints are made using Fuljiflex silver halide photographic paper, which is mounted using aluminum composite (ACM) made from 2 sheets of .012″ metal with a solid black plastic core, and finished with a thick High Gloss or Satin finish in a maximized effort to realize the photo’s ultimate viewing potential. Your clients can choose from different wood and metal moldings that are custom-made into frames for these prints.
Cost: $$$ (8×10: $55.59+)
Clusters and Splits

Those looking to tell a story in multiple images or frames can also choose clusters or splits to showcase their photos and fill their wall space. Clusters, as the name suggests, consist of a series of images framed and/or hung together in close proximity to one another. Splits, on the other hand, feature a single image in multiple pieces.

The specific patterns for both splits and clusters can vary, depending on the preferences of the client. If you order through Bay Photo, you can use any one of their pre-designed combinations.
Preparing Files for Large Photo Prints
As you might imagine, the larger the print, the more visible “small” details become and the higher your image resolution needs to be. Generally, before sending your photos to be printed in a large format, you’ll want to sharpen the details. In some cases, you might also need to upsample the image, which is a technique used for increasing image resolution that we’ll share below.
Some printers, like Bay Photo, will automatically sharpen and upsample your large format prints for you, but should you choose to do it yourself, now you’ll know how.
Pro Tip: Do your retouching before you upsample your photo. The reason for this is it will take a lot longer to work with a larger photo file, so knock out the retouching up front. If you prefer, you can also outsource the retouching with services like Bay Photo’s Resolution Optimization service, which also includes AI upscaling.
Upsampling (or Upscaling)

It’s fairly common (although not always necessary) to upsample an image before printing a photograph in a large format. You can do this using a tool in post-production software like Photoshop in order to bump the resolution. The actual process is quite simple, and can be broken down as follows. This is one of several methods available, and you can find others online with a quick search:
- Load your image into Photoshop (or whichever photo editing software you use that includes an upsampling tool)
- Locate the upsampling tool–your path will vary based on the version of Photoshop you have. Even pre-2018 versions include algorithms for upsampling photos. Here’s one basic path to follow:
- Image > Image Size > Adjust Dimensions for WxH (see basic recommendations below) > Resample > Preserve Details (Enlargement)
- Adjust the “Reduce Noise” slider to taste
- Select “OK”
Upsampling Recommendations (Height and Width in Inches x 300dpi)
- 24” x 36” | Upsampled Resolution = 7,200×10,800 pixels
- 40” x 60” | Upsampled Resolution = 12,000×18,000 pixels
- 45” x 93” | Upsampled Resolution = 13,500×27,900 pixels
It’s worth noting that upsampling can only do so much to preserve details when enlarging an image. It’s really the first part of sharpening up the image for better results before we run a high-pass filter. Also, if the original photograph is affected by motion blur or isn’t particularly sharp to begin with, then upsampling will not resolve the issue.
High-Pass Sharpening for Large Photo Prints
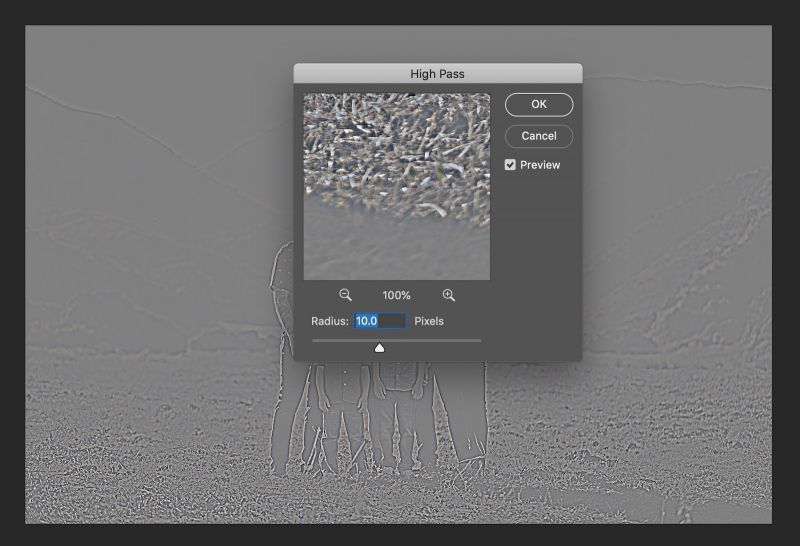
Now, after we upsample the image using the basic technique above, we can sharpen it further using the high-pass tool. Here’s a basic path to follow to take advantage of this feature:
- Create a duplicate layer of the upsampled file
- Go to Filter > Others > High Pass > Select Pixel Radius (Experiment for the best results)
- Switch the blend mode on the high pass layer to “hard light”
- Add a layer mask and brush off the high pass effect on areas over the skin so that they are not as drastically sharpened
- Save the image as a jpeg for print (and/or save the PSD file to edit later if necessary)
Ordering Photo Prints for Wall Displays
When you work with a professional print lab, ordering is easy, and the online ordering software also serves as a helpful tool for organizing your files and sharing them with clients.
Here’s a quick overview of some of the pro features in online ordering from Bay Photo. You can watch this quickstart guide to using Bay ROES for more in-depth information on how to order products:
Hide Prices/Branding
All it takes is one click to hide your prices and turn off the branding, in essence transforming Bay Photo’s online ordering system into a powerful tool for in-person sales.
Wall Previews & Custom Arrangements

This is one of the most helpful tools you can use to really help your clients visualize how great their living space will look with their new large photo prints. You can use Bay Photo’s Wall Previews to build product mockups. Whenever possible, try to use a photo of your client’s actual wall space to further help them visualize the finished product. Once you have everything laid out, you can save your Wall Preview and share a link with your clients for approval. If they like what they see, they can quickly add all of the prints to a cart with one click. Watch a video demo to see this feature in action on YouTube.
Image Collections
With Image Collections, you won’t have to waste time uploading images over and over again. These collections streamline the ordering and reordering process.
Quick Multi-Orders

After you’ve uploaded your images and selected your product, you can quickly order multiple prints in just a few clicks. You’ll have the option to select all or some of your images and order them in large quantities all at once. If you need to remove some of the images, you can also select several at a time and delete them from your filmstrip.
Save Projects
In Bay Photo’s online ordering system, you can save multiple in-progress projects and access them anytime you need to, for progressive changes or easy reorders.
Large Photo Prints | Conclusion
We hope you found this collection of tips for going big with large photo prints helpful. Again, offering large format prints to your clients allows them an opportunity to enjoy their favorite photos on a grand scale, and it’s a great way to showcase your work and earn extra income. Thanks to user-friendly tools and professional partners like Bay Photo Labs, we can easily prep and create amazing wall art without expending too much time or energy.


Get Connected!