When it comes to using a Wacom Tablet, one of the first questions I get is “Why would I need a tablet since I do the majority of my editing in Lightroom? Yes, even though there are around 150 different software that recognize and utilize Wacom tablets, it is with Photoshop that they are most typically aligned. This is somewhat understandable considering functions of pressure sensitivity and various brush settings are areas where the tablets shine, but Lightroom users can make these tablets totally integral to their LR workflow. In this article, we’ll teach you how to set up your Wacom Tablet in Lightroom, the best wacom settings in Lightroom, and more.
Basic Primer On Tablet Functionality Within Lightroom
The role of the pen tablet is a rather obvious one: it’s a digital input device that offers the fluidity and familiarity of using the pencil and paper we’ve used our whole lives. Initially hideous and choppy, they have crawled out of their primordial ooze an entirely refreshed creature, and Adobe and Wacom work together to make the user experience with these tablets significantly heightened. You simply cannot do the same things the same way without one.

Lightroom has five primary tools and of those five, the Adjustment Brush and Spot Removal are the obvious choices for pen use. If you’ve ever used Photoshop’s healing brush, you’ll know the Spot removal is nowhere near as fluid. However, with a Wacom, it’s much more so. It’s more precise and allows you to probably work three times as fast.
The Adjustment Brush, when used with a tablet, offers accuracy you’d be incapable of finding elsewhere. But what else can the pen do better? Well, there’s the fact you can control the opacity via pressure, you can set a button on the pen to allow you to adjust the brush size, and holding the opt/alt key can turn the brush into an eraser. Now that Lightroom lets you erase portions of graduated filters and so on, this is all even more useful.

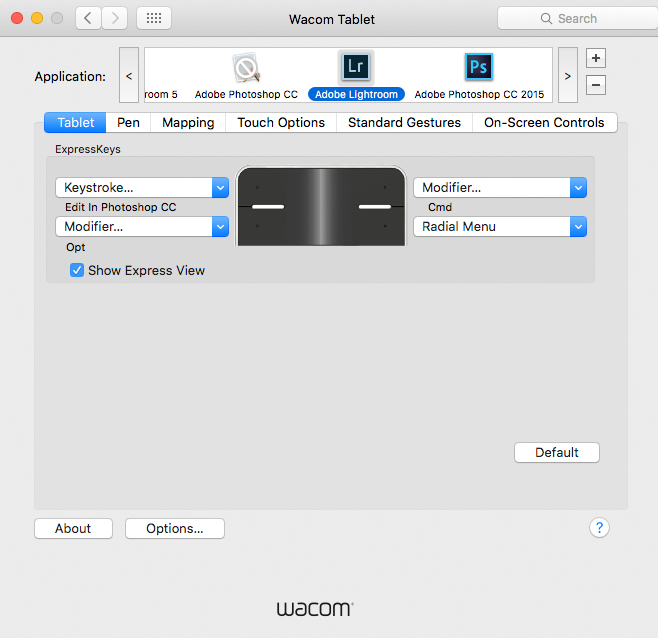
Of course, it doesn’t all stop there. Being able to configure the working space of the tablet means you will likely save the amount of hand movement, and the express keys and radial menus (depending on the model Wacom) will save you lots of time typically wasted on the menu navigation. And if it is just as a mouse you would like to use it as, you can, given they support multi-touch. The great thing is you don’t even need the most expensive tablet to do this with. In fact, when I’m moving around, I use about the second least expensive tablet, and it does most of what I need. You can see my review on it here, and here’s how I have my tablet set-up while using Lightroom:
*Important* When you’re setting up the tablet, ensure you specify which application you are setting up to work with for whatever settings, and do not select the option that lets you set it up for all applications.
Setting Up Your Wacom Tablet For Lightroom (My Set-Up)
For the purpose of this article, I’m going to work within the boundaries of using a more basic tablet with only four buttons versus the Pro lines that have the radial, 6 or 8 buttons respective of size. Here are my ideal settings for Lightroom.

Setting Up the Wacom Buttons in Lightroom
Touch On/Off
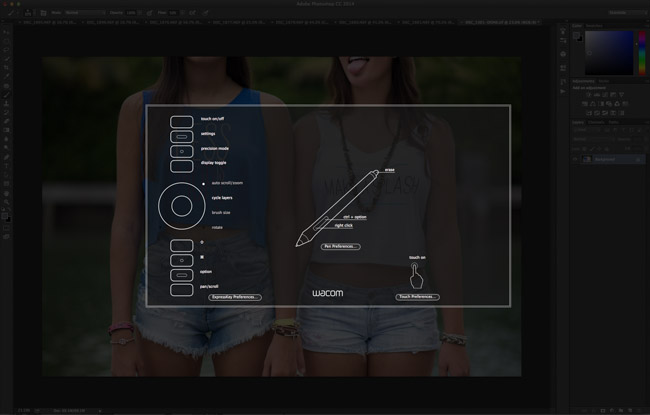
By default, your tablet’s express buttons will see one of them dedicated to switching the touch capability on and off, which I find useless. Other functions would suit it better because the tablets work in such a way where they switch from pen to touch via proximity of the pen. That’s how you can rest your hand on the tablet and use the pen without it messing everything up and recognizing your palm as input. With the pen, very close to the tablet touch is rendered off, and when it’s not, it’s back on.
‘Settings’ Button to Edit-In
This, again, is another useless pre-configured button in my opinion. This essentially brings up a menu that reminds you of the button settings on your tablet, but if you’re using a touch-enabled tablet, you can actually go into a menu for ‘touch’ and set up to use finger gestures to show the same screen. Since you’ll very quickly remember what button does what, this is a better option.


As alternatives, I use this button to switch between applications. Yes, you can do that. Within the settings button assignation menu, select Edit In and choose which. I typically set mine to Photoshop, so with a click of a button, it opens it for me. If you have done any adjustments within Lightroom, then you will still be given the prompt to choose either a copy with adjustments and so forth, but it’s still good and gets a lot of use.
Option/Alt Button
As we already mentioned, holding this turns your brush into an eraser. Having this at hand is great, and some even like to set one of the pen buttons for this function alone.

Radial Menu
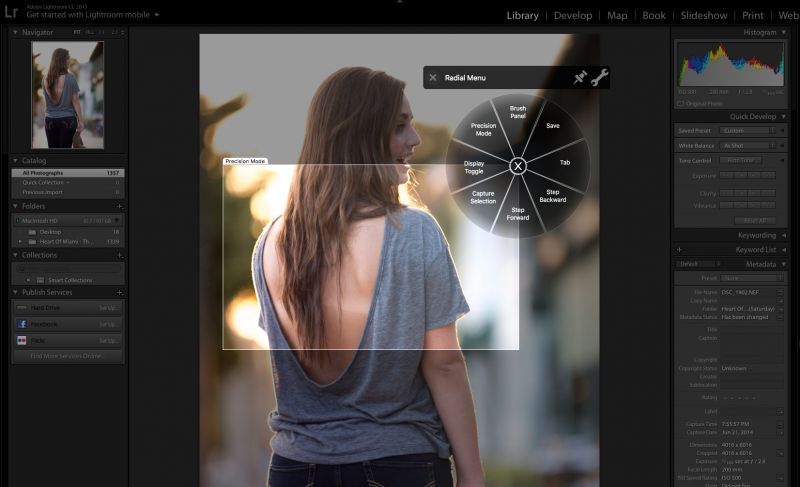
The last of the minimum of 4 buttons is assigned to bring up the radial menu. Typically this gets less use. However, it allows me to quickly bring up a selection of other options, which are essentially virtual buttons that can each be assigned. In truth, I typically only assign two of them specifically, and those are to bring up Precision Mode and to Undo. You can set that with Option+Z.

The Wacom Pen
You can see the images below for my settings exactly. I see no need for double clicking with the pen, so that’s turned off, and as far as pressure, you can set that as you like. The important ones are the two buttons on the shaft which probably get the most use of any buttons between the tablet and the pen.


The first button, closest to the point, I set to Pan/Scroll, and what this translates to in Lightroom is the ability to hold it and move the pen on the tablet to adjust the brush size. Anyone using Lightroom can imagine just how nice this ability is. It allows you not to break concentration, and it’s just totally intuitive as you’re editing.
The second button I have set to Backslash, so I can quickly toggle back and forth between the adjusted and original file before adjustments. Having it at your fingertips allow you to do it all the time and see just how well your adjustments are working out, helping to prevent you over or under-working an area, so it doesn’t blend with the overall image
Mapping Wacom and Lightroom
I have mentioned this before, but if you are using Photoshop or Lightroom, you do not need the entire working space of the tablet. It’s actually a hindrance as it encourages or requires much more movement of your entire arm and that gets tiring. It’s for this reason, I ALWAYS tell retouchers to go for a small tablet because you don’t need the extra real estate unless you’re a graphic artist.

Instead, go into mapping and create an even smaller active area, even on a small tablet, and that means you can use a flick of the wrist to move across the entire image. That’s pretty much all there is to setting it up. Within a day or two of this set-up, you’ll see how much better the tablet is, and then, of course, modify each button and setting to suit your particular needs.
I hope this was of some help, and will help you bring out the most of Lightroom. This together with a great foundation in LR will show you just how robust this application is. Check out the Lightroom Workshop in SLR Lounge Premium if you want to make the most of your investment and time.
If you’re now curious about getting a tablet check my reviews of the Small Wacom Pen & Touch and the Intuos Pro line.
Find:
Conclusion
If I were to interview you, speak to you in the capacity of a working, producing, prolific photographer, one of the things that would likely come up in conversation is, what your favorite and essential pieces of equipment are. The typical answers usually entail a list of standard lenses and an obscure one, a favorite camera body, maybe some unusual gimmick, and maybe a favorite lighting modifier. Ironically, in my experience, even though it’s an absolutely indispensable tool, the humble Wacom tablet is often left off the list.
This is all at once understandable and perplexing, because retouching isn’t exciting to speak about, but oh so necessary in the modern photographic economy. You simply MUST have a sufficient level of proficiency in retouching to be competitive. It is what is going to let you materialize your ultimate creative vision; and creativity in a world where everyone has the information at hand is the new currency.

Unlike in dark room days of yore where specialized information about retouching was the reserve of those in a relatively closed looped group, now, thanks to sources like CreativeLive, us, and even YouTube, the information is all out there to be soaked in so the number of people becoming exceedingly good at it is staggering. If you’re starting out, or haven’t approached the subject thus far, this isn’t to frighten you off, or make you feel inadequate, but to encourage you to use what’s at your disposal. And if you want to be proficient at it, get a pen tablet. Period. You need one, it’ll transform your workflow and your work in ways you can’t actually fathom until you do it.
*This article was originally posted in January of 2016 and updated March 2021.


Get Connected!