
Over the last year, you’ve no doubt become aware that A.I. has dramatically changed the photographer’s workflow. Tasks that used to take considerable time, for example, such as selecting subjects or removing background objects, now only take seconds. And that’s just a hint of what AI is capable of. In this video/article, we’ll focus specifically on plugins by Retouch4me and show you how we’ve incorporated these tools into an effective AI photo retouching workflow. For about a year now, they’ve delivered consistent results and saved us a tremendous amount of time, and we think they can save you a lot of time as well, especially if you do quite a bit of retouching work. We’ll show you what we love about this powerful new tool and how we’ve put it to work in our studio.
Video:Retouch4me | Using AI Photo Retouching Workflow
What Is Retouch4me?
Retouch4me is an Estonian company that specializes in creating A.I. powered photo retouching tools, and they can be used as standalone apps or also as plug-ins for Photoshop. We mostly use it for the latter as it fits neatly into our AI photo retouching workflow.
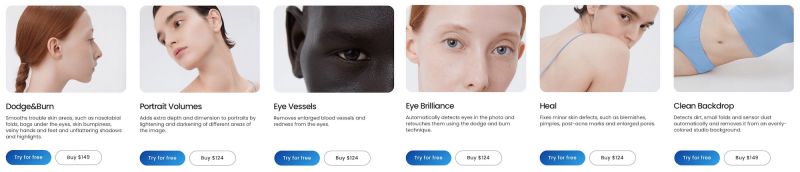
The cost varies between $124-$149 per plugin, but the time they save and the quality of the work they render make them a worthwhile investment. That said, we would suggest that you make sure to choose only the plugins that serve a specific purpose in your workflow and address a pain point, as opposed to making a purchase simply because you think it would be kind of nice to have on occasion. The good news is that you can try each plugin for free before you purchase it. There is even a free plugin for frequency separation.
Special Offer: 20% Off for the SLR Lounge Community
We’re excited to share a special offer from the Retouch4me team that will save SLR Lounge community members 20% off the price of any or all of the plugins featured in this article, as well as the ones we didn’t cover. To save 20%, use the following code during checkout: SLRLounge20
Okay. Let’s get into it.
Our Retouch4me Workflow, Pt. 1: The “Portrait Volumes” Plugin
As promised, we’ll start right inside of Lightroom Classic and show you how we’ve incorporated Retouch4me into our AI photo retouching workflow.
Step 1. Upload Your Images and Apply a Basic Look

Begin by loading the images you intend to edit into Lightroom, and go into the Develop module to apply a basic look. If you have a set of presets that you like to use, go ahead and choose a preset. For the first image in our example, we’re going to apply the “Soft Light” preset from Visual Flow and make a tiny adjustment by lifting the blacks.
AI Photo Retouching Workflow, Step 2: Export the Image into Photoshop
Once you’re done with this step one, press “Control/Command + E” to bring your image into Photoshop.
Step 3. Apply Your Retouch4me Plugin

Of course, your process and tastes might vary, but one of our favorite plugins to use is the “Portrait Volumes” plugin. To find it or any of the other plugins, go to the Filter menu, select “Retouch4me,” and then choose your desired plugin from the dropdown menu. The reason we like the “Portrait Volumes” plugin so much is that it can be applied to just about every single image that we create, and it makes quick improvements across the board, making it an effective part of our AI photo retouching workflow.

There are a few tools you should be aware of after choosing your plugin. The first is the scale detection tool in the lower left corner, just below your image. You can choose auto mode or select from different options such as closeup portrait mode, among others. The second tool to look out for is the blend tool, which you can find in the top center, just over your image. Adjust the blend tool to get more or less of the effect of the plugin. We usually leave it around 120%. Finally, you can create a soft light layer, too, if you like. Find the checkbox for this option in the upper right corner.
AI Photo Retouching Workflow, Step 4: Apply the Adjustments You’ve Made to Your Image and Save

Next, it’s time to apply the adjustments we’ve made to our portrait. So, what did it do exactly? Well, the Portrait Volumes plugin creates depth in your images and enhances them overall. Once the adjustments have been made, you can go ahead and save out your image.
Our Retouch4me Workflow, Pt. 2: Stacking the “Heal” + “Dodge&Burn” Plugins
Of course, we’ve just barely scratched the surface. Now, we’ll show you a bit more of the power of these tools. To do this, we’re going to start stacking these plugins together. Once you arrive at a look that you like, you can save your steps as a sort of Photoshop preset or action and then run it across your entire batch of photos. Using this process, you can edit a huge batch of photos in no time. Here’s how to do that.
Step 1. Upload Your Image and Apply a Basic Look
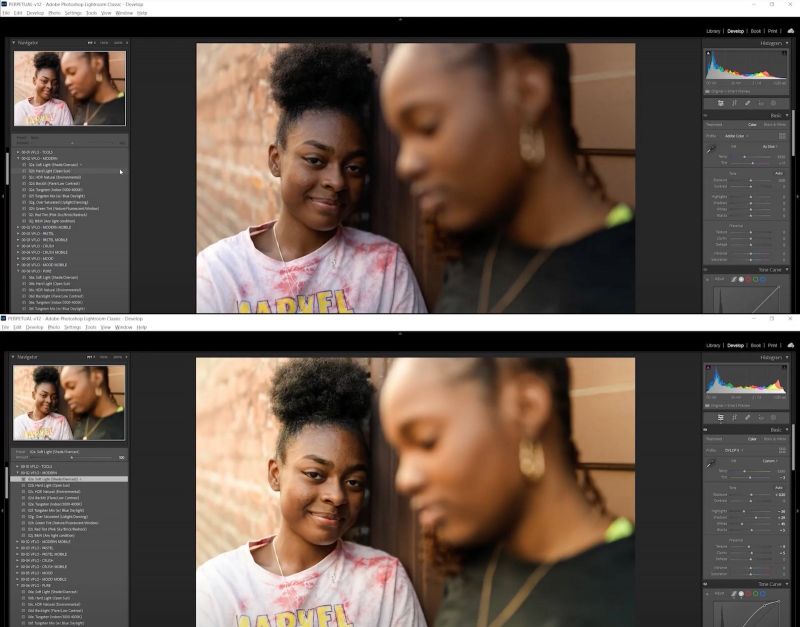
Like last time, upload your image into Lightroom and then start with the basic overall look. This image looked a little pink, so we adjusted the tint and then brought the exposure up.
AI Photo Retouching Workflow, Step 2: Export the Image into Photoshop
Once again, press “Control/Command + E” to bring your image into Photoshop.
Step 3. Apply Your Retouch4me Plugin
For this round, we’ll pair the “Heal” plugin with the “Dodge&Burn” plugin. To begin, go to the Filter menu, select “Retouch4me,” and then choose the “Heal” plugin from the dropdown menu.

After you select the “Heal” plugin, turn your attention to the Sensitivity tool in the top center, just above the photo. We can move the slider left or right to adjust the sensitivity of the plugin as we see fit. For this image, we opted to leave it fully up. When you get the slider where you want it, press the “Apply” button in the lower right corner to apply the effect to the image.
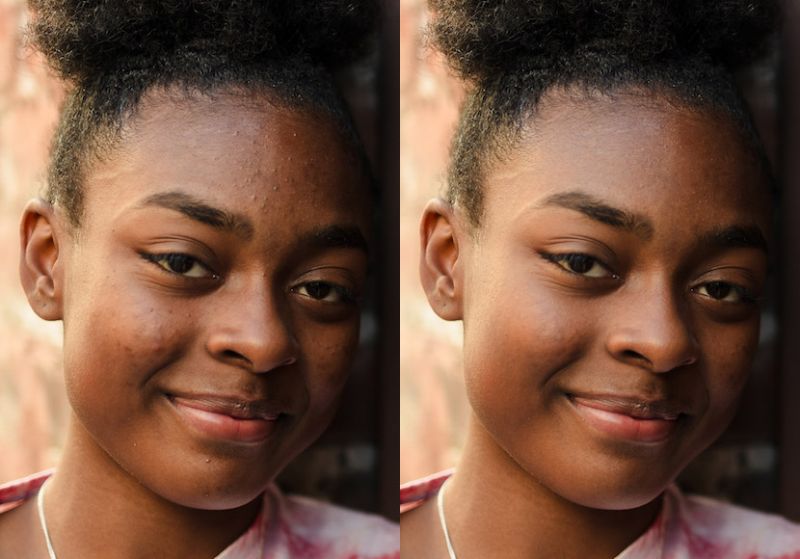
What you’ll notice right away is that the plugin already made a huge improvement, as subtle as it was. Basically, the plugin detected all of the blemishes on our subject’s skin, “healed” them, and then left everything else alone.
Step 4. Add a New Layer with the “Dodge&Burn” Plugin
Now, we’re going to press “Alt + Control + Shift” or “Option + Command + Shift” to get everything to a new layer because we’re going to layer the “Heal” edit with the “Dodge&Burn” plugin. With the new layer selected, go back to the Filter menu and select Retouch4me and choose the “Dodge&Burn” plugin.

We left the automatic scale detection on and then adjusted the Blend slider to dial in the effect. Together, these edits made a huge improvement over the skin while retaining freckles and other features of the skin.
Now, you will notice that in some cases it is actually affecting the background, like it is with this particular image. The reason why that’s happening is because the background is kind of the same color tone as the skin. So, it might be misinterpreting it as skin, but those are really easy things to mask off if needed. This edit looks fine as is.
Our Retouch4me Workflow, Pt. 3: The “Clean Backdrop” Plugin
This time around, we want to show you one of the more specialized tools for your AI photo retouching workflow, the background or backdrop cleanup tool. If you shoot in the studio often, especially if you’re using white infinity walls (or whatever color it might be), you already know how regularly the floor gets scuffs and marks on it. It’s annoying because it takes a good amount of time to clean up in both life and in post-production. With the “Clean Backdrop” plugin, however, now you mostly just need to worry about cleaning the real floor now and then.
Step 1. Upload Your Image in Lightroom and Apply a Basic Look
By now, you know the drill. Get your image into Lightroom and add whatever preset you want to get the image ready for the next phase, using the Retouch4me plugin in Photoshop.
Step 2. Export the Image into Photoshop
We should point out that while we like to use Retouch4me in the plugin format in Photoshop, we do like the standalone aspect. This holds especially when it comes to batch processing, which we’ll cover as well.

But, for an image like this, Photoshop allows us to quickly select the areas we want to work on (see the image above) and use generative fill or, in this case, content-aware fill. Photoshop does a beautiful, base-level job of automatically fixing these kinds of issues in the background.
Step 3. Apply the “Clean Backdrop” Plugin to the Image
Now, go to Filter, select Retouch4me, and choose the “Clean Backdrop” plugin.

You will have the option to select which type of “dirt” (coarse dirt, medium dirt, etc.) the plugin will look for when cleaning up the image. We opted for medium dirt. Choose the option that best suits your image and then watch the magic happen. It might take a minute, depending on the speed of your computer as well as the resolution of the file that you’re working with.

Look at the before versus the after. It’s wild how much of this image is fixed and ready to go. That said, be sure to inspect the image and catch anything that might’ve been missed.

In our example, we noticed blue tape on the floor, which we can then quickly fix with our patch tool inside of Photoshop.
AI Photo Retouching Workflow Pro Tip: Anytime you need to clean the backdrop for a large number of portraits like this, where they need to look good but not necessarily perfect, just batch process all of them using the plugin as a standalone app. A good example of this would be for proofing examples in which your client needs to approve and choose the images they want. You don’t want to fully retouch images they won’t keep, but you can use this plugin to make the images look almost perfect, barring any last minute cleanups like the blue tape we had on the floor.
Our Retouch4me Workflow, Pt. 4: Creating Actions
Now, let’s put this all together. We’ll show you how to create an action now using these AI plugins as part of your AI photo retouching workflow.
Step 1. Upload Your Image in Lightroom and Apply a Basic Look

So we’re going to start with this image and I’m just going to play a basic look again before sending it over to Photoshop.
Step 2. Export the Image into Photoshop
Like before, press “Control/Command + E” to bring your image into Photoshop.
Step 3. Create a New Folder and Stack Plugins to Create the Action
Now, from here, let’s create a new folder and rename it as “Actions.”

Next, press the plus and name your action (see the image below). We called ours “Portrait Special Sauce.”

The goal for creating this action is to create a look that we can apply to all of our portraits. Because it will be so widely used, it should probably be somewhat subtle, but also significant enough to positively impact the image. While you’re setting this up, you’ll likely want to leave most all the plugin options on “auto” mode because you want the AI to be able to detect what it is that you’re applying it to.
Here are the plugins we’ve included in our Portrait Special Sauce action:
- Heal
- Dodge&Burn (set to 120)
- Eye Brilliance (set to around 80% blend to not over do it)
- Skin Tone (so great for unifying skin tone and knocking out blotchy spots!)
- Portrait Volumes
You can use these actions to batch process your images, but you can also set Lightroom Classic to export and apply those actions to every single image that you export.
Once you’ve finished stacking plugins, press “Stop” (see below).

Remember, because you’ve layered a bunch of AI tools, it’s going to take a bit of time to process, especially if you’re processing this over a large batch of images, or any number of high-resolution images.
New Retouch4me Plugin: Color Match

Retouch4me recently released Color Match. This powerful new plugin allows you to create “LUTS,” or “lookup tables” or color grading effects based on reference files. Here’s how you can use it.
Step 1. Choose an Image to Edit

The first thing you want to do is open an image in Color Match. We’re using one from a recent shoot.
Step 2. Load a Reference File

Next, you’ll need to load a reference file, which can be any image from anything, including a still from a Hollywood movie (which you can find on Google or some other search engine). We’ll used a scene from the movie “Inception” for reference. This film uses the popular teal and orange color-grading effect.
Step 3. Adjust the Blend

Once your edit photo and your reference file are loaded, you can begin adjusting the blend on the reference file and dialing in settings like Luminance, Color, and Smoothing. As you make adjustments, you’ll notice how the AI is matching the color grading effect from the reference file over to the image you’re editing.
Step 4: Export Your LUT for Future Use
You can also export your reference file settings as a LUT, which you can then use inside of Photoshop, or in Lightroom as a profile, or even in video editing apps and more. When you export the LUT, Color Match gives you the option to save it as a Q file, which you can then use inside other applications.
Before We Go: Some Wiggle Room for Improvement
One of the things that we’d like to see is some more tools and functionality inside of each of the plugins where we could apply and see the adjustments that we made.
We also wish everything was optimized a little more so that it all worked a bit faster, especially when applying the edits across large sets of images. For example, if you’re doing a thousand images and you’re applying the action that we just created, you’ll want to let your computer run basically overnight.
Of course, that could just be our computer.
It’s important to remember, though, that even the time it takes to apply the edits is really the computer’s time. Afterall, it doesn’t actively take our time to run automatic edits on the computer, right?
Final Edits Using Retouch4me


Conclusion
I hope you found this overview helpful in terms of understanding how Retouch4me’s AI-based plugins can streamline your AI photo retouching workflow. The huge benefit of using these AI tools really reveals itself when we’re able to let the computer do a lot more of the manual work on our behalf, which in turn frees us up time to focus more on the vision of what we’re creating. If you’re in the business of handling loads of photos, especially as a studio, portrait, or wedding photographer, Retouch4me plugins are your time-saving secret weapon. Be sure to choose the plugins that best suit your needs and then put them to work.
To find out more about other Retouch4me AI-based plugins, you can visit the website.


