
To do mass processing of images ranging from simple white balancing with an eye dropper, or adding presets across a series of images for set continuity, Lightroom has been the program of choice. Despite the fact that it can really eat your computer’s resources and behave like a 5 year old crashing after a sugar rush, with an able enough computer it works exceedingly well.
Its interface is simple to understand and use, and its Develop module which comes right out of Camera Raw has always aided this. It’s the perfect companion when loading up your travel photos to scan all 2 trillion of them quickly, culling to sort the wheat from the chaff, and applying presets for artistic effect. But it can’t do everything, and PS can do a lot too, and quickly.
[REWIND: Curves | How To Get The Most From The Adjustment Tool You ‘Think’ You Know]
With the advent/release of CS6 and CC, Adobe has been releasing some steady changes for Photoshop over the past year, and two of the newer ones I think can help usher in the use of this incredible tool for the novice, and more casual shooter, as well as make more images useable for the more experienced.
Removing Camera Shake With Shake Reduction
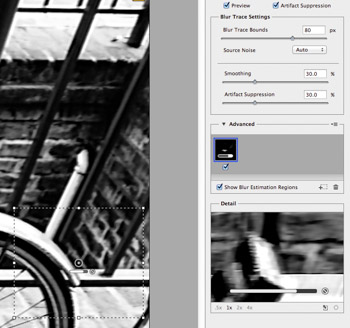
We all, regardless of skill level, sometimes succumb to camera shake. Whether due to the fact you haven’t eaten for too long or circumstance pertaining to low light, heavy glass, or slow glass. Photoshop has a tool that will help reduce camera shake in an image to great effect. Now, it’s necessary to make the distinction between camera shake, and movement within the image. This tool pertains strictly to movement OF the camera, and not to the movement of things within the frame. It’s effectively a Sharpen filter, but it can be applied to more than one spot in an image which allows you to allow for movement in some parts if needed, perhaps if doing a long exposure, and target others. Here’s how:
1. Filter>Sharpen>Shake Reduction

Once you do this, allow a few seconds for Photoshop to analyzes the parameters of the photo. It will set a little box where it estimates the majority of blur is, can tell you which direction it looks as if they blur is coming from, and then will automatically sort it out. You can then add more boxes if you wish. You can tell here I added numerous boxes, but still left some parts (corners) off to show the blur. This works best with less busy subjects than this.
You can see from the before/after image below (after being on the bottom), that it can do a great job, though it can at times, give some strange effects to the areas it hasn’t worked on. Notice the center and front wheel are much clearer. I could go in and try to fix the rest if desired.


That’s pretty much all there is to it! It can be very generous with its ability, but don’t expect it to solve everything. If you’ve been friendly with a bottle of brandy on your vacay in the South of France and snapping away with all the stability of a West African Dictatorship, this is probably not going to help you. That said, it can really make a completely useless photo, into something presentable.
Camera Raw Lens Correction
If you’ve ever traveled to some old European town and wanted to capture some of the peeling Victorian modesty, or maybe even taken a jaunt into your local city and tried to photograph it, you’d quickly realize that shooting buildings isn’t as easy as it may appear. If you’re using something even moderately wide, the perspective of buildings shot from street level up will look a bit skewed. This may be what you’re going for but maybe you’d like it to be straight.
Well, using the Lens Correction option you can quickly address and resolve that. Once you open an image, any image in Camera Raw, or use the Camera Raw filter, there will be a small button under the histogram with an image on it that looks like a set of lens elements. That’s the lens correction selection and will help cure your perspective ailments.
1. Open image in Camera Raw or Camera Raw Filter

2. Select Lens Correction button, then select the Manual tab. There are five primary buttons: Off, Auto, Level, Vertical, Full. Depending on what the image needs, you can use the slider adjustments below, but I’ve found that ‘Auto’ and ‘Full’ generally do very well.


If you’ve got the perspective to what you desire, you may find that some cropping needs to be done. You can either use the ‘Scale’ slider to do this, or simply open the image and do it in normal Photoshop.

I will at some point, if not already, sound like a broken record for praising the Camera Raw Filter. But that’s a chance I’ll take as it has totally changed how I manage and edit. I used to move back and forth much more between LR and Photoshop even though Photoshop is my primary, since it allows me to do pretty much everything. What the filter does is bring the ease of the Develop Module from Lightroom, into Photoshop. This perspective feature is just yet another way it’s doing that.


Get Connected!