Welcoming a newborn into the family is a momentous occasion. Those initial days when babies have their unique newborn look – delicate fingers, squishy cheeks, and that unmatched innocence – are fleeting. As such, many parents aim to preserve those special moments through photos. While professional studios offer this service, there’s something intimate and genuine about capturing your baby in the familiar surroundings of home. Here’s a guide to help you take beautiful newborn photos right at home.
Video: How to Photograph a Newborn at Home
In this article/video, I’m going to walk you through how to create your own professional newborn photos from start to finish right in your home garage. Before we begin, be sure to grab the Exercise File and edit it along with me!
Best Time for Newborn Photos
When considering the timing for newborn photos, the first two weeks of the baby’s life often provide the best results, especially between days 5 to 12. It’s during this period that babies tend to sleep deeply, which allows for various newborn and baby poses without disturbing them. Also, they retain much of the natural fetal position, making it easier to capture those quintessential newborn shots.
Creating the Right Environment
One of the critical aspects of newborn photography is ensuring that the environment is suitable for the baby. Firstly, babies are accustomed to a warm ambiance, reminiscent of their time in the womb. So, make sure the room where you’re photographing is cozy, ideally around 80°F or 27°C. This is particularly important if you’ll be photographing the baby with minimal clothing. The ambiance also matters. A calm, quiet environment will ensure that the baby remains peaceful and undisturbed. A handy tip is to consider using a white noise machine or even an app on your phone. It can be instrumental in recreating a soothing environment, similar to what the baby heard in utero.
Safety is paramount. When trying different poses, always ensure that there is sufficient support for the baby, especially for the head and neck. Even when they seem secure in a particular position, always have an extra pair of hands nearby, just in case.
Lighting
In photography, lighting can make or break a picture. For newborn photos at home, natural light proves to be the best choice. You can achieve soft, diffused lighting by positioning the baby near a large window, though not directly under sunlight to avoid harsh shadows. If you’re trying to plan around the weather, overcast days are splendid because the cloud cover acts as a natural diffuser, ensuring the light isn’t too harsh. But if it’s a sunny day, shooting during the early morning or late afternoon is advisable.
Poses
When it comes to poses, the idea is to showcase the natural beauty and innocence of the baby. Wrapping the baby in a soft blanket not only looks endearing but is also functional as it keeps them warm and gives a feeling of security. Placing them on their back and letting their tiny arms and legs stretch out or allowing them to curl up can bring out their vulnerability and cuteness. Don’t forget to involve family members too. A shot of the baby nestled against a parent’s chest or a gentle touch from an elder sibling can evoke powerful emotions.
How I Captured the Image

Before we begin, I’d like to point out that you can use any camera you’d like to capture this image and if you’d like, you can even use your phone in portrait mode or portrait mode equivalent and still come out with fantastic, professional-level images. For today’s tutorial, I photographed my newborn daughter, Josie, with the Fujifilm GFX100S Medium Format Mirrorless camera paired with the Fujifilm GF 80mm f/1.7 R WR Lens which is roughly a 50mm full-frame equivalent. Generally, for portraits like these, I recommend either a 50mm or 85mm prime lens. Since toddlers and young children tend to move quickly, I kept my shutter speed around 1/400 to 1/500 seconds and with our bright natural light coming in through the garage as the primary light source, our ISO will land at around 400-800 depending on the time of day.

For this image, I set up my Backdrop by Ethan Alex a little deeper in the garage since the neutral colored walls provided abundant fill for a large amount of light coming in through the garage opening. If you don’t have a backdrop, you can always use bedsheets or even just a plain wall and when you’re taking the photographs, make sure you always have an adult right by the baby and remove any distractions from the room while you or an assistant try to catch their attention for that perfect expression.
Related Reading: 10 Newborn Baby Photoshoot Ideas & Inspiration
How to Edit a Natural Light Newborn Portrait
You may have noticed that the exercise file is a JPEG. That’s because Lightroom doesn’t yet support the massive 100-megapixel RAW files that come out of the GFX100S, so we’ll be editing the JPEG file which is already beautiful on its own. Specifically, I’ll be using Lightroom Classic, which is a powerful and often underestimated tool and I’d recommend it over Lightroom CC if you’re looking to get the most out of your raw images with the full desktop experience.
Step 1: Getting That Perfect Crop

By pressing R+O with the cropping tool selected, you can cycle through the various composition guides to help you frame the image just right. I began by slightly tightening the frame and getting Josie’s face right in the middle of the picture.

Notice I left a lot of negative space around Josie. I did that because I like the overall look, but also, practically speaking, I’ll want that extra room in case I decide to print the picture down the road and need to fit it into a frame or an album. If the picture is too tight and I need to rework it for any reason, I won’t have anywhere to go without potentially cropping into the subject.
Step 2: Applying the Base Tones with the Basic Adjustment Sliders
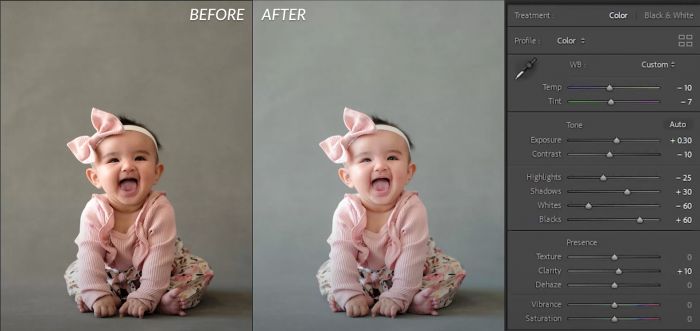
There’s a tendency to adjust the exposure first, but we’re going to think a little differently and work backward starting with the evening out the shadows and highlights. By lowering the whites and highlights and raising the shadows and blacks, we’re reducing the contrast and enhancing the brightness and softness created by the large light source coming in from our left.

We’ll lower the contrast slider just a touch and then I’ll brighten up the exposure as well as raise clarity by 10 to boost some of the mid-tone contrast. Using the white-balance selector, find a point in the image that’s closest to neutral that’s also being lit by the primary light source. Seeing that mostly everything in the frame has a tint, I picked Josie’s headband as the closest neutral source and made slight adjustments to arrive at the settings above.
Step 3: Fine-Tuning with HSL and Color Grading
We’ll be working with just the Saturation part of the HSL panel. The biggest difference you’ll notice is that I desaturated most of the blue hues. The blue often happens when you’re working with natural light from a window and you’ll see that mostly in the shadows. By removing the blue hues, we arrive at a more neutral palette. I also pulled some oranges and red hues out of the skin tones as well as greens, aquas, and purples, which are colors that aren’t in the scene anyway.

In the color grading panels, I added warmth to the highlights to match the skin tone and likewise in the mid-tones as well as upping the luminance. In the shadows, I added a touch of blues and raised the luminance to polish up the overall color tone.
Step 4: Final Retouches and Adjustments
Using the adjustment brush tool, I added a touch of warmth to the bottom of Josie’s feet to match the color of her hands and her face. Josie’s smile lines also appeared a bit on the dark side so I used the Diminish Lines tool from our Visual Flow Retouching Toolkit and painted over the lines to soften up the shadow areas and you’ll see that it brightens up the image quite a bit.
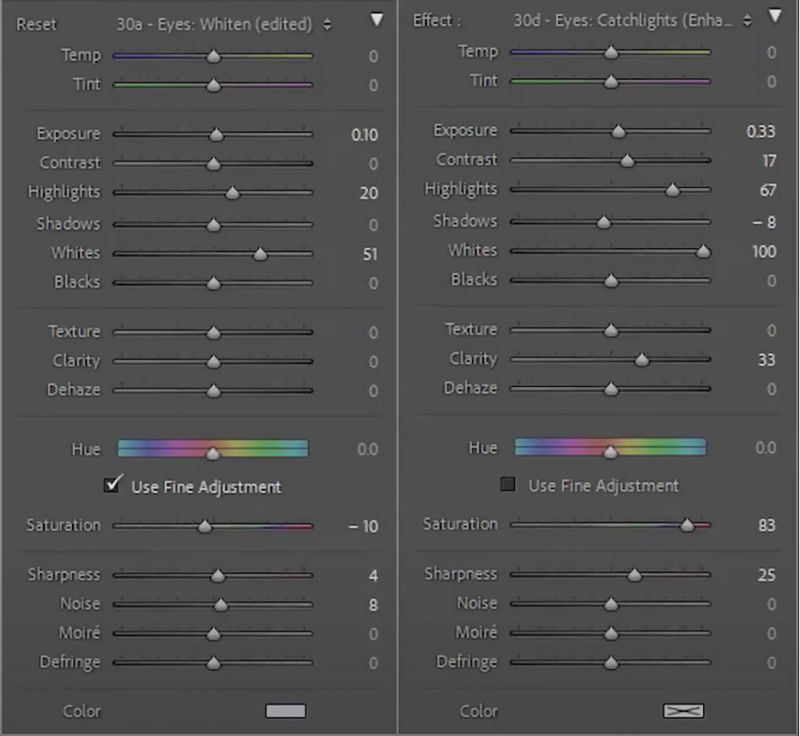
After some basic spot healing to get some little flecks and in some cases, boogers, off, our last adjustment is on the eyes. I used Eyes: Whiten as well as Catchlights from the Retouching Toolkit to help Josie’s eyes pop out. Just be sure to zoom in and out frequently to make sure the effect isn’t overdone and is evenly applied to both eyes.

Quick Tip: Hold down Alt or Option, click and drag the adjustment brush marker to the left or right to evenly adjust the overall intensity of the effect.
Before and After of The At Home Newborn Photo

Conclusion
I hope you enjoyed this full walkthrough of how I captured and edited this newborn portrait of my daughter, Josie. The screenshots layout the baseline settings so that you can create your own adjustment brushes and presets, much like those included in the Visual Flow Retouching Toolkit. We also have an entire Newborn Photography Workshop for those interested in mastering the techniques and incorporating stunning newborn photography into their portfolios.
Be sure to catch our next episode of Mastering Your Craft on Adorama’s YouTube channel next week! If you want to catch up on all the episodes, make sure you check out our playlist!


Get Connected!