What are your posing goals for men? Are you aiming to depict strength and masculinity, authenticity, beauty, fun and excitement? Regardless of the vibe or the desired end goal, having an arsenal of mens poses and a sound understanding of posing nuances for men will help you create more impactful imagery. Whether you are shooting lifestyle portraits or photographing the groom for wedding photography, the examples and tips in this article will help you direct your subjects for better photo poses for men.
In the following article, we’ll cover the following topics:
Posing Tips for Men
Posing for men can be quite simple with just a few pointers and tips. This dynamic posing guide is easy enough for anybody to follow. Starting from the feet, we’ll work our way up posing each part of the body. We developed a system called “Foundation Posing.” The result will be a natural look that can transform your image.
The “Before” Photo
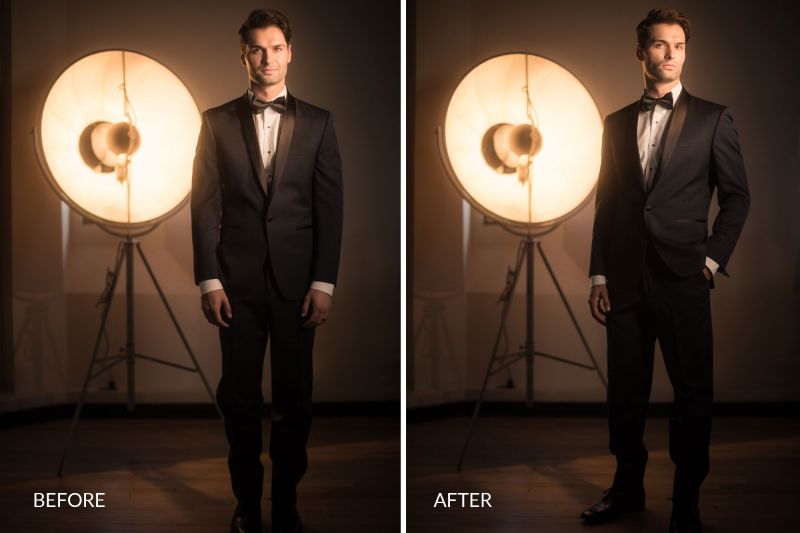
First, I’ll show you the worst case scenario. This is if the client has no idea how to pose. The ending result will be an image like the one above. As we fix the pose, the most important point to keep in mind is how body language communicates.

Start with the Stance with Toes Pointed Out
Direct your male subjects to open their stance so that their feet are shoulder-width apart. It’s also important to point the toes slightly out for a more confident look. When the toes are pointed inward, subjects tend to look timid and sometimes even childish.
Tip #2: Feet Shoulder Width Apart

Don’t go wide. However, don’t go too narrow either. The right amount would be about shoulder’s length. Here’s the before and after once we correct the feet. Now let’s move onto the hips.
Tip #3: Lean to One Side
While men can get away with standing straight, one tip is to put all the weight onto one leg. The official term for this is called “Contrapposto” from the Greeks.” This creates an asymmetry that looks natural and comfortable. When the hips are shifted to one side or the other, as opposed to placing equal weight on both feet, subjects look more relaxed and the pose feels more natural.
Tip #4: Give the Hands Purpose

Hands are tricky because we often don’t know what to do with them. Usually, we like to keep them occupied rather than just dangling on our sides. They’re always communicating something. The trick is to give them a purpose such as adjusting the lapel. However, just to start, we’ll have Derek put one hand in his pocket. This provides a great and natural base.
Tip #5: Straighten the Spine

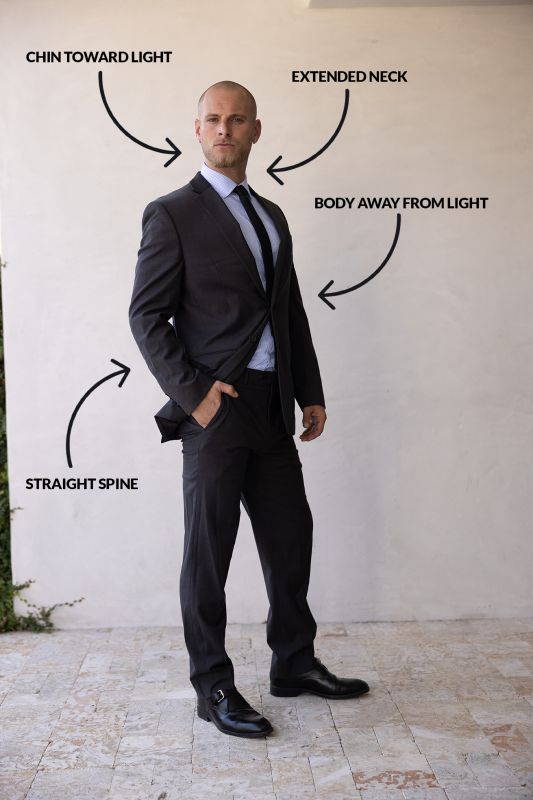
‘Keeping a straight posture gives off a confident appearance. We want the spine to have a natural curve to it as demonstrated above. Instruct your clients to act as though a string is gently pulling up from their head. Be careful not to overdo it, however. Overdoing it can look just as unnatural.
Tip #6: Extend the Neck Forward
The neck and jawline are important for men. We want to define the jawline and have it stand out. Extending the head forward just a touch will accentuate the jawline.
Tip #7: Turn the Body Away From the Light and the Chin Toward the Light
To help emphasize the jawline, first, turn the body away from the light. With the body turned away, turn the chin back toward the light. This creates great light on the face. The shadows create a dramatic affect. In addition, the shadows help lean out the subject.

Tip #8 | Take a Breath In
When we inhale, our chest expands and our stomach contracts, making our chest appear broader and our stomach appear leaner. It also tends to straighten posture, so ask your subject to take in a breath before you snap the shot.
Tip #9: Lower the Camera Angle

You’ll notice that a higher angle will shorten the appearance of the legs. The lower we place the camera, the longer the leg appears. Be sure to use a wider angle lens between a 24-50mm and keep the camera low. The result will be your subject appearing taller and more prominent. Here is the before and after up to this point.
Tip #10: Capture Action and Detail Shots

To add interest to your images, you can do two things. First, have your subject do something. For example, you can have your subject adjust his tie. Another example would be to adjust the cuff link. Second, be sure to get a variety of depths. Getting closer shots as well as wide shots will create a unique story.
The Before and After Result of the Posing Steps for Men


By making these simple posing adjustments, we can clearly see that we’ve accomplished our goals of expanding our subject’s presence and boosting his masculinity.
Bonus Tip 1 | Play with Cropping
Be careful not to crop at joints or where the body begins to widen out. I usually keep my images cropped at the thigh to show the gap between the legs. This helps with form. If not there, I’ll crop above the hips.

Here is the final collage of the various images we captured. Adding movement as well as close up and medium shots gives a sense of story and detail.
Bonus Tip 2 | Play with Various Expressions

Canon 5D Mark IV, Canon 50mm f/1.2 at f/1.2, 1/500, ISO 100With additional adjustments of facial expressions and direction, as well as multiple crops to focus on different parts of your subject’s story, you can create cohesive, impactful images that will look great in an album spread or as part of a wall art cluster.
4 Basic Photo Poses for Men
Orchestrate the perfect shoot with our techniques in hand placement, expressions, and body language that can revamp your portfolio. In our Complete Posing Workshop, transform from a photographer into a director to pose clients and master the subtle nuances for every shooting scenario.

From standing to group photos, here is our guide to photo poses for men:
Standing Portrait
Starting with the standing portrait pose, we can direct our subject from the ground up. Adopt the Foundation Posing Framework to make posing and directing less daunting. Our first three steps to pose our subject through the standing portrait are:
- Feet First, Hip Distance Apart
- Toes Pointed Out
- A Straight Spine

Posture instantly changes the look of confidence and translates as a triple-threat: masculine, strong and powerful. In our Photographing the Groom workshop we cover more tips on posing men, capturing expressions, lighting, and composition in a less-than-perfect hotel room.
Sitting Portrait
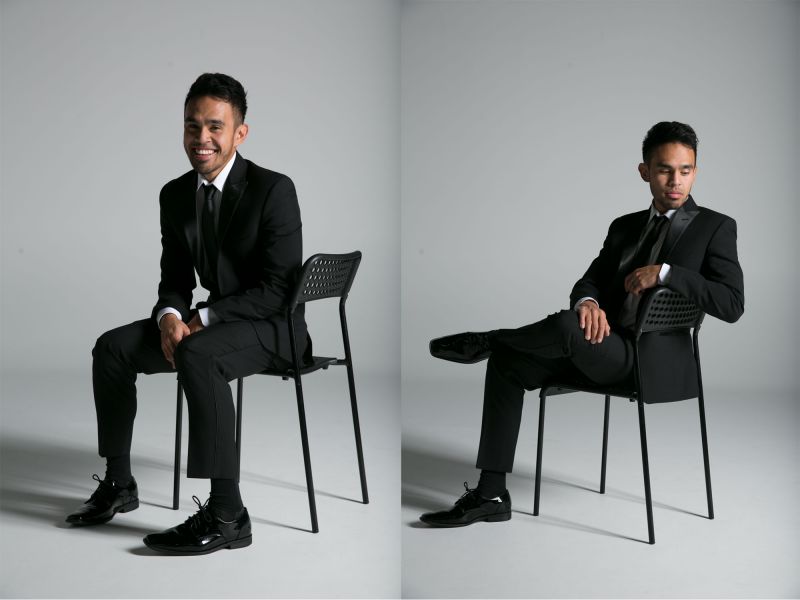
Sitting poses can be complicated because typically our natural inclination is to hunch over. We’ll walk you through how angles can diminish or increase your client’s presence, building the pose from the ground up.

Begin at the feet and keep the toes pointed outward to refrain from the “potty” look. Shift to a stronger posture and varied hand placement to change our subject’s demeanor. Use camera angles to help your subject achieve presence in the frame; a slight adjustment in angle helps our subject become more proportional in the frame and changes the portrait from whimsical to editorial.
Focal length plays a huge role when photographing seated subjects because of distortion from specific lenses making objects closer to the camera appear larger and wider.
Editorial Group Photo
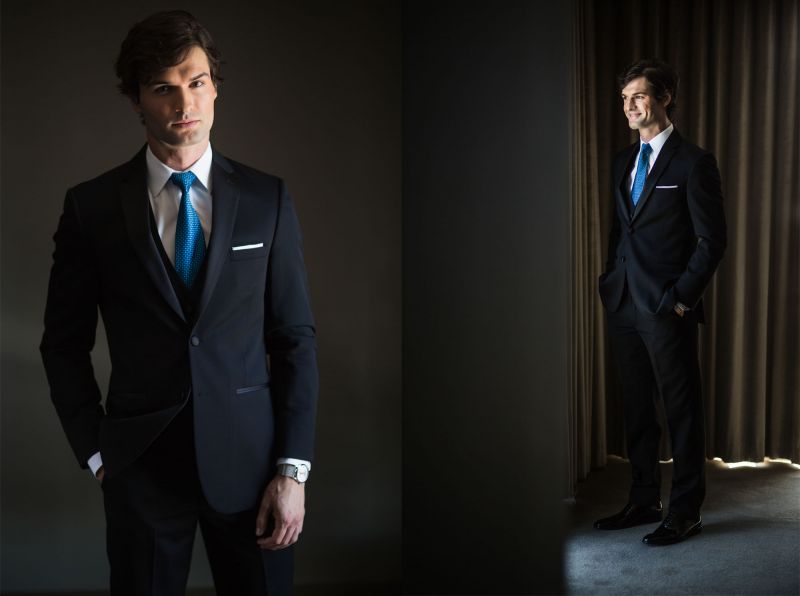
High-fashion group photos provide the perfect opportunity to showcase your directing skills. Great direction is a catalyst to great posing which means that it might take a bit of coaxing to get your subjects to cooperate with this next pose. Since men can handle harsh shadows and brooding looks, pose them with more of a high-fashion/GQ theme in mind: think serious expressions, strong dominance in the frame, moodier tone, and dramatic light.
One way to make a portrait ‘editorial’ is through lighting like we cover in Lighting 201. Be sure to direct your subject through expressions as well to sell the image. Try a more serious expression and utilize shadow cast to chisel out his jaw and features.
Fun Group Photo
Fun group photos provide the perfect occasion to interact and get those candid expressions. As the director, think about what is going to make the image most meaningful, and work in and out of the scene to tell an entire story. Not only will this translate as authentic, but you’ll be able to capture those truly candid moments through your interaction.

Conclusion
In this guide, we have explored a variety of photo poses tailored specifically for men, aiming to enhance confidence, express personality, and make your male subjects look their best. Remember, the best pose is one that not only looks natural and comfortable but also reflects the individual’s unique character and style. We encourage you to step in front of the camera with confidence and creativity. Use this guide as a starting point, and don’t be afraid to adapt poses to suit your personal flair and the specific context of your photoshoot.
For more guidance, see the video below. In addition, you can find more of the best education in photography, from mastering manual mode to lighting and posing your subjects, at SLR Lounge Premium.


Get Connected!