With 15 images prepped for this article, I have a feeling it could turn into something massive. That’s no surprise considering the amount of work which went into the creation of this shot. This article will guide you through it all, in as much detail as possible, without wasting half of your day.
As those of you that read my articles will know, this year is the year of product photography, and you may also remember that I’ve been talking about elevating photos by adding other elements. I feel there comes a point with product photography (any genre in fact) where you can consistently create solid images, but in order to put yourself above the rest, you need to add other elements and explore challenging, perhaps even untrodden, territory.

Max Factor Product Photography Lighting
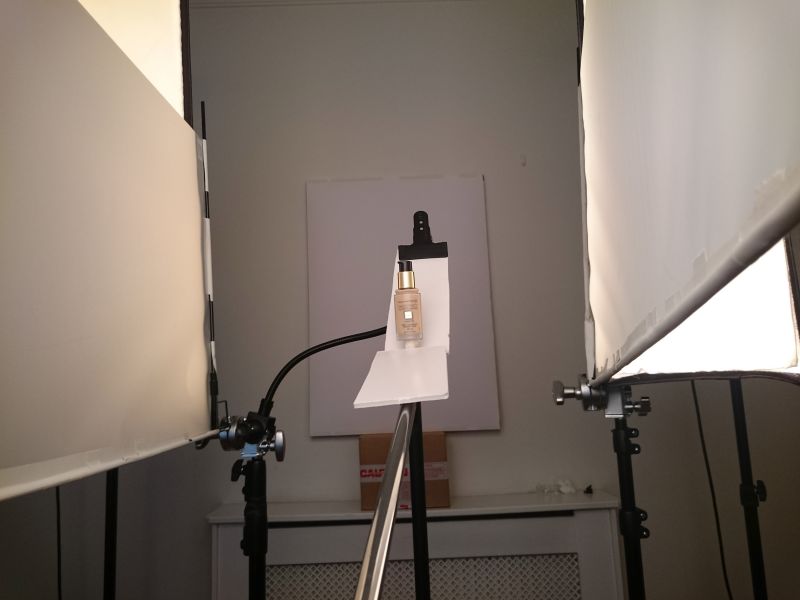
In the interest of reigning in the length of this article, I’ll try to keep the words to a minimum; although, I’m never too good at that. The behind the scenes photo’s for this shot are not the best, but they give you a good idea of the lighting set up.

As you can see from the last two photos, I was using a large rectangular softbox and two scrims. The scrims were touching the softbox and at a slight angle. It was important for the scrims to touch the softbox so I could control the size of the highlight on the bottle, and so I could create gradients on the scrims. The camera was at a low angle so it didn’t reflect in the bottle. Always remember that light moves in straight lines, therefore, the low angle meant that the softbox reflected in the bottle and not the camera.

In that rather horrid behind the scenes shot, you can see that I was also using a small stripbox at the back of the scrim. This arrangement was mirrored on the other side. The idea here was to add more gradients and brighten the edges in a flattering way. Ignore the Speedlight you can see to the left of frame; from memory, I turned it off.

The last behind the scenes image shows the Max Factor foundation from (roughly) the camera’s perspective. Here we can see that I used a couple pieces of foam- board – one behind and one in front. The purpose of these was not to add any light but rather to control the reflections from the bottle. Glass can be tough to shoot, especially if it’s curved, so by placing these pieces of white foam-board very close to the bottom and back of the bottle I managed to control those reflections. Significant adjustments in post would still be necessary, but at least the job will be easier and less time consuming.
Product Photography Splashes, A little Confession
The splashes used within this image were heavily edited and manipulated. They started off as completely different colors (blue, red, green) and shapes, and each side is made up of three individual splashes which were combined into one and then placed as you see. The RAW images of the six splashes were taken from the Photigy splash pack, which you can find in the Photigy store, click here.
I did briefly grapple with the idea of using RAW splashes created by someone else, but in the end my decision was based around one question: Could I create these RAW splashes myself? If a client approached me and wanted me to do this, could I? With the answer to that question being ‘yes’, I had no issue using these splashes.
Editing This Commercial Photography Max Factor Image
I wanted this photo to have a high-end commercial / advertising, feel, meaning I wanted it to be at home blown up on the walls of departments stores. That desire meant two things to me: Firstly, it had to be immaculate. Secondly, this was going to take a long time. I cannot take you through every step as that would take far too long. Instead, I have split the edit into sections and will show you that area, and it’s corresponding layers.

My first step, as always, is to take multiple images and focus stack them together so that every area is perfectly sharp. To do so, I use a program called Helicon Focus. You can find my review of it, as well as a discount, by clicking here.
[REWIND: IS HELICON FOCUS THE BEST FOCUS STACKING SOFTWARE? {REVIEW}]

When shooting an object like this, I’ll often process multiple stacked versions (some under exposed) so that I can protect the highlights. As such, my first step, once in Photoshop, is to combine those elements.
With the layers combined, my next step is always to clean, and clean and clean. With any imagery that you want to take to a commercial photography standard, it has to be perfect, as no brand would want consumers looking at their imagery and poking holes. Don’t be afraid to spend a long time here.

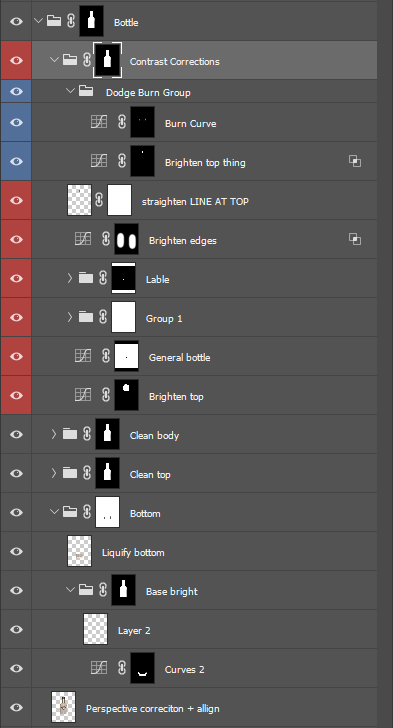
I’d also like to clarify what I mean by cleaning. When I say cleaning, I mean a great number of things, and not just some cloning to remove dust spots. I do things like; polish metal, perspective correction, straighten labels, cloning and Healing to every area, Frequency separation, and some others that I’m probably forgetting. I also, having “cleaned” the bottle, get creative and adjust the contrast. That will involve selectively adjusting the text and branding, adding overall contrast and selective contrast, dodging and burning and so on.
In the layers photo above I had to collapse the cleaning groups as there were just too many layers to screengrab! I thought the contrast ones were a little more interesting.

Adding Something Unique To Your Commercial Photography
Now we come to the splashes. Splashes, in and of themselves, are not particularly unique for high-end commercial photography. For that reason, I wanted to do something a little different and went to great lengths to achieve that.

As previously mentioned, the RAW splashes came from a splash pack which was purchased from Photigy, find it here. Once I selected the six splashes I was going to use, the editing began.
I first used Color Range to remove the splashes from their backgrounds (check out this article for more info). With them selected I smoothed out the tonal transitions; used Puppet Warp and Liquify to mold them into shape; adjusted their contrast; dodged and burned, and matched each one to the color of the bottle. Finally, I combined them together using masks and placed them in position next to the bottle.
[REWIND: HOW MUCH DO YOU KNOW ABOUT MASKING IN PHOTOSHOP? YOU MAY BE SURPRISED]

The Finishing Touches
With the bottle cleaned, splashes created and so on, the last phase was to add the reflection. This is a simple process. Hide your background and merge all other layers onto a new layer. Flip that merged layer and place in a suitable position beneath all your original layers. Adjust the opacity, add a blur (I use tilt-shift) and add a mask to feather the effect off. Done.

Sleep On It, Get Feedback And Return Another Day
With a shot like this, with such in-depth, heavy, time-consuming editing, it’s understandable that one would miss things. I find it so valuable to post images to forums, hear feedback from other photographers and then use that to improve the shot. I don’t, and you shouldn’t, listen to everything people say, but the opinions of others are always valuable.

The “finishing touches” to this image, as you can see from above, were extensive. If you’re not into posting your images to forums, at the very least, sleep on it and return to your work with fresh eyes. While I cannot stress the value of that approach, another great way to see errors you missed is to print your work. Once printed you’re viewing it in a different way, literally, and that can help to shift your perspective.

So, above you can see the SOOC (one of the underexposed ones) and below is the final image. There was a lot of work to get from that, to this.

Commercial Photography Summary
The key things I would like you to take away from this article are:
- To elevate your photography and take it away from what is considered normal or average, you need to add other elements. Be they splashes, powder explosions, water tanks, interesting locations, unique lighting, new camera techniques and so on. Whatever it may be for YOUR genre of photography, think differently.
- It’s ok to use stock photos so long as you know that if a client asked you to repeat the work, you could. If not, and the photo will be in your portfolio, I would not advise it.
- Commercial product photography, high-end fashion photography, beauty, etc. all take a long time to accomplish. Don’t be afraid of spending hours and hours in the digital darkroom.
If you’re interested in purchasing the Photigy splash pack, you can find it on their website here. On the other hand, if you’re looking for something else which could alter your images, check out the SLR Lounge Cloud Pack and Smoke Pack. Both contain a wide array of images which you can use in your photos. Keep in mind, however, these things should only be used to augment already solid imagery. As a great friend of mine often says, you cannot polish a turd. Therefore, If it’s further education you find yourslef in need of be sure to look over everything on offer in the SLR Lounge Store, click here.


Get Connected!