
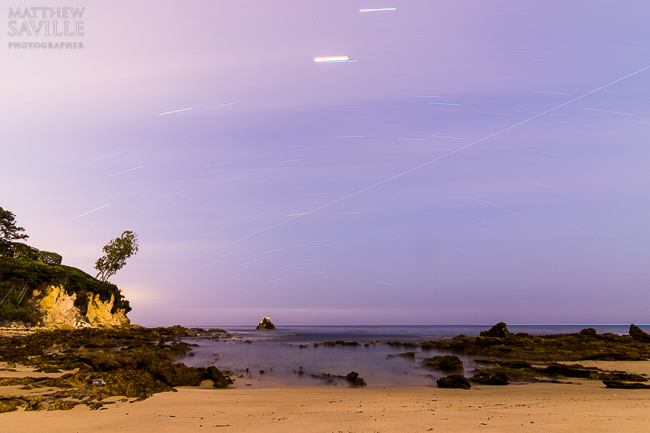
The Photo
(Click here to view a larger version!)
The Equipment and Settings
- Nikon D5300
- Tokina 11-16mm f/2.8 @ 11mm
- Heavy, (very old) rock-steady Slik Tripod
- 6 ~1200 sec exposures @ f/8 & ISO 400
- Manual (Bulb) Exposure, Manual WB, RAW
How We Shot It
When it comes to astro-landscape photography, I’m a “put all your eggs in one basket” kinda guy. If you don’t go for broke, you’ll be hard pressed to create images that truly push the boundaries of what is possible with digital photography today. So I like to take risks, even if it means that hours of watching and waiting could be wasted when a shot or concept doesn’t turn out. Of course as an astro-landscape photographer I often have 2-3 cameras at my disposal, so there’s always at least a few “eggs” left over for a different basket!
Last night was one of those nights. It was the first of four lunar eclipses that we (North America) will have in 2014 and 2015, and I wanted to try something that I haven’t done since the days of film.
When most people think of photographing an eclipse, they think of grabbing their biggest telephoto lens, zooming all the way in, and getting a close-up shot of the moon in its various different stages of eclipse. Especially full eclipses such as this one, when we get a “blood red moon”.
Call me jaded, however after the first or second time every eclipse starts to look the same. Don’t get me wrong, they’re incredible to witness with the naked eye or through a telescope, however as far as documentation is concerned, we all wind up seeing a hundred very similar pictures on Facebook the next morning: A weird looking moon. Yay! Again I’m not saying these images aren’t cool, in fact it is something every photographer should attempt at least once or twice. After a while though, I found myself wondering if there was a different way to photograph it, something that (most) other photographers aren’t doing…
Being the long-exposure junkie that I am, I wondered if I could turn the moon into a “star” trail. A 1-2 hr long exposure, or combination of exposures, ought to do the trick. I did it once before many years ago, with a 2-3 hour long exposure on film. The image turned out almost completely black, due to reciprocity failure, except for the streak of the moon burning its light onto my film.
So with this goal in mind, a couple friends and I headed to the beach where there would be a little less light pollution, and (allegedly) clear skies.
We started like any good nightscape photographer ought to: at 30 sec with our apertures wide open! Here’s the test exposure that gave me an idea of what I was dealing with:

I made this exposure right as the eclipse was beginning to take full effect. (We had started earlier in a different location, however the weather man lied to us and the clear skies were not-so-clear…)
So I knew that the moon would get a little bit darker, and then rapidly get a whole LOT brighter. Perfect! I think…
From my exposure of 30 sec @ f/2.8 & ISO 1600, I decided to do exposures of ~20 mins, f/8, and ISO 400. (Do the math on your fingers!)
[Click HERE to read an article on how to gauge extremely dark exposures at night!]
Here’s what the single exposures looked like:


Half way through the sequence, I had second thoughts about my 20 min long exposure time. So I switched to ~10 minute exposures, and bumped up my ISO one stop. The reason I did this was twofold: First, 10 minute exposures would reduce any “christmas tree light noise” that can happen with long exposures. Secondly, I was also worried that towards the end of the eclipse, 20 min exposures wouldn’t be able to give me an accurate enough way to track the brightening of the moon- As the moon got brighter, it would “explode” to white and blow out my photo. Instead of having to throw away an entire 20 min exposure when this happened, I’d rather be able to cut it as close as possible and only have to “throw away” the last few minutes of blown-out moon-trail. (If this doesn’t make sense, please feel free to comment below!)
Indeed, in the last couple exposures you can see the moon getting explosively bright and over-powering the image. (Not to mention, the lens started getting a little foggy) It was at that point I decided to end the sequence and call it a night…
In retrospect, I probably should have picked even shorter, faster exposures- maybe 1-5 min in length. I’m definitely going to be trying this again in October of this year, (14th) …maybe somewhere with fewer clouds!
The Post-Processing
Post-processing for this scene began with simple processing of each RAW file. I started with an SLRL Lounge Base Preset from the “Vivid” category, a Light HDR preset. This helped me out by automatically setting all my favorite settings for lens profile correction, sharpening, and contrast / color.
From here, however, things started to get a little tougher. I took each separate image onto photoshop, and used a layering technique which I outline here in this video.
Since I had picked 10-20 min long exposures, the final layering job was not very smooth when using simple layer blending mode techniques:

It also didn’t help that light clouds were passing over quite rapidly, which will cause any points of light to blur quite a lot. However simple layer masking and cloning yielded the following final result:

To learn more about layer blending, masking, and general HDR blending techniques, check out this video HERE or check out our HDR Photography Workshop DVD!
Aaand, done!
In retrospect, I think I can do better. I feel like this was only partly successful, and partly just an experimental, trial run for next time.
This, I feel, is the essence of photography in general. Everything is a learning process, and experimentation is the key to creativity! Just keep this in mind whenever you go out, whether you’re shooting something you’ve never shot before, or something you’re getting bored of shooting. Keep your creative vision fresh, and don’t be afraid to play around and try something new!
Take care, and happy clicking,
=Matthew Saville=
Learn HDR Photography
For more HDR education, be sure to check out HDR Tutorial by SLR Lounge. This comprehensive “gold standard” guide will give you a mastery of HDR photography, from the scene considerations to the actual shooting to the post production. Click here for more info.
Adobe Photoshop Lightroom
Lightroom 5 is, in our opinion, by far the most powerful workflow tool for any photographer especially wedding and portrait photographers who need to achieve perfect color correction at a rapid-fire pace. Become a Lightroom Master using our complete Lightroom Workshop Collection for Lightroom 5! This DVD workshop includes extensive tutorials for everything from organization & workflow to image processing and our awesome preset system.
The SLR Lounge Preset System
The SLR Lounge Preset System is designed to enable Lightroom users to achieve virtually any look and effect in 3-5 clicks. Including basic color correction, vintage fades, black & white effects, tilt-shift effects, faux HDR, retouching, detail enhancing, and so much more, the sky is the limit with what has been dubbed the most powerful and intuitive preset system available! Click the link above to learn more/purchase. The SLR Lounge Preset System is now available for both Lightroom 5, Lightroom 4, and Adobe Camera Raw. (Bridge CS6 and CC only, click for more info.)


Get Connected!