Introduction
In this video from our Lightroom 4 A to Z Workshop on DVD, we will demonstrate how to use the Sync and Auto Sync functions to batch process images in Lightroom 4.
Batch processing is essentially copying settings from one image and then applying those same settings onto other images in the catalog. Batch processing can save you a lot of time in post production, allowing you to spend more time behind your camera!
Watch the video and continue reading the article below.
Watch the Video
How to Select Multiple Images
First, select an image to use for this tutorial and make some significant adjustments to it. For our example, we will make some adjustments in the Basic Panel (press “Ctrl + 1” to expand this panel). Next, we are going to make a selection of images in our catalog. Hold down “Shift” on your keyboard and click on the last image of your selection to make a selection order. If you want to select non-sequenced images, then hold down “Ctrl” on your keyboard and then click on each individual image. For this tutorial, we will simply hold down “Shift” and select the first 5 images in the filmstrip of our catalog.

Once we have selected multiple images in our catalog, the bottom right panel button of Lightroom has changed (we still have the Reset button). Now, we have the options for Sync or Auto Sync.

To enable Auto Sync, flip up the switch next to Sync. Once you flip up the switch, the Auto Sync Button will appear. The Auto Sync and Sync buttons do different things, which we will discuss in the next sections of this tutorial.
![]()
The Sync Button
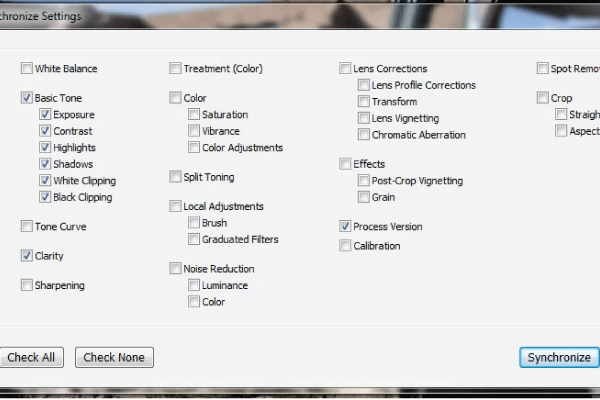
First, flip the switch back down to turn off Auto Sync. Once you flip the switch down, the Sync Button will appear again. When you click on the Sync Button, this will bring up the Synchronize Settings Dialogue Box. Here, you can choose exactly which settings you want. First, click on “Check None” at the bottom left of the dialogue box. Since we only made adjustments in the Basic Panel, we are only going to check the boxes next to “Basic Tone” and “Clarity” but you should feel free to check whichever boxes you need to!
In addition however, be sure to check the box next to “Process Version” because that we are using the same Process Version on all of the images selected in our catalog, and we don’t want to accidentally get bumped back to one of the older process versions. Once you are done selecting all of the develop settings, click on “Synchronize” at the bottom right of the dialogue box. This will take the settings from the main highlighted image (the one currently displayed) in our selection and automatically sync those same settings over the remaining images selected.

The Auto Sync Button
When we enable Auto Sync, any adjustments we make to our main image in the selection will automatically be applied to all of the remaining images selected. (With the exception of brushes and gradients; these will not be applied to all subsequent images and must be Sync’d manually.)
With Auto Sync enabled, we are basically batch processing all our selected images simultaneously! For example, if we adjust Exposure down to -4 on one of the images, the remaining 4 images in our selection will also have an exposure of -4. As you can see below, all images in our selection have an exposure of -4. If we click on the Reset Button, next to the Auto Sync Button, this will reset the settings on all of the images in our selection.

When is Auto Sync Useful?
The Auto Sync feature is just another way to batch process images inside the Develop Module in Lightroom 4. If we have a handful of images shot in the same scene with the same camera settings, we can enable Auto Sync, make all of our adjustments at once, and then un-select the group and make any final individual changes separately.
As always, our goal with post-production is to minimize repetitive adjustments. If you need to make the same adjustment to multiple images, you should always avoid making that adjustment twice! Just perform the adjustment once on all the images using Auto-Sync, or perform the adjustment on a single image and then sync it to every other image that needs that adjustment.
Conclusion & Learn More!
There are several different ways to move develop settings from one image to another. In our “How to Use the Previous and Reset Buttons in Lightroom 4” tutorial, we demonstrated how to batch process using the Previous Button. We can also use the Copy/Paste Buttons, demonstrated in our “How to Use the Copy and Paste Buttons in Lightroom 4” tutorial, to batch process our images as well. The Sync and Auto Sync Buttons we discussed in this tutorial are another great way to batch process images.
There are all sorts of different options out there when it comes to batch processing, so customize and use whatever system works best with your workflow. At Lin & Jirsa Photography, we typically apply settings to a specific image in the scene and then use the Sync feature to sync across the entire scene. The rapid efficiency of these batch processing techniques allows us to cull and edit over 1,000 images an hour in Lightroom 4. We then make minor adjustments as we go through each image independently.
We hope you enjoyed this article and video excerpt from the Lightroom 4 A to Z Workshop on DVD. Stay tuned for our next article and episode!
The Lightroom 4 A to Z Workshop on DVD is a 14 hour video workshop turning any Lightroom novice into a complete master of Lightroom 4 in no time! The Lightroom 4 A to Z Workshop can be purchased by itself, or within the Lightroom 4 Workshop Collection which also contains our award winning and industry standard Lightroom 4 Preset System, as well as the Lightroom 4 Workflow System.


Get Connected!