In this chapter, we are going to demonstrate how to use Lightroom’s Publish Services to upload your images to online services such as Facebook, Flickr and more. We will also explain how you can manage your published images through Lightroom.
What is Lightroom’s Publish Services
Lightrooms’ Publish Services function is another way to export images to another location such as the hard drive or online services like Facebook and Flickr. The difference between Publish Services and the standard Export function is that Publish Services offers you several solutions in regards to managing the published images from within Lightroom.
The Publish Services function is available only in the Library Module. It is also not accessible via the menu or a hotkey. Here is an example of how you can use Publish Services to upload your photos to your Facebook account.
Setting Up a Facebook Publish Service Account
The first step is to click on “Set Up…” on the Facebook button under Publish Services.

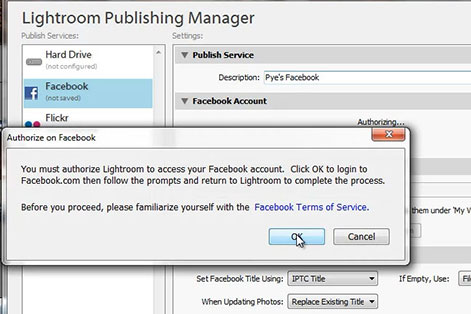
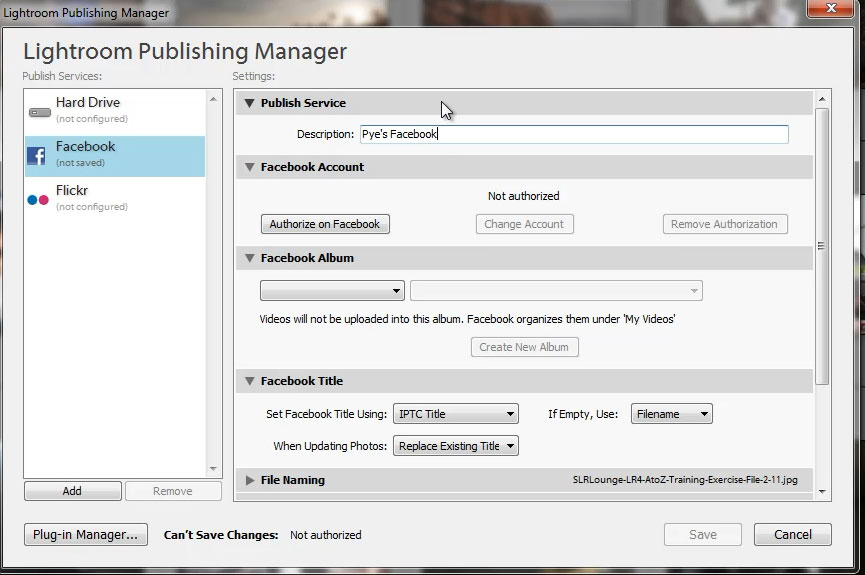
This will open the Lightroom Publishing Manager where you will set up your Facebook account and establish an authorized credential with Facebook. Once you input the name of the Publish Service, click on the Authorize on Facebook button. A popup dialog will appear and ask you to authorize Lightroom to access your Facebook account. Click OK to open up Facebook on your web browser.


Next, login with your e-mail and password to enter Facebook’s Request for Permission page. This is the page where you can grant Lightroom access to your Facebook page. Hit Allow and go back to Lightroom.

Once Lightroom has access to Facebook, you will now have several options in the Publishing Manager. The first is Facebook Album. Here, you can create new albums or use existing albums from your Facebook account.

In the Facebook Title options, you can set how Lightroom will name your Facebook Title and what it should do when you update the photos in Lightroom. Let’s set the Facebook Title by Filename, and let’s have Lightroom Replace Existing Title whenever you update your photos.

Most of the other options will be the same as the standard Export dialogue options. As mentioned before, we make changes to the File Name from the Library Module, and since we are uploading to the web, let’s keep File Settings to 80% quality.

For Image Sizing, let’s set the Long Edge to 800px.

Because these images will be viewed online, we can also leave sharpening to Sharpen for Screen at a Standard Amount.

Finally, for Metadata and Watermarking, we can include just the Copyright Only along with our Watermark. Once all the settings have been selected, click on Save.

Publishing Your Photos into Facebook
Now that we have our Facebook Publishing Service all set up, the next step is to select some images and drag them into the album under the Facebook account.

After the photos are in the album, click on the Publish button on the upper right hand corner to upload your selected images into Facebook. Once the photos are uploaded, you can open up your Facebook page to see whether the photos are published.

Managing Your Published Photos
You can also use the Publish Services to manage the published photos from within Lightroom. If you right-click on album name, you can republish the photos in the album by selecting Mark to Republish. You can also individually mark a photo to republish by right-clicking on a photo and choosing Mark to Republish.

Furthermore, when you click on a photo, Lightroom will download any existing Facebook comments into Lightroom. You can view the comments and reply to them, and Lightroom will then upload your comments back to Facebook.

Summary of Publish Services
Lightroom’s Publish Services is a management system that allows you to publish your images to your hard drive and to online publishing services such as Facebook and Flickr. The procedure is the same for all of the online services. First, you establish your credentials for each site, and then you configure the settings for each account. Once an account has been set up, you can then upload your images to the respective service. You can also update and republish your images from Lightroom, as well as read and reply to the comments that are made for each image. That’s it!
The next step in our tutorial series is to talk about the Library Module workflow.
Youtube Video


Get Connected!