
One thing that Lightroom is an absolute champ at is batch–processing high volumes of images, especially when each image requires almost exactly the same editing as the others.
True, you could create a Photoshop action and automate the process, or create a similar batch workflow. However the advantage of Lightroom is that it works entirely within it’s non-destructive environment, allowing your computer to avoid the time-consuming process of “open, edit, save, close” for every single image.
If you want to create just one second of timelapse video that plays back at 30 frames per second, you’re going to need 30 individual images. Each image has to be edited separately and then arranged into a video format. So just 10 seconds of timelapse will require 300 images. Want to create a 10 minute long video? You’ll need, oh, 18,000 images. Usually, RAW images if you’re timelapsing a very dynamic landscape.
In today’s video, we’re going to briefly demonstrate our process for “prepping” individual RAW landscape images that will be compiled into a timelapse clip.
Watch The Video Tutorial
Gear Used: Nikon D5300, Tokina 11-16mm f/2.8 @ 11mm
30 sec. @ f/2.8 & ISO 3200 (all 600+ images!)
Syrp Timelapse Genie, Revo 47″ Slider, FotoPro C5C & Oben CT3451 Tripods
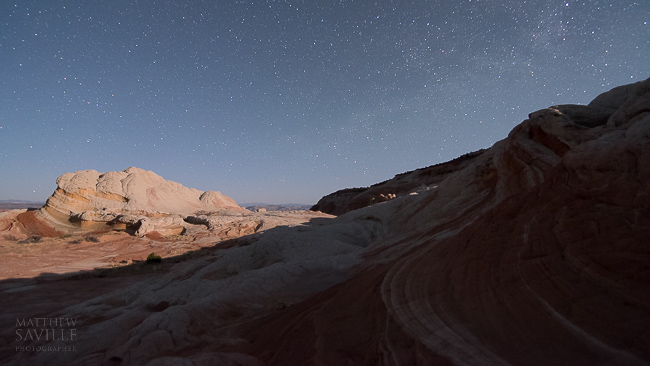
Original Timelapse Image Frames


Final Timelapse Image Frames


If the light had been exactly the same during these entire timelapse sequences, I might have been able to get away with editing just one single frame from the entire set, and then exporting the whole thing without a second thought!
However, since the moon rises during each of these clips, I want to be sure to inspect the results at three or four different points during the timelapse, and make minor changes (to all the images) if necessary. In this case, I chose to focus mainly on the part of the clips where the moon was shining, even if the initial parts of the sequence were a little too dark. This, I felt, made the moon’s rising seem even more dramatic.
The final JPG images, at 1920x1080p, were easily converted into an MP4 movie file using an app called “Zeitraffer” on my Mac. This way I don’t have to worry about importing hundreds or thousands of images into Adobe Premier, Apple Final Cut, or iMovie etc., which are much more complex editing tools. Done!
We hope you enjoyed this brief introduction to Timelapse frame editing! In future tutorials we’ll get more in-depth with the overall process, and how to take your Timelapse editing to a more advanced level. Thanks for viewing, folks!
Take care, and happy clicking,
=Matthew Saville=
Learn HDR Photography
For more HDR education, be sure to check out HDR Tutorial by SLR Lounge. This comprehensive “gold standard” guide will give you a mastery of HDR photography, from the scene considerations to the actual shooting to the post production. Click here for more info.
Adobe Photoshop Lightroom
Lightroom 5 is, in our opinion, by far the most powerful workflow tool for any photographer especially wedding and portrait photographers who need to achieve perfect color correction at a rapid-fire pace. Become a Lightroom Master using our complete Lightroom Workshop Collection for Lightroom 5! This DVD workshop includes extensive tutorials for everything from organization & workflow to image processing and our awesome preset system.
The SLR Lounge Preset System
The SLR Lounge Preset System is designed to enable Lightroom users to achieve virtually any look and effect in 3-5 clicks. Including basic color correction, vintage fades, black & white effects, tilt-shift effects, faux HDR, retouching, detail enhancing, and so much more, the sky is the limit with what has been dubbed the most powerful and intuitive preset system available! Click the link above to learn more/purchase. The SLR Lounge Preset System is now available for both Lightroom 5, Lightroom 4, and Adobe Camera Raw. (Bridge CS6 and CC only, click for more info.)


Get Connected!