
Outdoor photography is a hobby and a profession that many artists are very passionate about. Whether you are a traditional landscape photographer, or you consider yourself a nature photographer, a wildlife photographer, or an outdoor adventure photographer, you’ll have a lot in common with these other genres.
One of the biggest differences you’ll face when photographing any outdoor subject is not the genre of photography itself, but actually the location, the time of day, and the weather!
In other words, whether you’re photographing ultra-wide landscapes or super-telephoto wildlife, you’ll need to be even more prepared for whether you’re in a mountain snow scene or a barren desert.
The same thing applies to the post-production of those images! That is why I’m creating this article; I want outdoor photographers to understand the basics of editing their photos so that they can apply them to any subject, location, or weather conditions.
For the images I’ll be processing in this tutorial, I’m using Zoner Photo Studio X. I’ve used it quite a lot for wedding and portrait photography work in the past, (see my review here and my wedding workflow tutorial here!) …but today, I’m excited to take it for a spin on some of my favorite landscape images!
Basics Of Color Correction
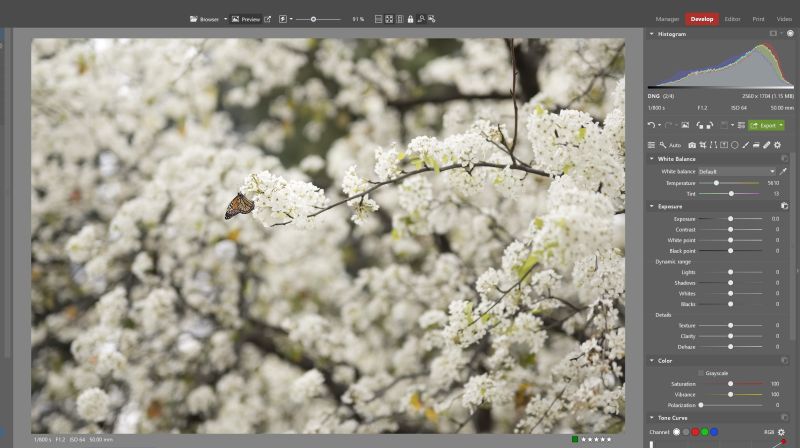
First and foremost, you should be starting with an original, raw image that has “pretty good” exposure and white balance. (Note that I don’t say “correct” exposure/WB, because both are subjective!)
With this foundation set to build upon, let’s cover the basics of processing a landscape photo. First, I prefer to tackle any major changes to the color and/or exposure if necessary. As a general rule, the first setting you should adjust is always whichever “problem” is worse. This will allow you to better perceive all other, more subtle adjustments as they become necessary.
Color Profiles

Think of color profiles as your choice of film. In landscape photography, the film you chose had major implications for both the color and tonal range that you would capture! Now, with digital, not only is your camera sensor able to capture incredible dynamic range and vibrant colors, but you can also change the profile later, after you’ve clicked your photos!

Of course, I’m tempted to recommend that you simply choose the “Landscape” color profile and be done with it! Your images will look clearer and more vibrant right out of the box, without any other adjustments. Still, the other camera color profiles are worth testing, in case you want to create landscape imagery with more subdued saturation levels, or a more unique, creative color palette.
What is Correct Color?

Of course, we could write an entire article on color correction itself. There are innumerable ways to manipulate colors in any raw conversion application, and Zoner Photo Studio X is no exception.
Honestly, though? I’m going to break it down into one very simple decision that will steer the entire process for you: Either adjust colors to seem accurate to what your own eyes see in the real world, OR, just have fun with the creative process, experiment and learn by the “I wonder what this slider does?” process.
There is no right or wrong way to process colors. Yes, there’s a brief learning curve as you get used to achieving “correct”, if that is your goal. However, beyond that, just run with the creative process!
Lens Correction Profiles

Thankfully, most modern lenses offer automatic profile corrections that fix/remove things like distortion, vignetting and chromatic aberration. They can be pretty important in your landscape photography, or they might not make much of a difference at all; it depends on which lens(es) you have!
Many landscape scenes may not have any straight lines to visibly distort, but I still recommend always leaving distortion correction on.

Vignetting correction can be very important, especially if you are working at wide-open apertures, either for a nightscape, a blue hour landscape, or a wildlife subject at sunrise/sunset.
Either way, just turn on all lens corrections whenever possible, and you’ll get much better results overall! In ZPS X, you may have to download and import a (widely available) lens correction profile for your particular lens. Many of the latest mirrorless cameras, however, already have the profile embedded in the raw file itself.
When To Convert Your Landscape Photos To Black & White?
Capturing beautiful, eye-popping colors in every landscape photo isn’t always possible, of course. Sometimes, the colors present in a scene actually distract from the main subject of the image.

This is a perfect time to convert your landscape image to black and white! With B&W, you not only subtract color from the scene, but in doing so you increase the emphasis on everything else, such as leading lines, shapes, textures, etc.

The processing of B&W images is almost completely about achieving the right tones and contrast, of course, so let’s move on to the next step in the landscape photo editing workflow!
Basics Of Dynamic Range
Dynamic Range sounds like a complicated thing, but it’s not. Dynamic range simply refers to how bright the highlights and shadows are in a scene. Generally speaking, in most outdoor photography situations, you want to clearly see the fine details in both the brightest highlights and the darkest shadows.
This is relatively easy with most modern digital cameras because they are capable of capturing more than enough dynamic range in a single exposure. Even a single exposure of a sunrise can be processed to have excellent highlight and shadow detail.
Sliders, Curves, Burning & Dodging

Of all the genres in the world of photography, landscape photos are at the top of the list when it comes to the impact of dynamic range, and every tone in the entire image. All of the greatest landscape photographers whose work you admire have this one thing in common: they are absolute masters of managing the contrast, and the highlights, shadows, and mid tones, in every image they create.
This is why it is very important to have an application that lets you easily manage the tones in your image on many different levels. Overall, the first thing you want to do is get your exposure dialed in, if necessary, and adjust your main highlights and shadows to suit the scene.
Once your image looks well-balanced overall, then you can get into the more subtle refinements and make sure that the contrast within each area of your image has the right amount of “pop”.
If you just grab the contrast slider and crank it up, there is a very good chance that either your highlights, shadows, or mid-tones will look totally over-processed, even though the other zones look great.
This is why I recommend taking it easy on high-powered, global sliders such as Contrast and Dehaze. Instead, look to make more subtle adjustments using the Whites and Blacks sliders. Combined with just a gentle touch to the Contrast, Dehaze, and Clarity sliders, you’ll start to see excellent results.
Balance Shadow/Highlight Recovery and Contrast/Curves
With that said, however, one thing I have noticed in all programs (including Zoner Photo Studio X) is that the more you need to work the dynamic range of your image, (recover highlights and shadows significantly) …the more you will need to bump up either Contrast or Dehaze in order to bring back good contrast into a scene.

If you still can’t get the contrast to look right in one particular tonal range for your landscape image, then using a Curves adjustment will make quick work of that. What I like to do is use the Curves slider dropper tool, and place two dropper points on either side of the tone that I find to be currently too flat. Dragging those two points up and down, to brighten the highlights and darken the shadows of that specific tonal range will create perfect contrast in that area. If necessary, you can use additional curve points to bring the rest of the image back down to where it used to be.
Last but not least, if your landscape image still does not emphasize the main subject enough, you can use local adjustments such as Burning & Dodging or Gradients. These adjustments, as you probably already know, are how you brighten or darken (or add/subtract contrast) from just one specific area of your image.
In years past, this used to require opening up your raw photo in a completely different application, however, today’s raw editing software, including Zoner Photo Studio X, allows you to perform many different types of local adjustments without ever leaving the main app.
In fact, ZPS X allows you to do both non-destructive raw adjustment brushes & gradients, as well as additional, advanced work such as layer masking and even stretching your canvas to a different aspect ratio! Of course, this latter step requires converting your raw photo to a TIF file.
Stylize Your Landscape Images

Most landscape photos can stand on their own merits if all you do is apply basic color correction, of course. However, there is no rule that says “basic” should ever be your limit! Many landscape photographers apply at least a very subtle (and sometimes very obvious!) stylized colors or toning to add just a hint of their own personal touch to every image they capture.
Presets In Zoner Photo Studio X
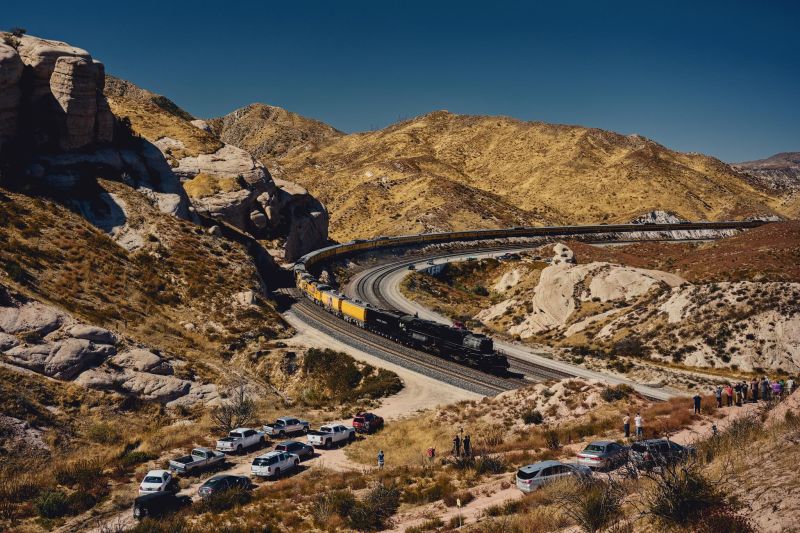
Personally, I do prefer to make most of my landscape photos appear relatively timeless in terms of their overall color correction and tonal processing. However, sometimes certain images just really lend themselves to a specific color scheme or another stylistic choice. I find this to be especially true whenever I am photographing actual “vintage” subjects, such as the steam locomotive above.
Producing a consistent style with any imagery becomes even more important if your primary focus is a social media feed, where viewers view your “portfolio” as a grid of images, and you want everyone to be able to easily spot your images as they’re scrolling their feed.
You don’t need to go completely over-the-top with wild color hue shifts, by the way. The important thing is simple: when you look at all your images together as a collection, do they share a subtle color scheme?
To achieve such a consistent stylized look, using a preset on your raw photos is a perfect tool. These allow you to add just a subtle hue or tonal “response” to every image, without having to fiddle with a dozen different color/hue or saturation/luminance sliders for every single image, trying to match your previous images.
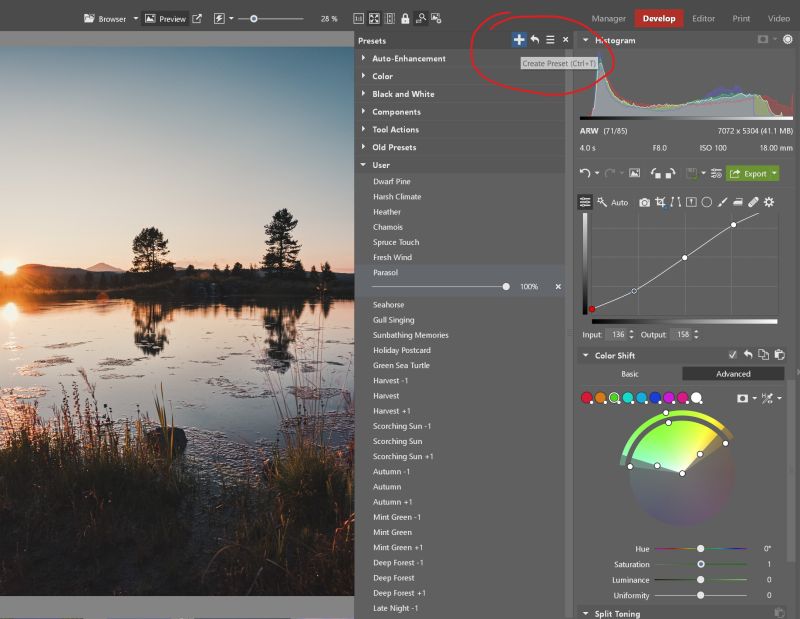 Zoner Photo Studio X offers an impressive array of presets that are very well-suited for various landscape photography scenes. Plus, of course, you can create and save your own presets too.
Landscape Photography Sharpening, Resizing, Exporting, Printing

Only sharpen your photos at the very last stage of your editing process! The optimal way to create the best landscape photography prints is to follow this final procedure: Resize to desired final print resolution, if necessary -> Sharpen based on the existing final level of detail -> Save as JPG/TIF -> Print!

My personal preference is to attempt to make the fine detail in my digital images appear more film-like, instead of the over-sharpened, chunky detail look that many digital landscape photos can have if they are resized and sharpened improperly.
What this means is, that I often use a very fine radius of sharpening, with a very high intensity setting, and only a faint bit of masking. I also do not use noise reduction on my landscape images, unless the shadows’ dynamic range is really bad. I even add a little bit of grain to my B&W landscape photos sometimes!
Sharing Your Landscape Photography Adventures

Of course, your photo editing process is not complete until you’ve actually shared your images with viewers! Whether it is online or in print, presentation is very important in how your work will be appreciated and valued.
Unfortunately, a lot of photographers will return from an amazing adventure, with all sorts of outdoor photos, from landscapes to wildlife, …and the photos will just sit on their hard drive, or maybe one or two of them will get shared on social media. While there’s nothing wrong with social media sharing, in my opinion, landscape photographs are meant to be hung on walls as a print, or enjoyed as a coffee table photo book.
For this reason, I really appreciate the convenience of a photo editing application that integrates virtually effortless creation and purchasing of physical products. I recommend starting small with something simple like a poster to enjoy a single image, or a calendar to enjoy a dozen of your favorite photos. Then, once you view your work displayed in physical form, I’m certain that you’ll want to create something like a canvas print or a coffee table photo book of your best work.
I recommend checking out the photo products page on the Zoner Photo Studio website page to see if the products and pricing are of interest to you.
Conclusion

With landscape photography, like all types of outdoor photography, every step of the editing process is important. You will have to put time and effort into mastering the process, from managing the dynamic range and colors to the final touches and presentation of your work.
I found that Zoner Photo Studio X is an excellent choice for my entire landscape photography workflow, whether I am editing photos of winter wonderlands or desolate desert scenes. The editing controls are familiar, and the capabilities are broader than any other raw processing application we have ever reviewed!
About Zoner Photo Studio X
You can read our in-depth review of Zoner Photo Studio X here. To learn more about Zoner Photo Studio, visit zoner.com.
You can download a free 30-day trial here, and if you like the software, we recommend the relatively affordable annual subscription of $59/year.


Get Connected!