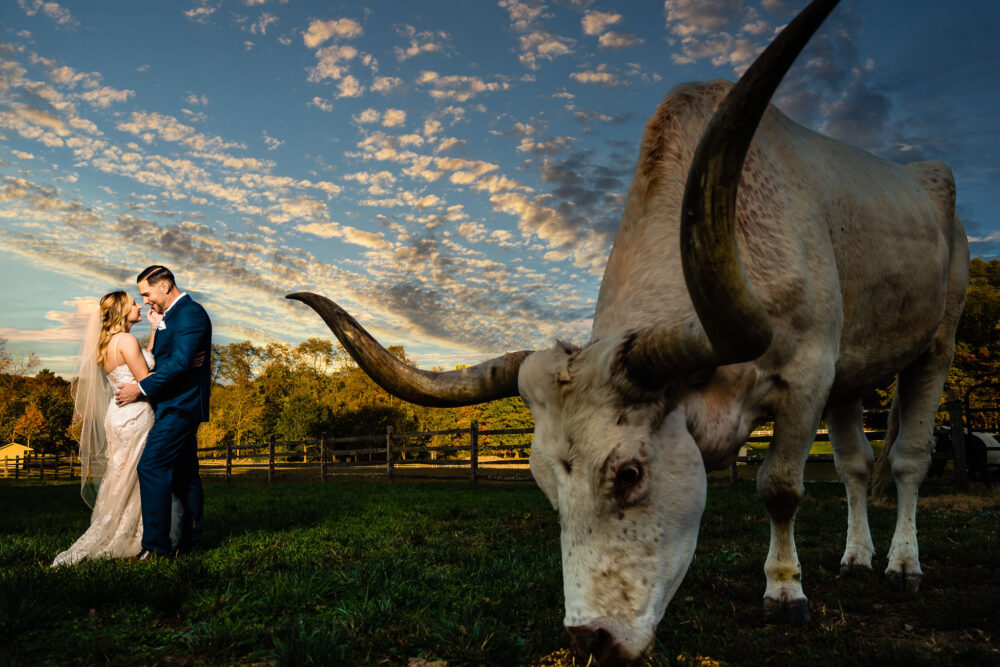
Wedding photography can be a demanding line of work, and the challenges and hours of hard work are far from over once you’re done clicking the actual photos! Once you get home from that wedding you have to download, back up, and edit all of the photos, of course!
Indeed, wedding photographers capture a high volume of photos, often numbering in the thousands per day, which can add up to many thousands of photos a month, and even tens or hundreds of thousands of photos per year!
Unfortunately, there aren’t many photo editing programs that are made to handle every step of your post-production workflow from start to finish, however, in this article, we will cover an entire workflow using one program that does offer everything, Zoner Photo Studio X.
This article will give you a complete overview of a straightforward, reliable, professional wedding photography workflow from start to finish! Maybe you’re an experienced wedding photographer who is looking to streamline your existing process or save time and money. Maybe you’re just getting started in wedding photography, and are looking for a simple, affordable entry point into this very important aspect of your new business! Either way, you’ll want to keep reading.
The reality of being a wedding photographer is that every second spent in post-production adds up, and this will turn into many hours every week. That’s time you could either spend working on other areas of your business or being with family and friends!
One thing we can be thankful for as wedding photographers, though, (as opposed to fashion/editorial, etc) is that not every photo will even be kept and in need of color correction. Furthermore, barely any of your wedding photos will need advanced retouching! In fact, only a select few wedding portraits or family/group photos might require a little bit of retouching before a large print or album spread is made. Otherwise, in most cases, basic color correction will suffice.
Nevertheless, streamlining the process by using one app for everything can be a huge help that saves many hours per week. The fewer applications you have to buy, learn, and integrate into your workflow, the better!
Unfortunately, many wedding photographers do end up using separate apps for culling, color-correcting, and retouching. This is understandable because sometimes the best tool for a job is one that is specifically made for only that job and nothing else.
We are always looking for opportunities to simplify our workflow, though, which is why we were interested in Zoner Photo Studio X in the first place! As mentioned above, it offers a full start-to-finish workflow environment, meaning you can begin and complete your entire post-production from just one app. On that note, let’s actually break down what a wedding photography workflow involves.
The Major Steps In A Wedding Photography Workflow
Before you even look at your photos, the most important step in the process is, of course, to download your photos and back them up. If you are getting paid to take pictures, do not take this step lightly; always back up your images on more than one device, and in more than one location!
We’ll call this “Step Zero” in the process, because while it isn’t specific to wedding photography, it is still a critical step for any photographer who values the safety of their imagery, and especially if you are getting paid to photograph a once-in-a-lifetime event for a happy couple!
Step 1: Import Photos | Create A Catalog
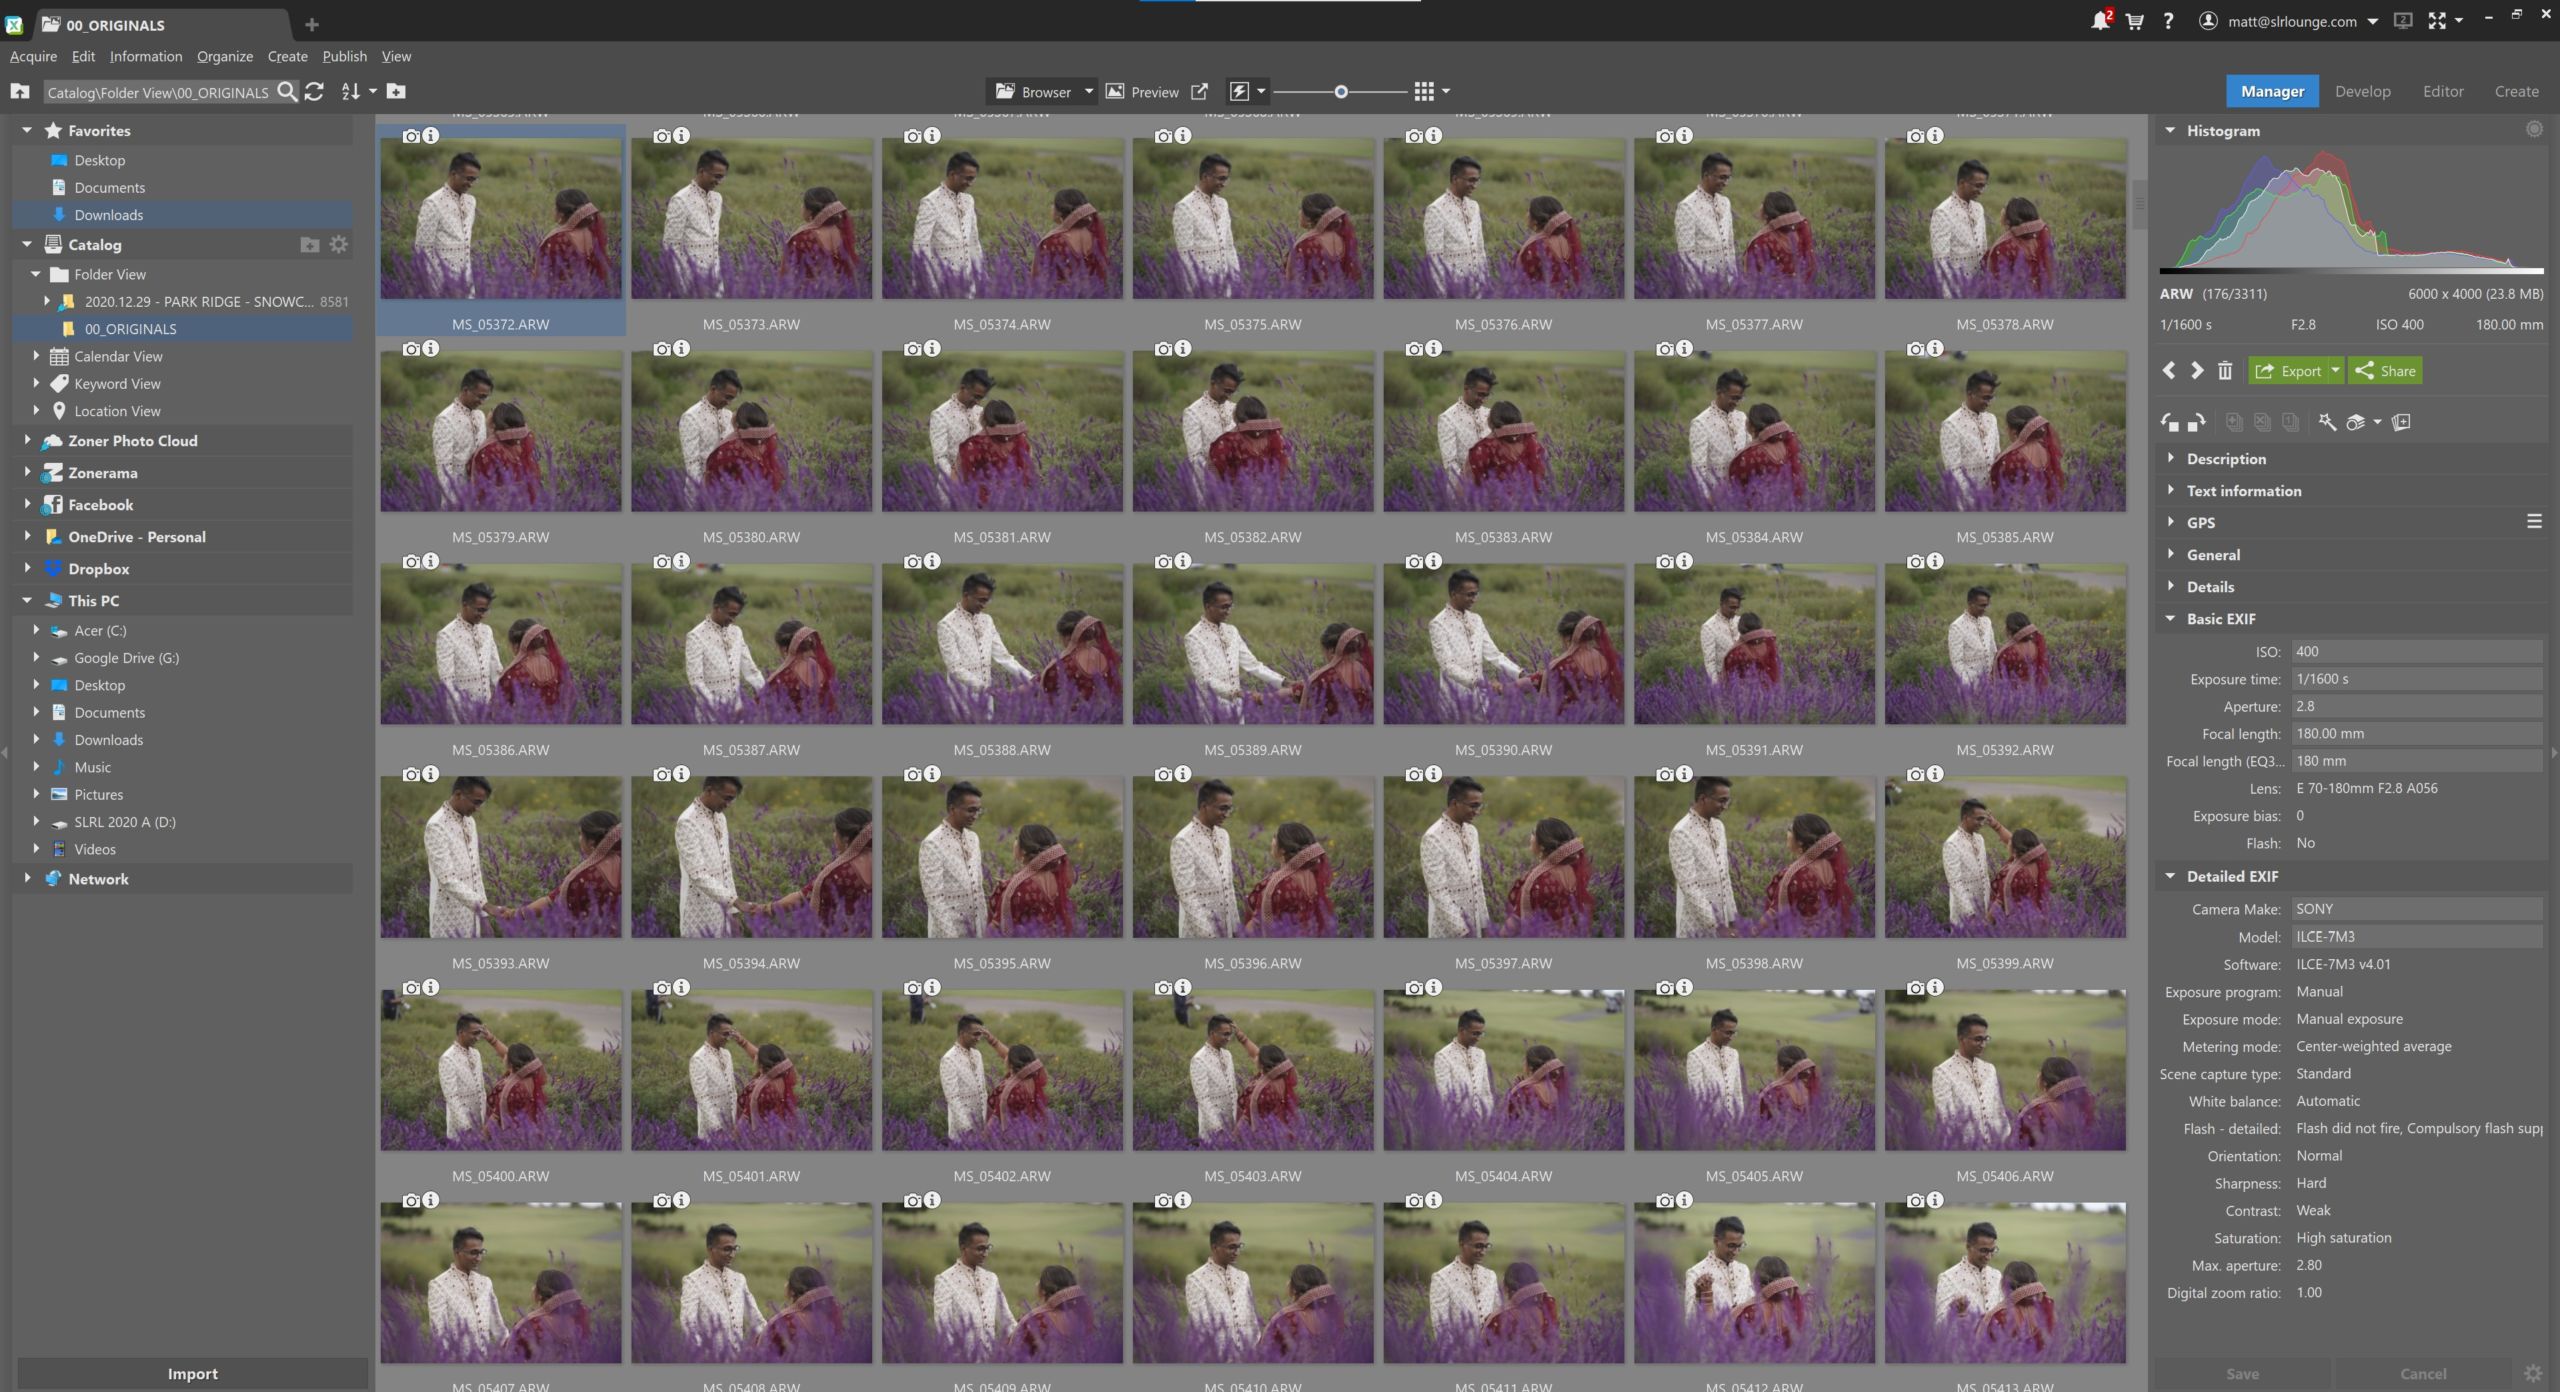
Once your photos are safe and sound, the first step in your wedding photography workflow is to import them into a catalog system. This will allow you to browse them more swiftly compared to “Browser” type applications, and once thumbnails are generated, you can even glance at your photos without needing to pull up the original raw file every time! This is important because it will really save you a lot of time.
Zoner Photo Studio X allows you to create a catalog of all your photos, meaning when you launch the application, it has all your photos’ location stored, with thumbnails, (once they’re rendered) and all of your edits are saved, too.
ZPS X does allow you to just directly browse your hard drive, too, which is a very convenient way for aspiring photographers to simply check and see where a particular photo or event is stored on your hard drive(s), however, we do recommend that professionals create a catalog. Either create one big catalog for each week/month of work or create a new catalog for every wedding you photograph.
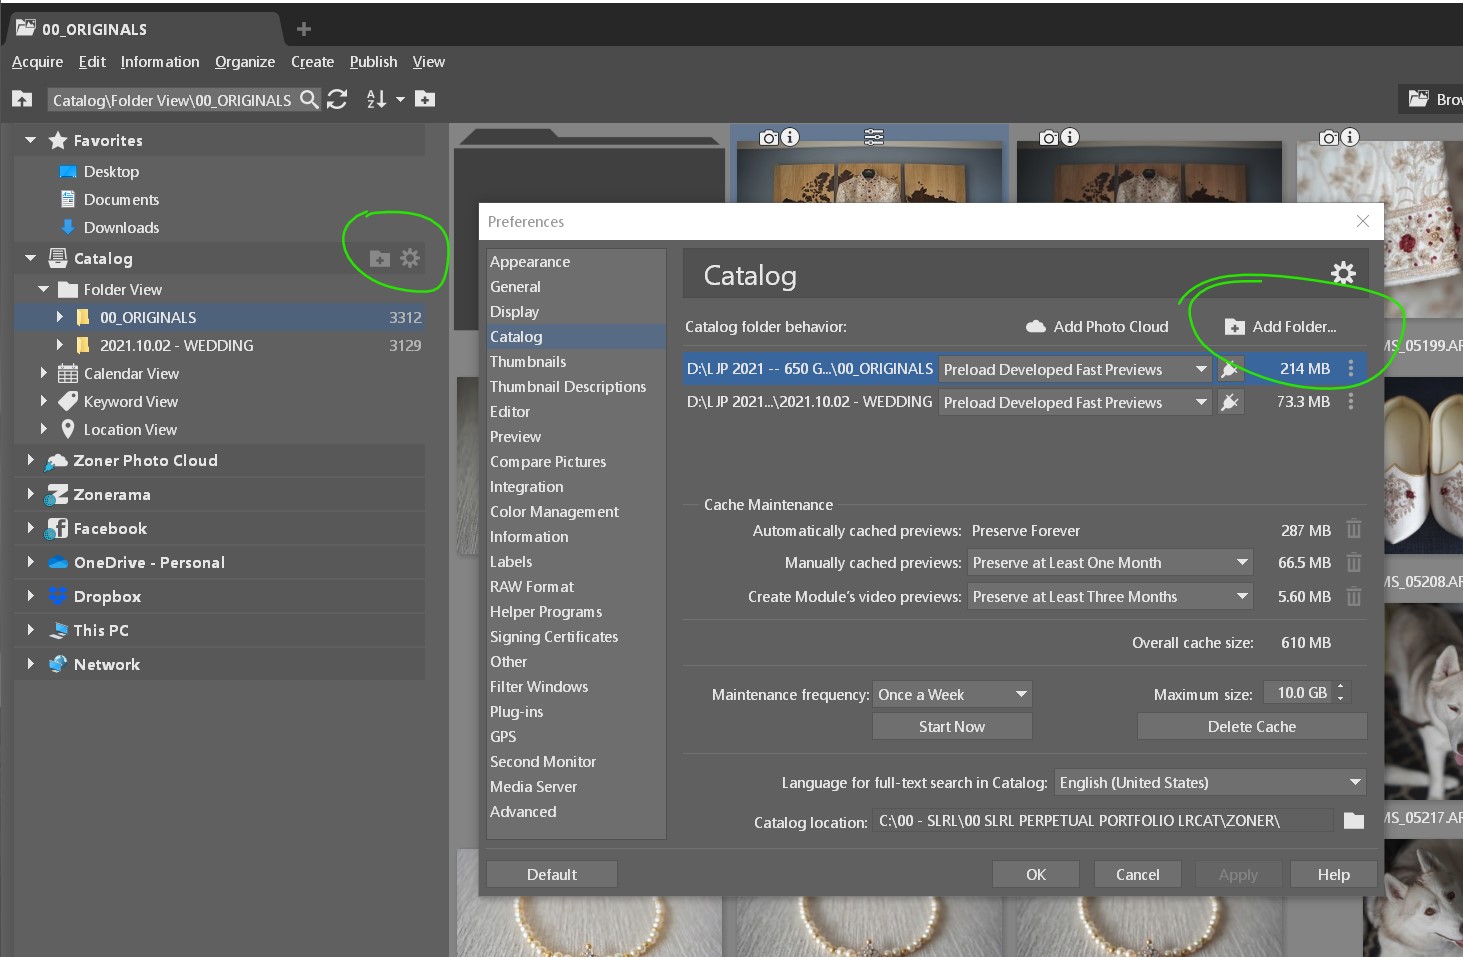
It is important to note that if you create a catalog, you do not have to copy or move any of your photos to an unknown location on your computer. You can simply add folders of raw images from right where they are on your hard drive so that your data backup doesn’t get complicated.
Also, we recommend using “smart” previews for your high-megapixel raw files, because it will significantly speed up your culling and/or your editing time,
Lastly, when creating a catalog and performing your edits within that catalog, you will still be able to see your edits later, even if you lose your catalog and just directly browse your folders later, using ZPS X. In fact, you will still be able to view and export your edited files even if your software subscription has ended, which is not something that is possible with an (expired) Adobe Lightroom subscription!
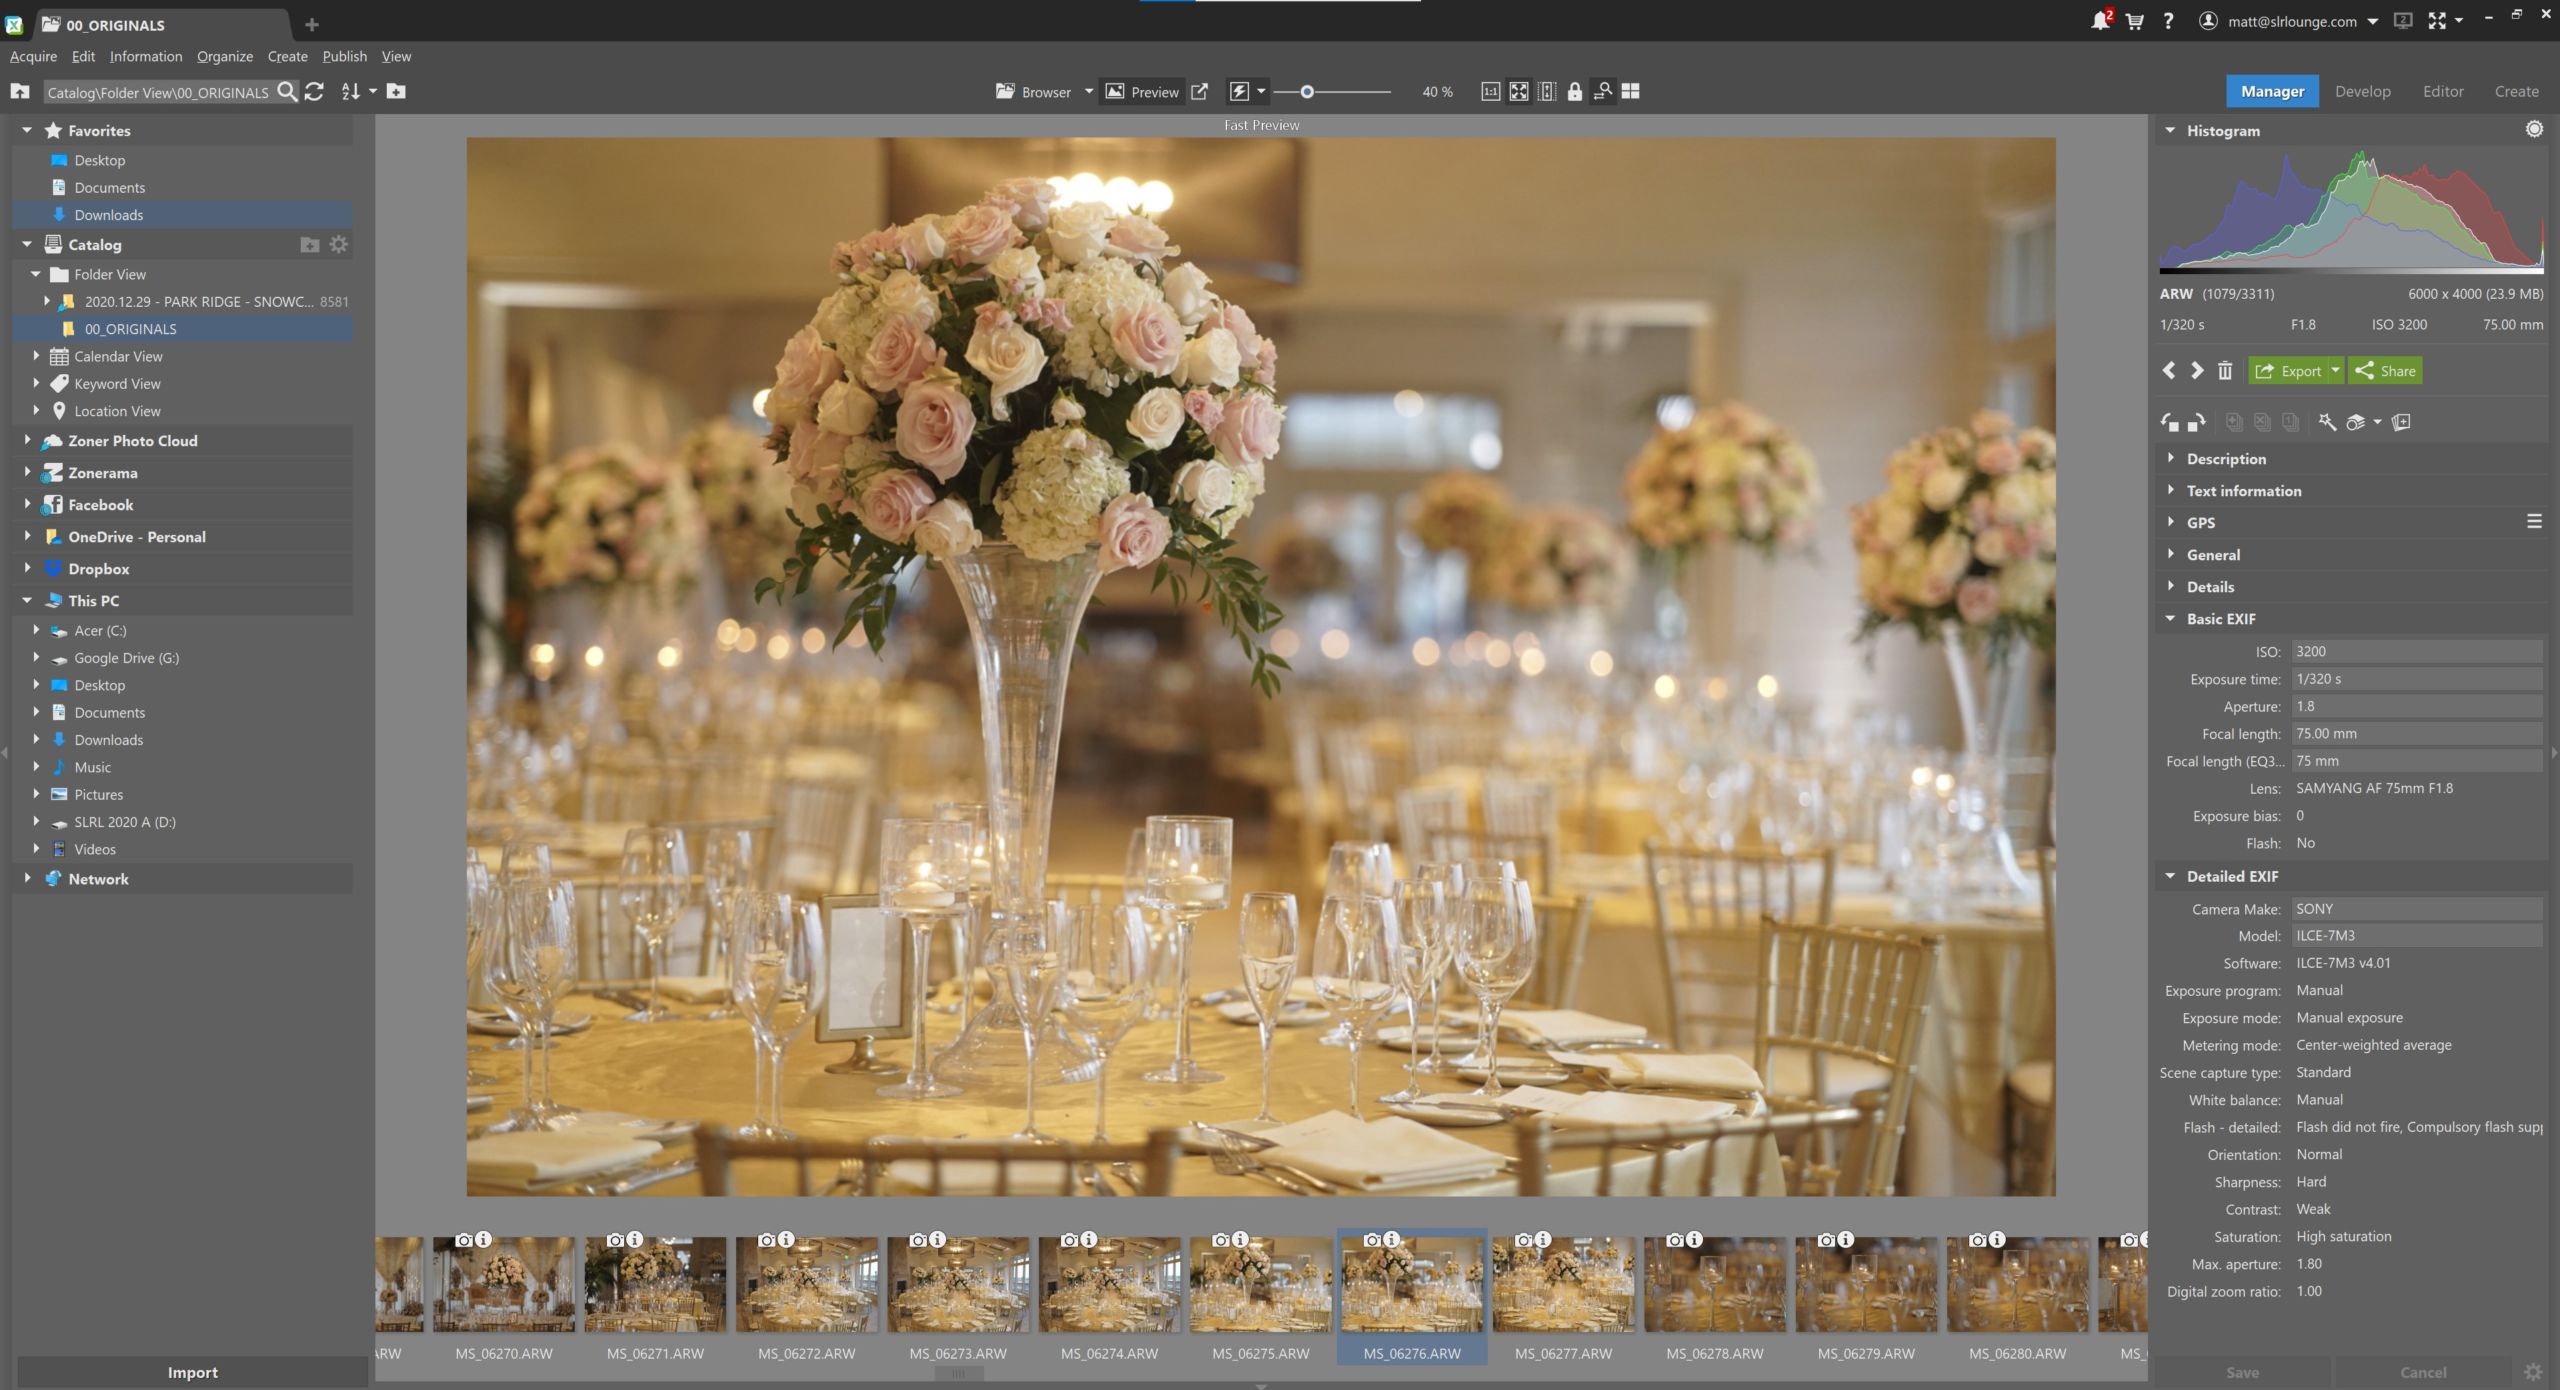
Step 2: Sort/Cull Keepers From the Rejects
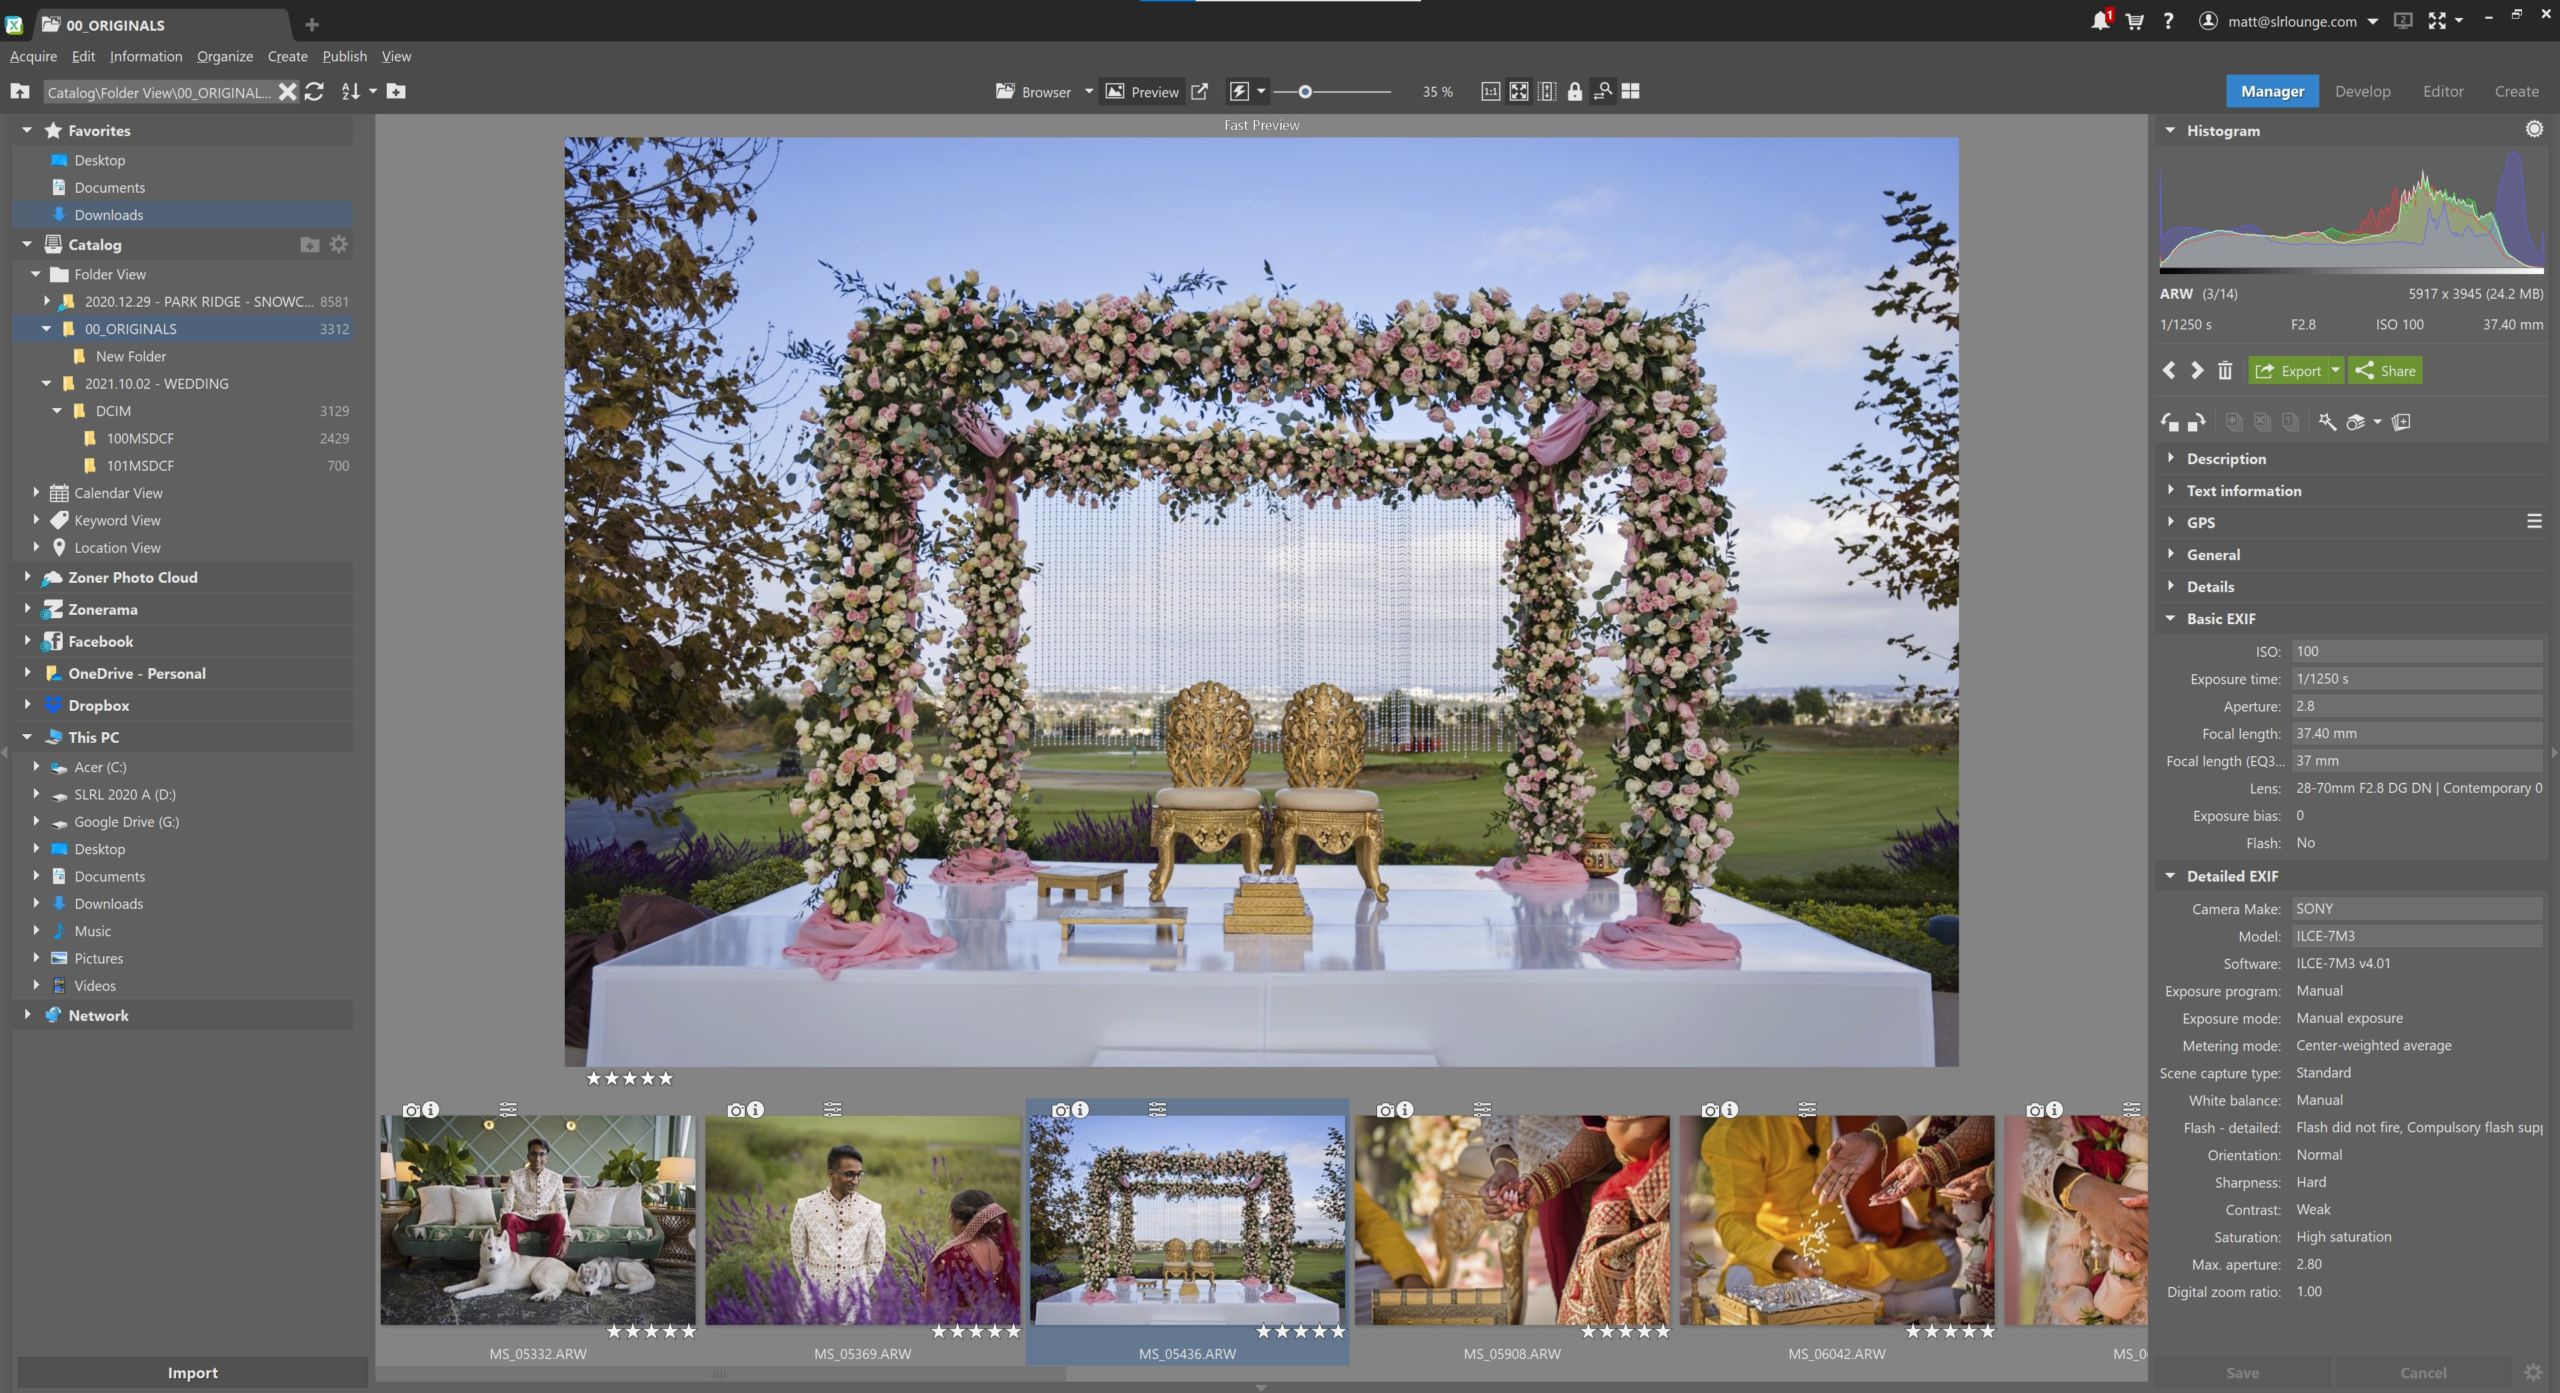
Next, you’ll want to sort the images, otherwise known as culling. In this step of the workflow, you’ll get rid of the “reject” images so that you can color correct and deliver the best “keeper” images.
Often, for example, this means narrowing down 2,000 or 3,000 captured images to “just” 500 or 1,000 delivered images, depending on your personal style, and the length of the wedding day. (Have you ever photographed a 16-hour Hindu wedding before? They’re incredible events to witness, but you’d better bring extra memory cards!)
Here’s the thing, though: most experienced photographers can decide whether to keep or reject an image in literally a fraction of a second, however, most raw image display methods just aren’t fast enough to keep up! So, without the right workflow tool, you may spend double or triple the necessary time just on culling alone.
The fastest way to cull raw images by the hundreds or thousands is by viewing their embedded previews. Some raw editing applications don’t offer adequate options in this regard, which is why many photographers who edit high volumes of raw images will use a different application (Such as Photomechanic) to cull their photos before they even begin the color correction process.

This is one advantage of ZPS X; it allows you to choose between previewing embedded thumbnails for raw files for maximum speed or actually viewing the raw edits for maximum color accuracy.
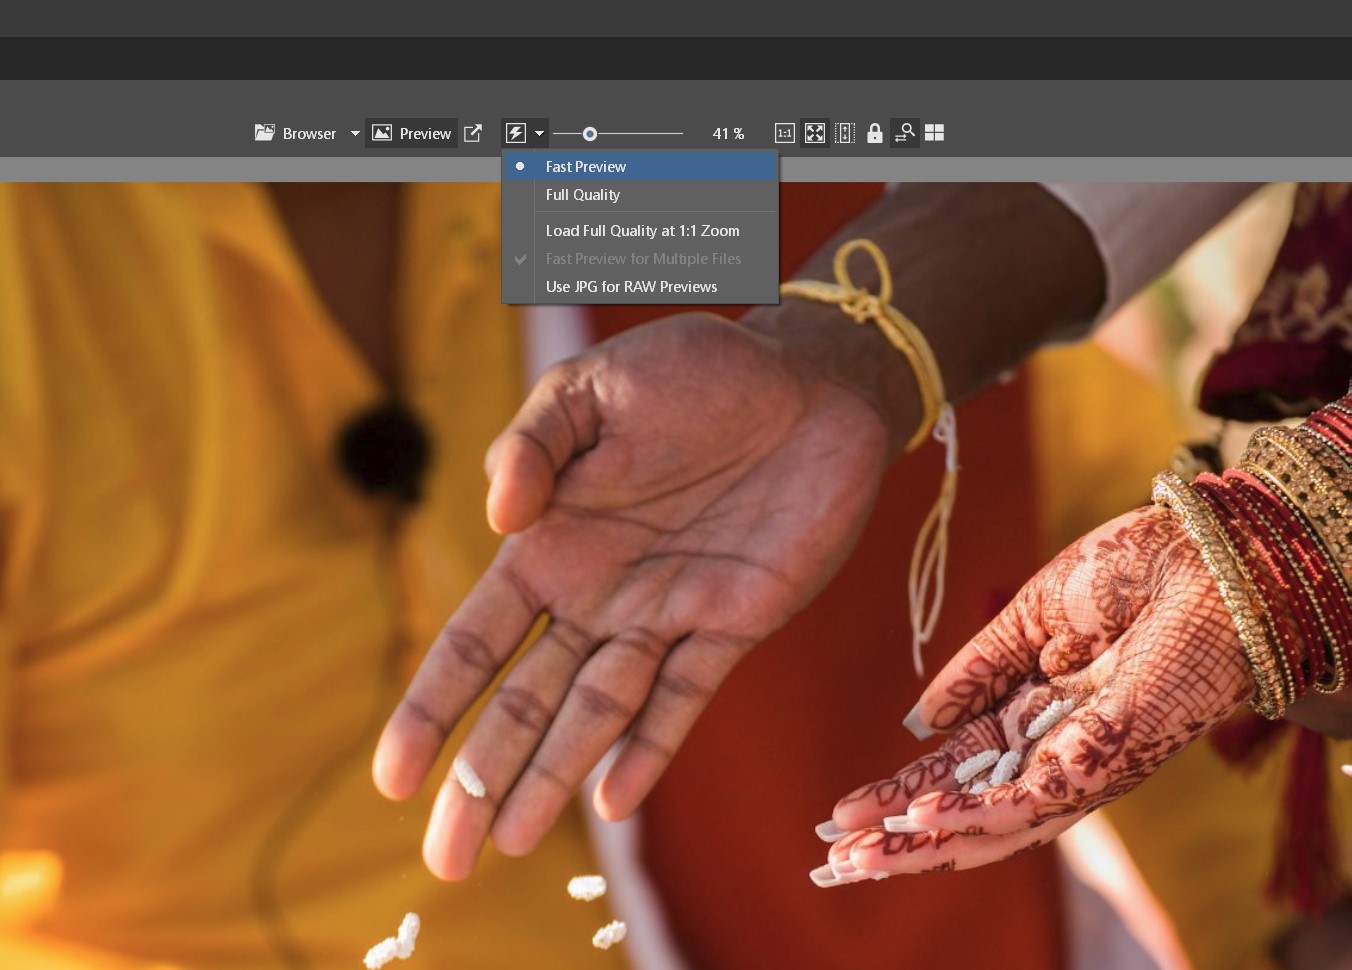
In other words, you don’t need a separate culling app; you can seamlessly import your raw photos, cull them swiftly, and then move forward to the color-correction process, all within the same app.
If you want to take your workflow capability one step further, especially if you’re working from a laptop and storing your raw photos on an external hard drive, you can also use the “Preload Smart RAWs” feature which will allow you to view, sort, and even perform basic color correction on your photos even when they aren’t actually on your hard drive!
As a side note, we don’t recommend actually deleting your “reject” images while you are culling them. We recommend using either color labels or star ratings to quickly select or deselect your best images, and then move the rejects to a “Rejects” folder once you’re done. You might want to glance through the unkept images and see if there is a slightly better one. wait to actually delete any images off your hard drive until after you have finished your entire color-correction workflow and delivered the final images to the client.
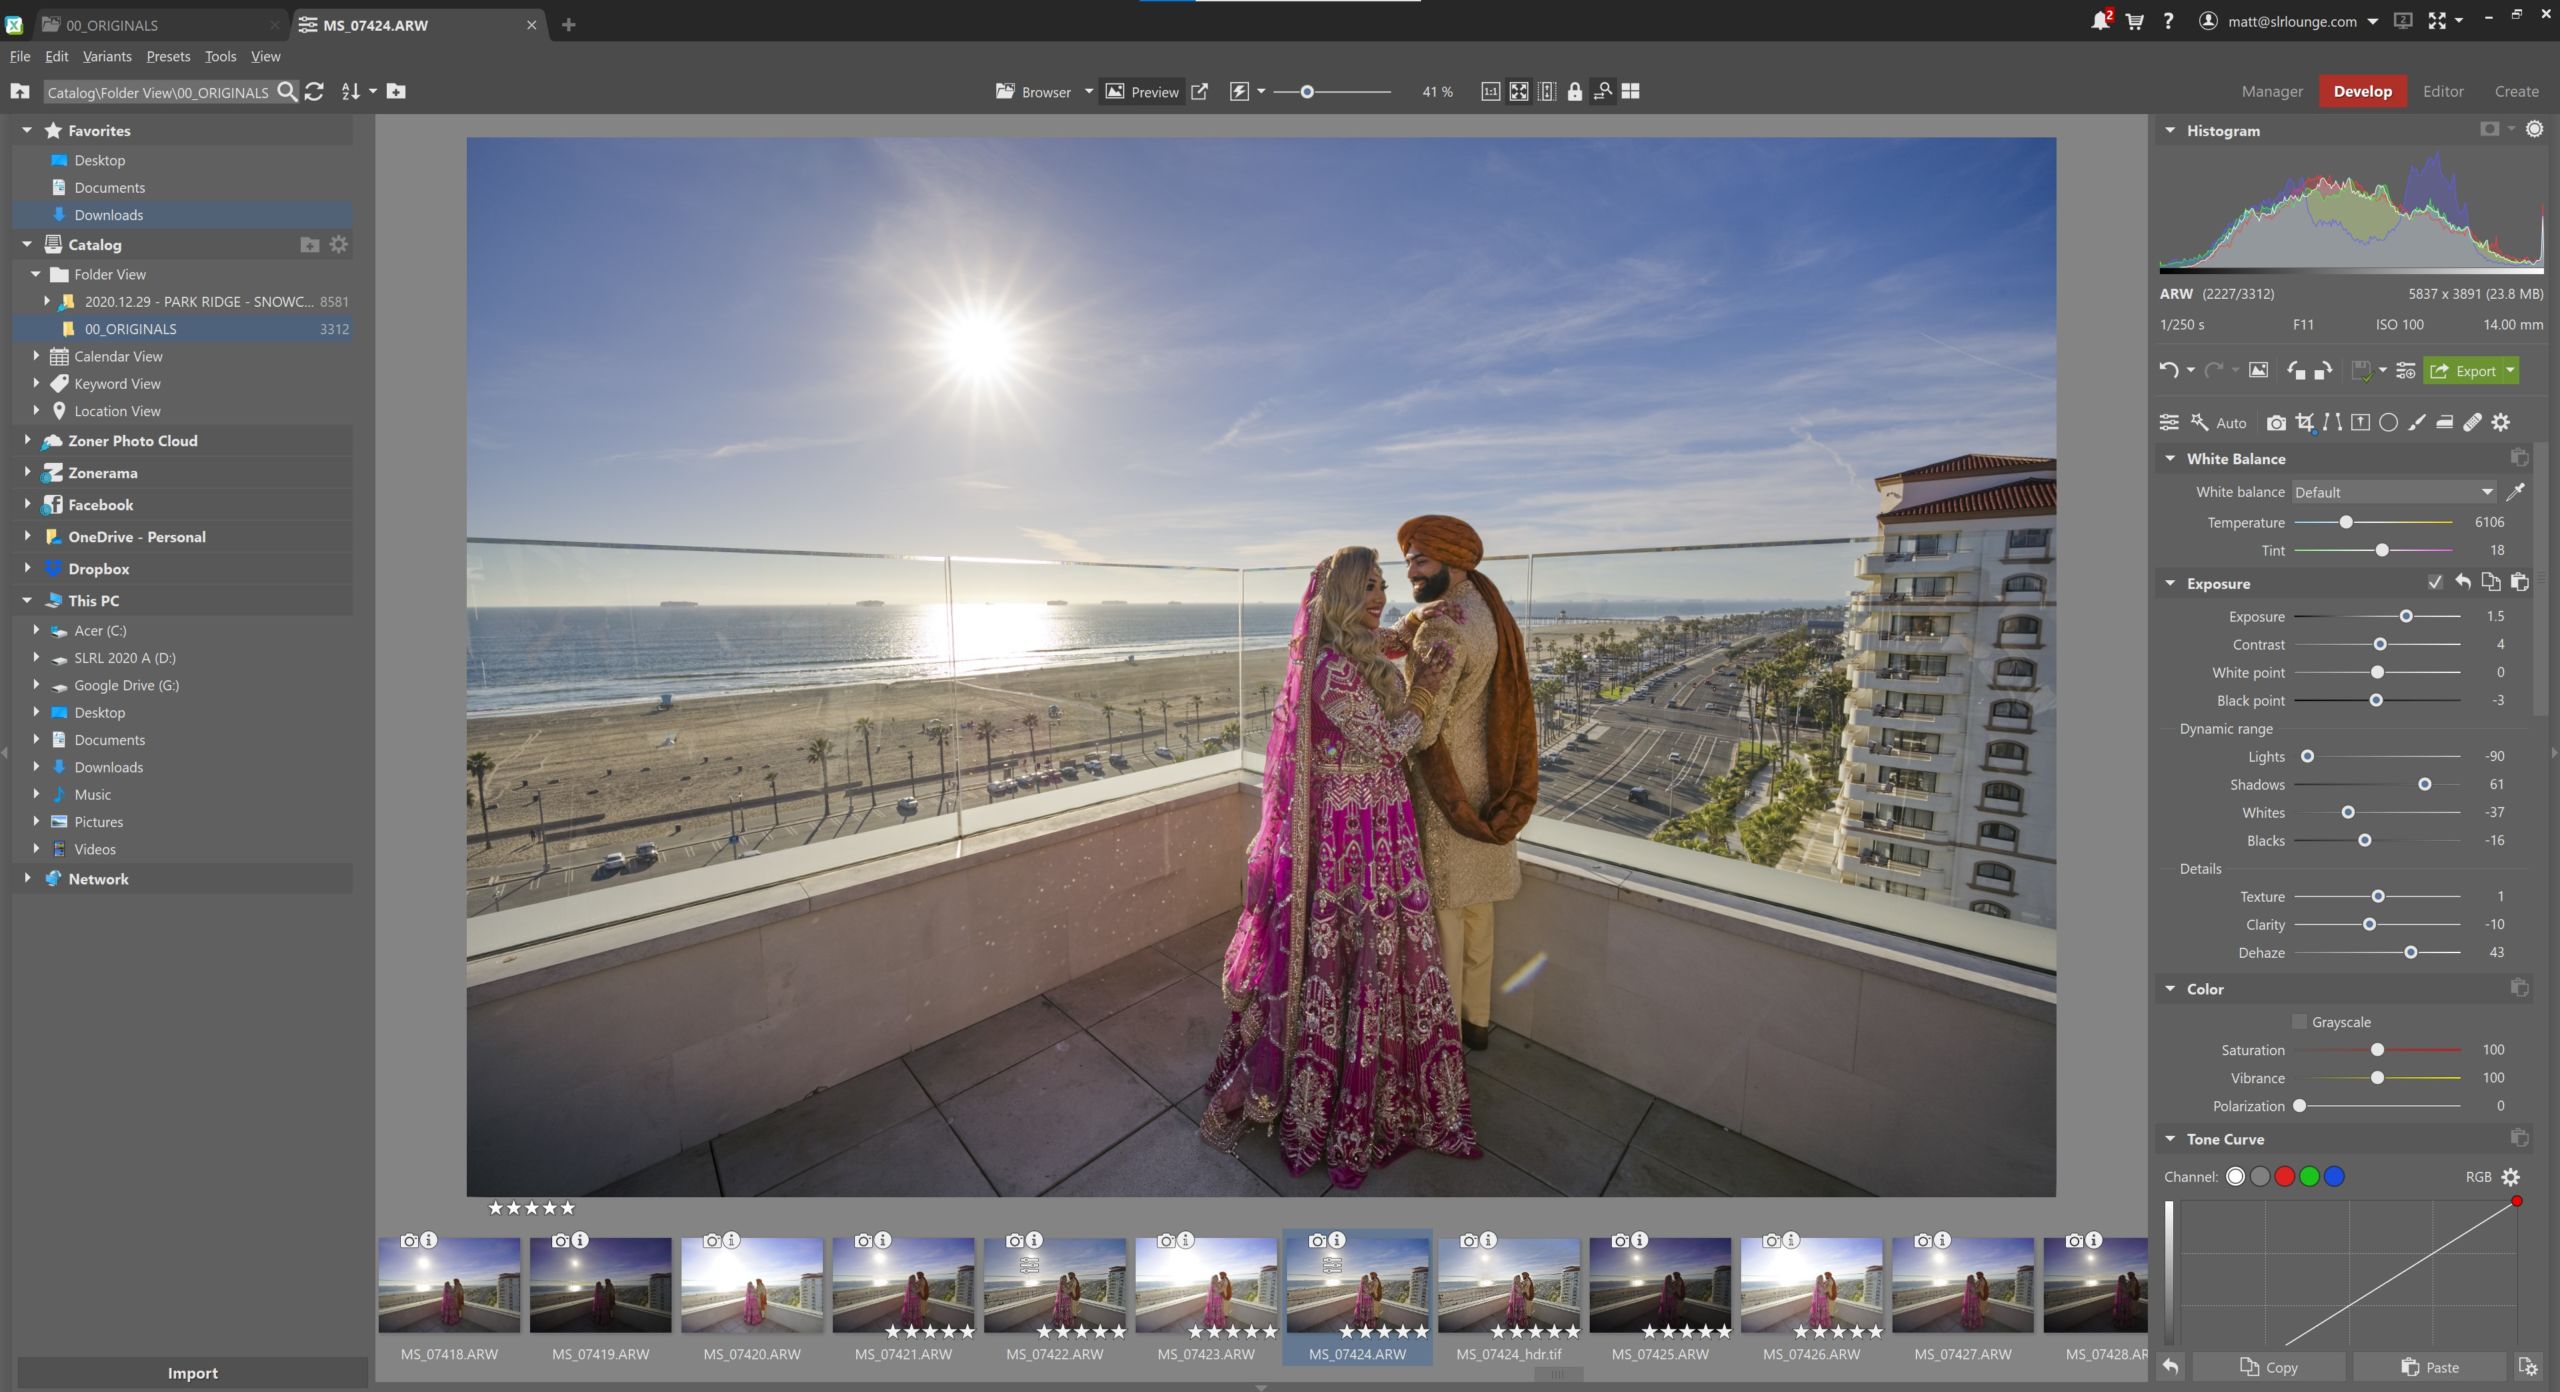
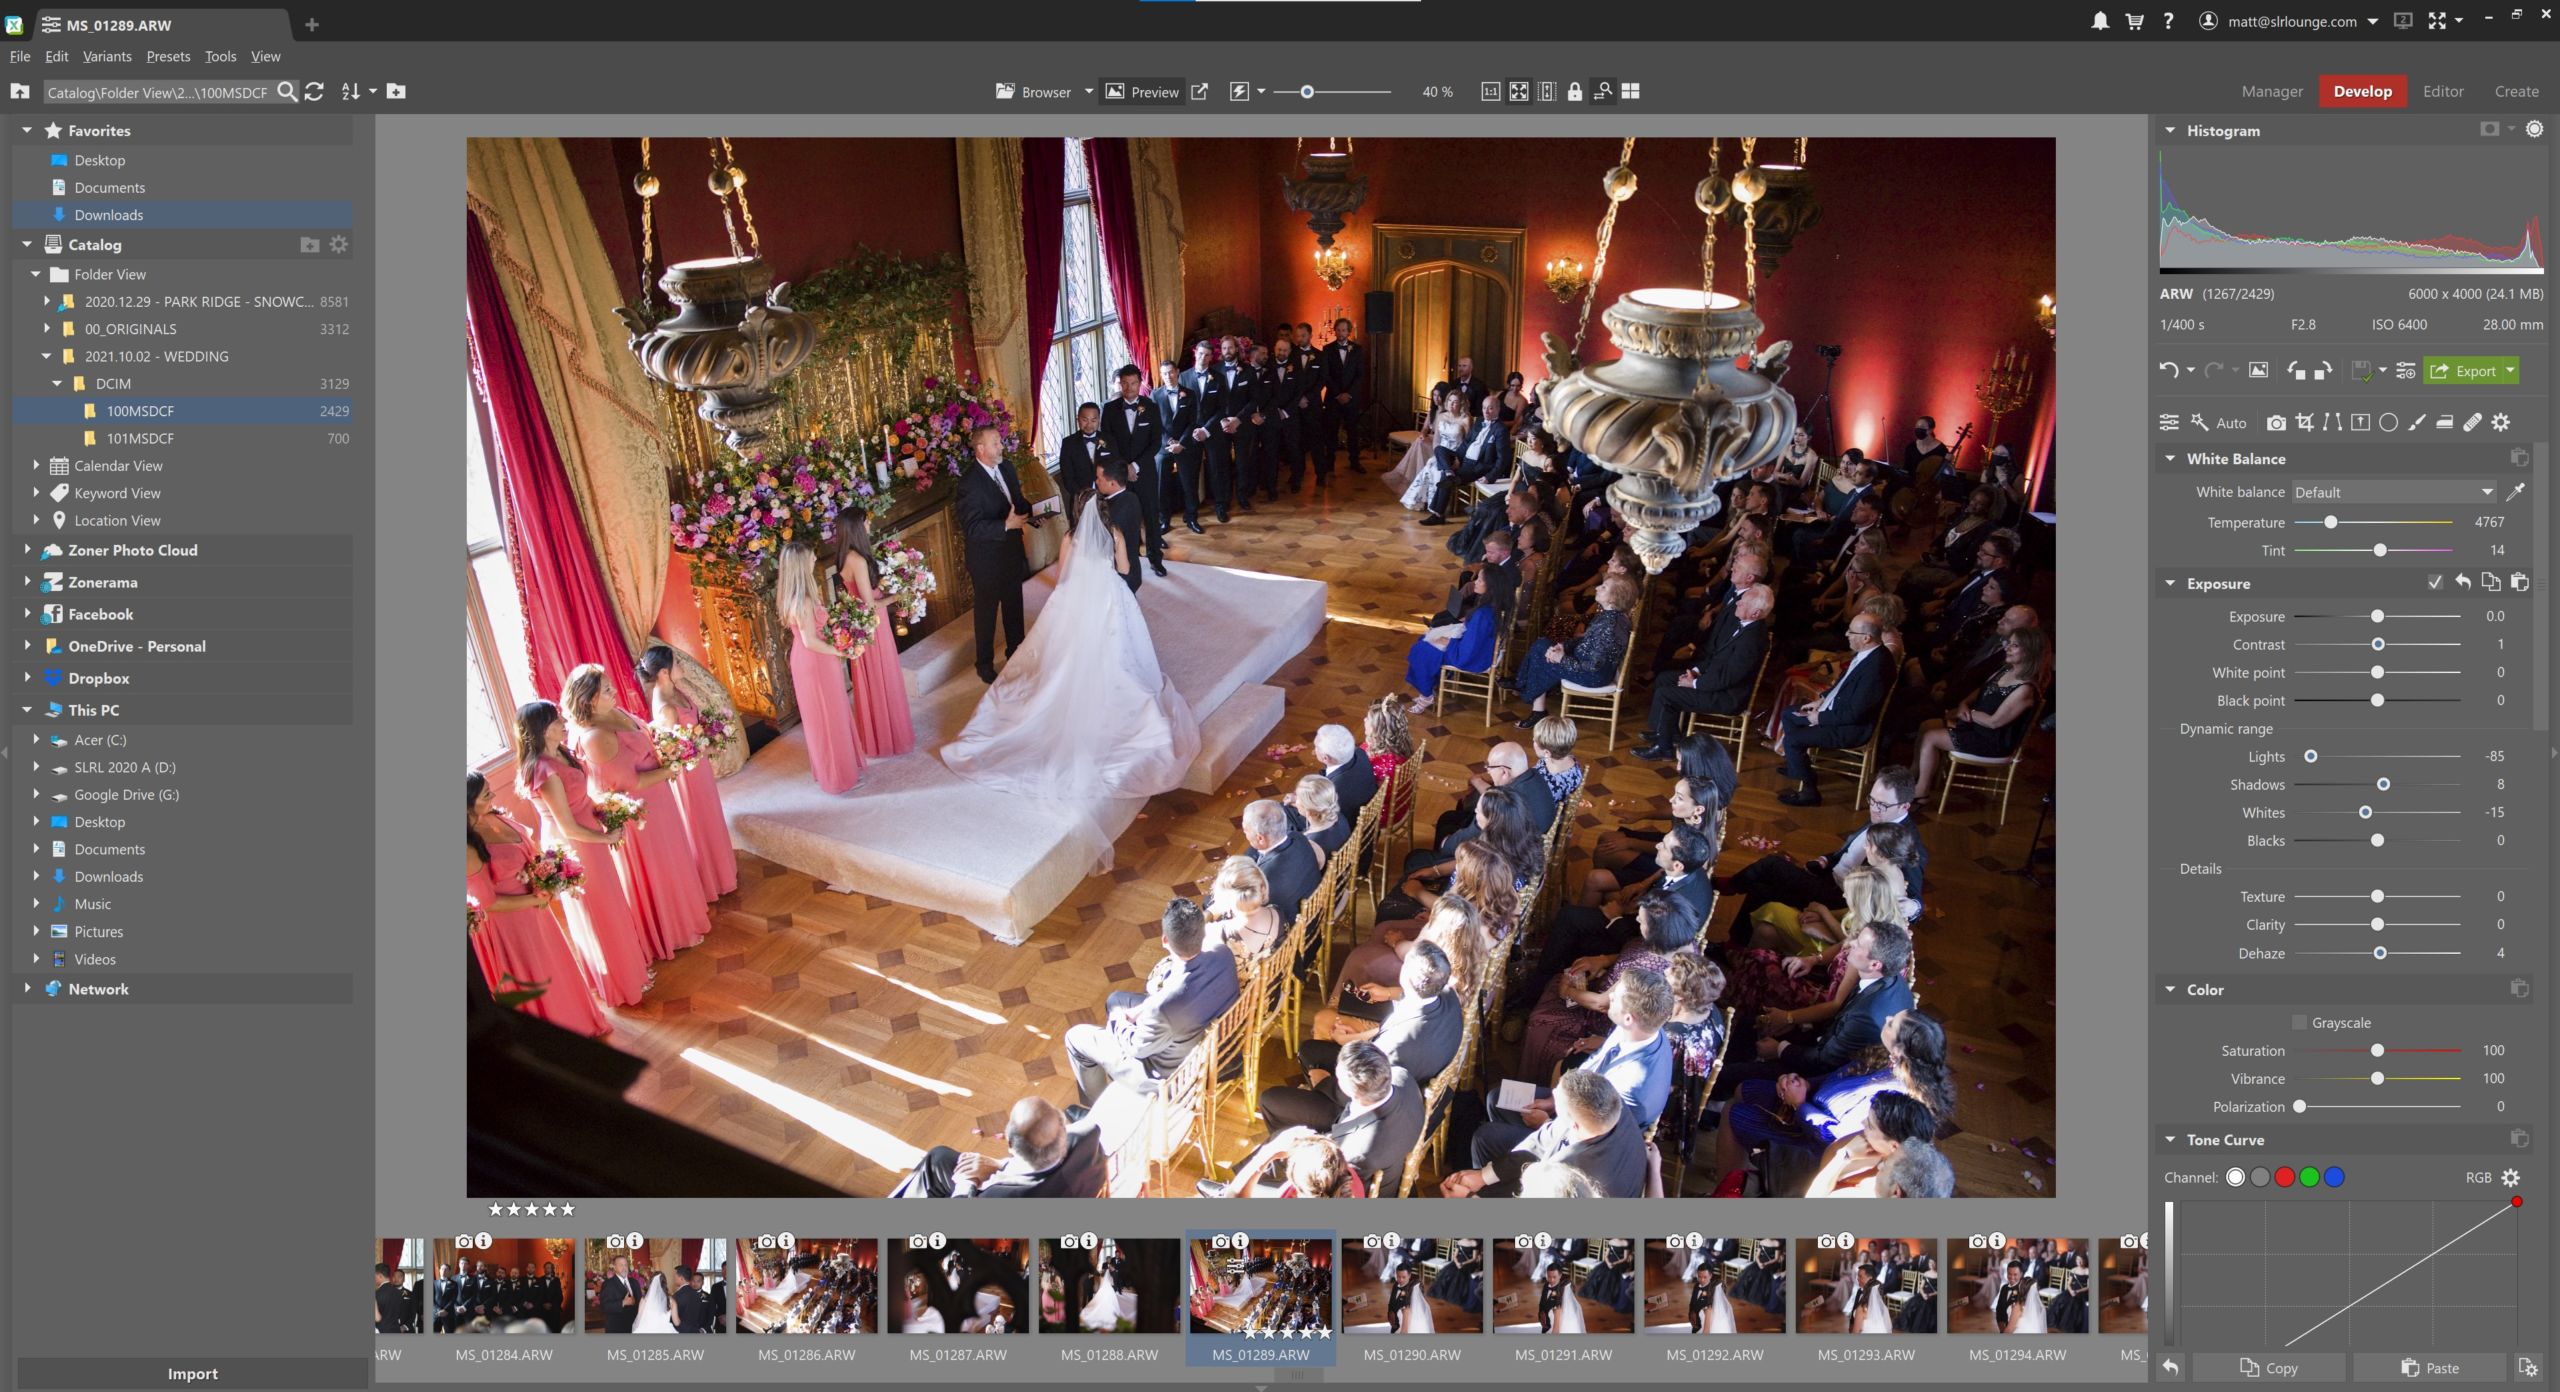
Step 3: Color-correct the “Keeper” images
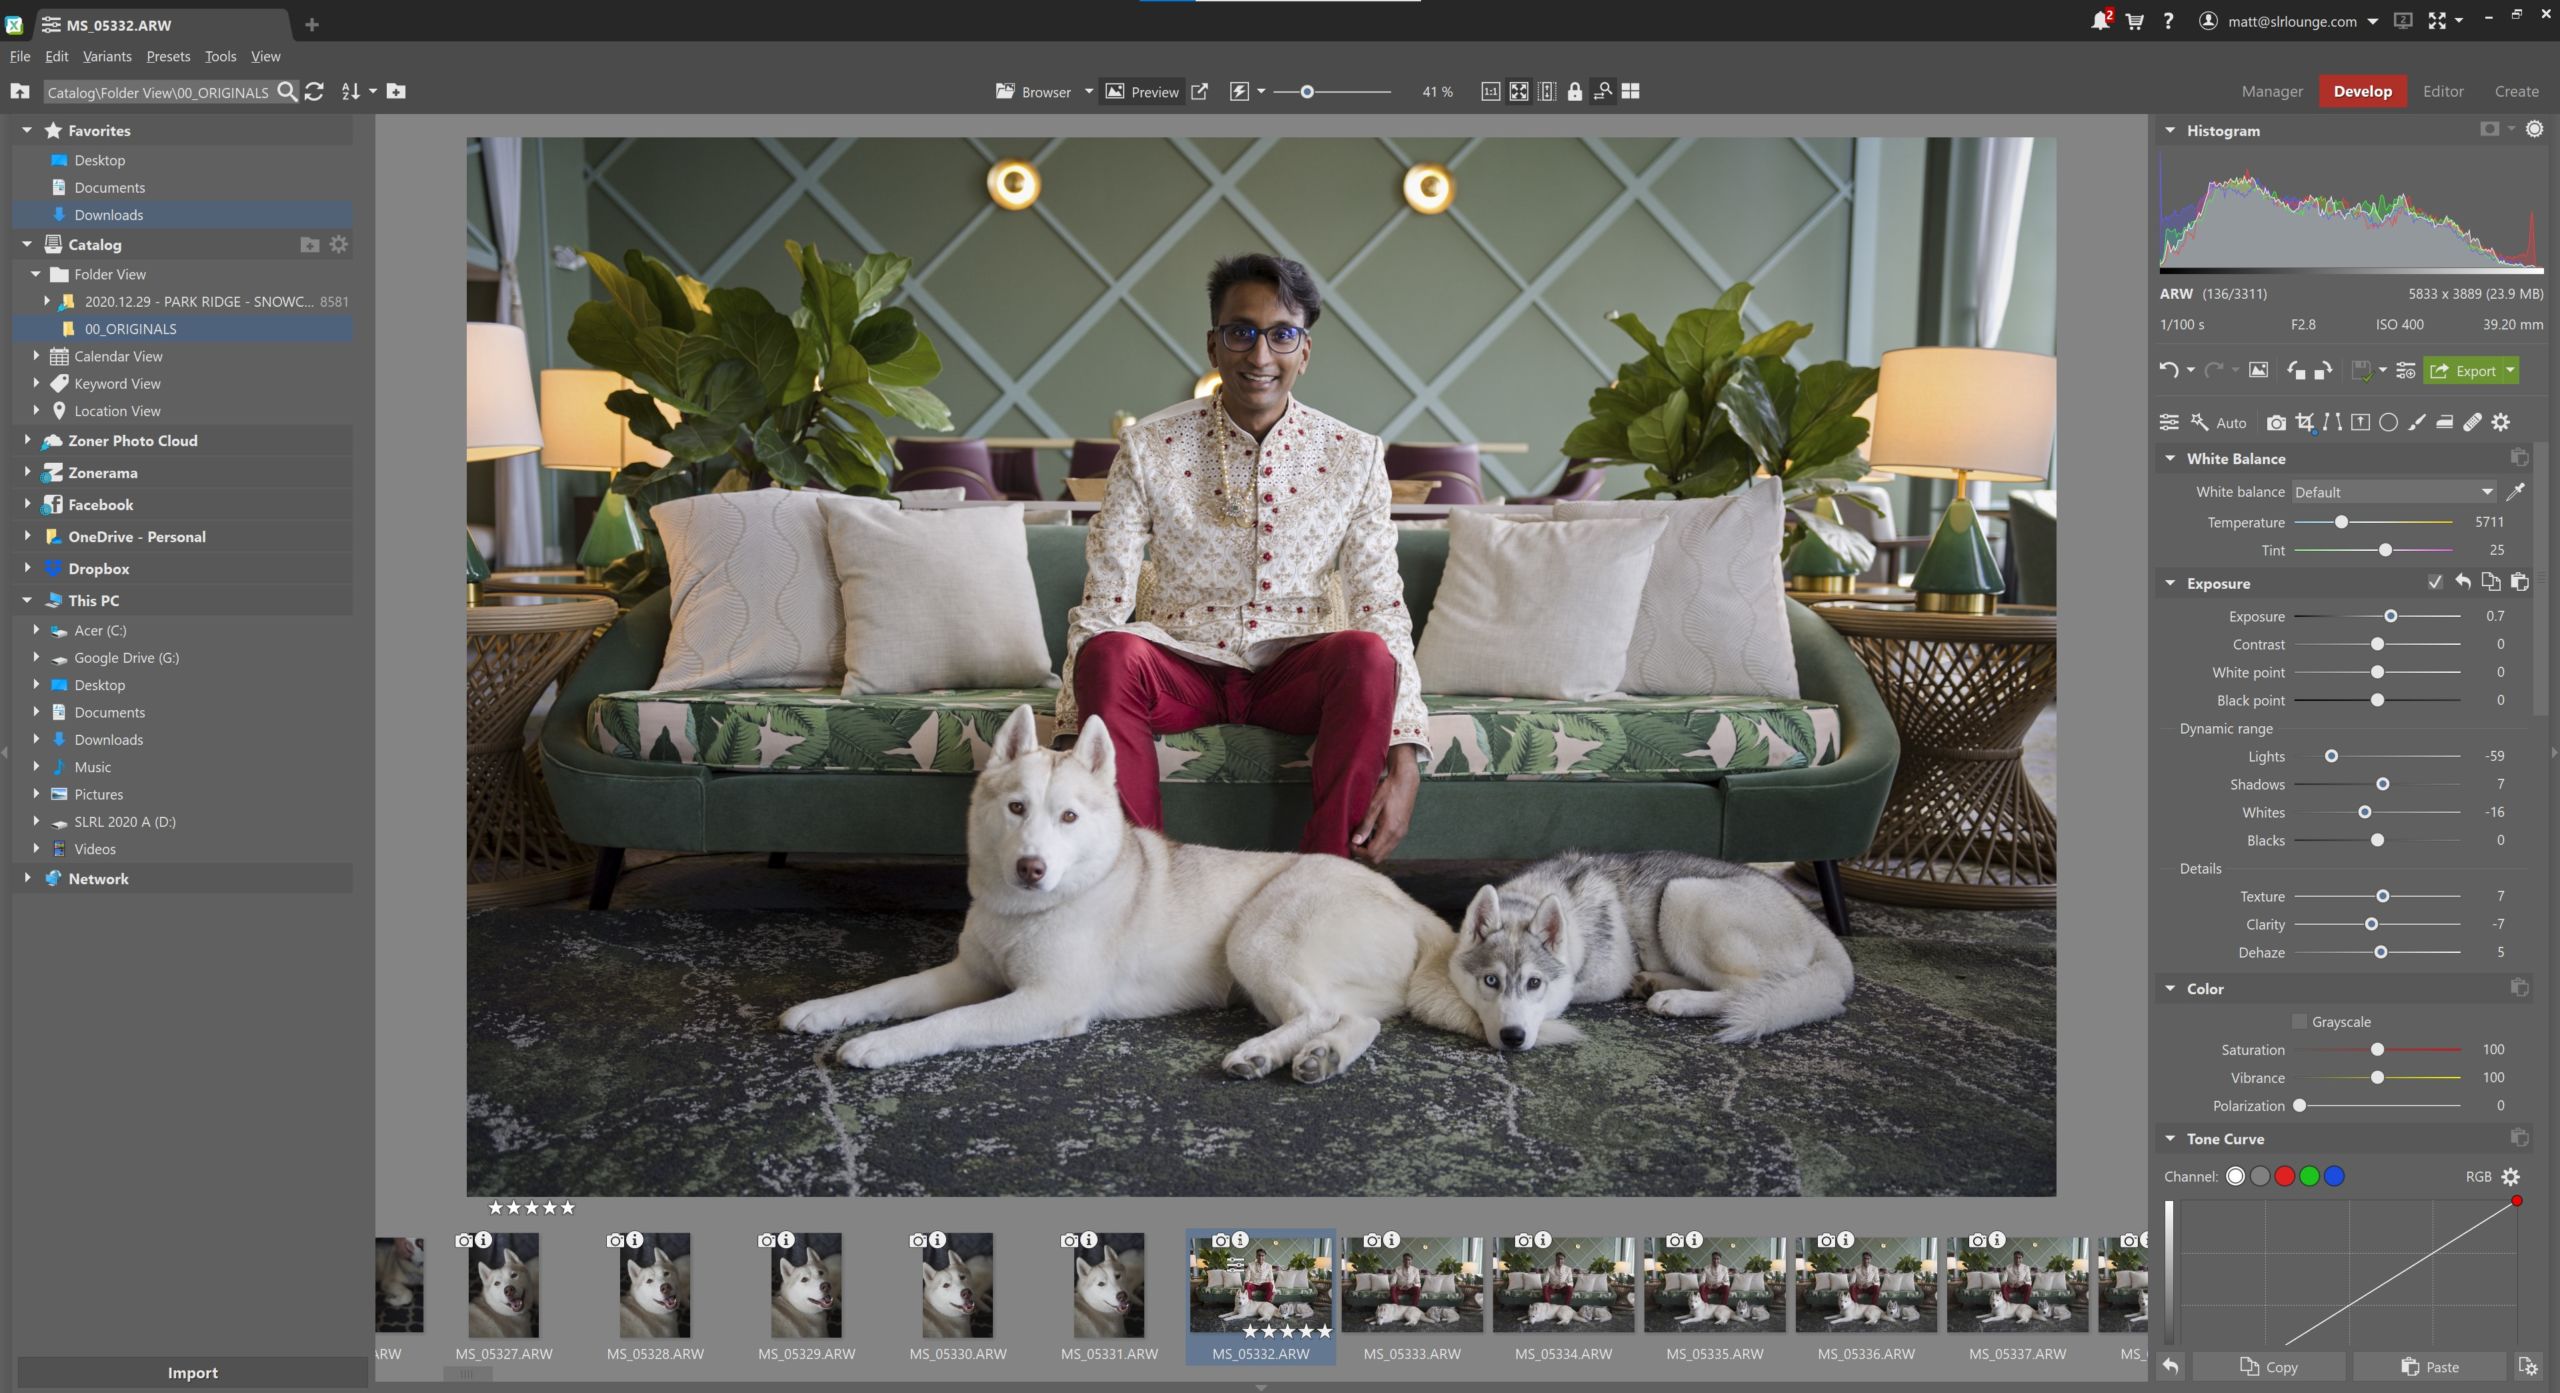
Now comes the fun, creative part! With your own artistic style and a little experience, the color-correction process can be a pleasant creative task, not a boring monotony.
One trick to avoid monotony is to simply avoid performing the same edits over and over again; that is, edit your images in batches!
Here’s how we do it: Take each part of the wedding day, broken down by their lighting conditions, and edit those photos as a group. For example, the open shade in which you captured the bride & groom’s first look, their portraits, the bridal party, and even the family; if you’re lucky enough to capture all those group photos in a relatively similar light, then all the images captured at that time can receive identical edits for things like White Balance and other subtle corrections.
When going image-by-image through an entire gallery of images, you should only be checking major settings that might have changed or been slightly off, such as exposure, or major highlight/shadow recovery.
This process of editing all your photos in batches becomes even more important as you develop a creative style, by the way. Want all your images to be bright and warm? Or have a muted vintage fade? You had better be performing nearly identical stylistic edits to your whole set of images, otherwise, the final result will look very different, incongruous.
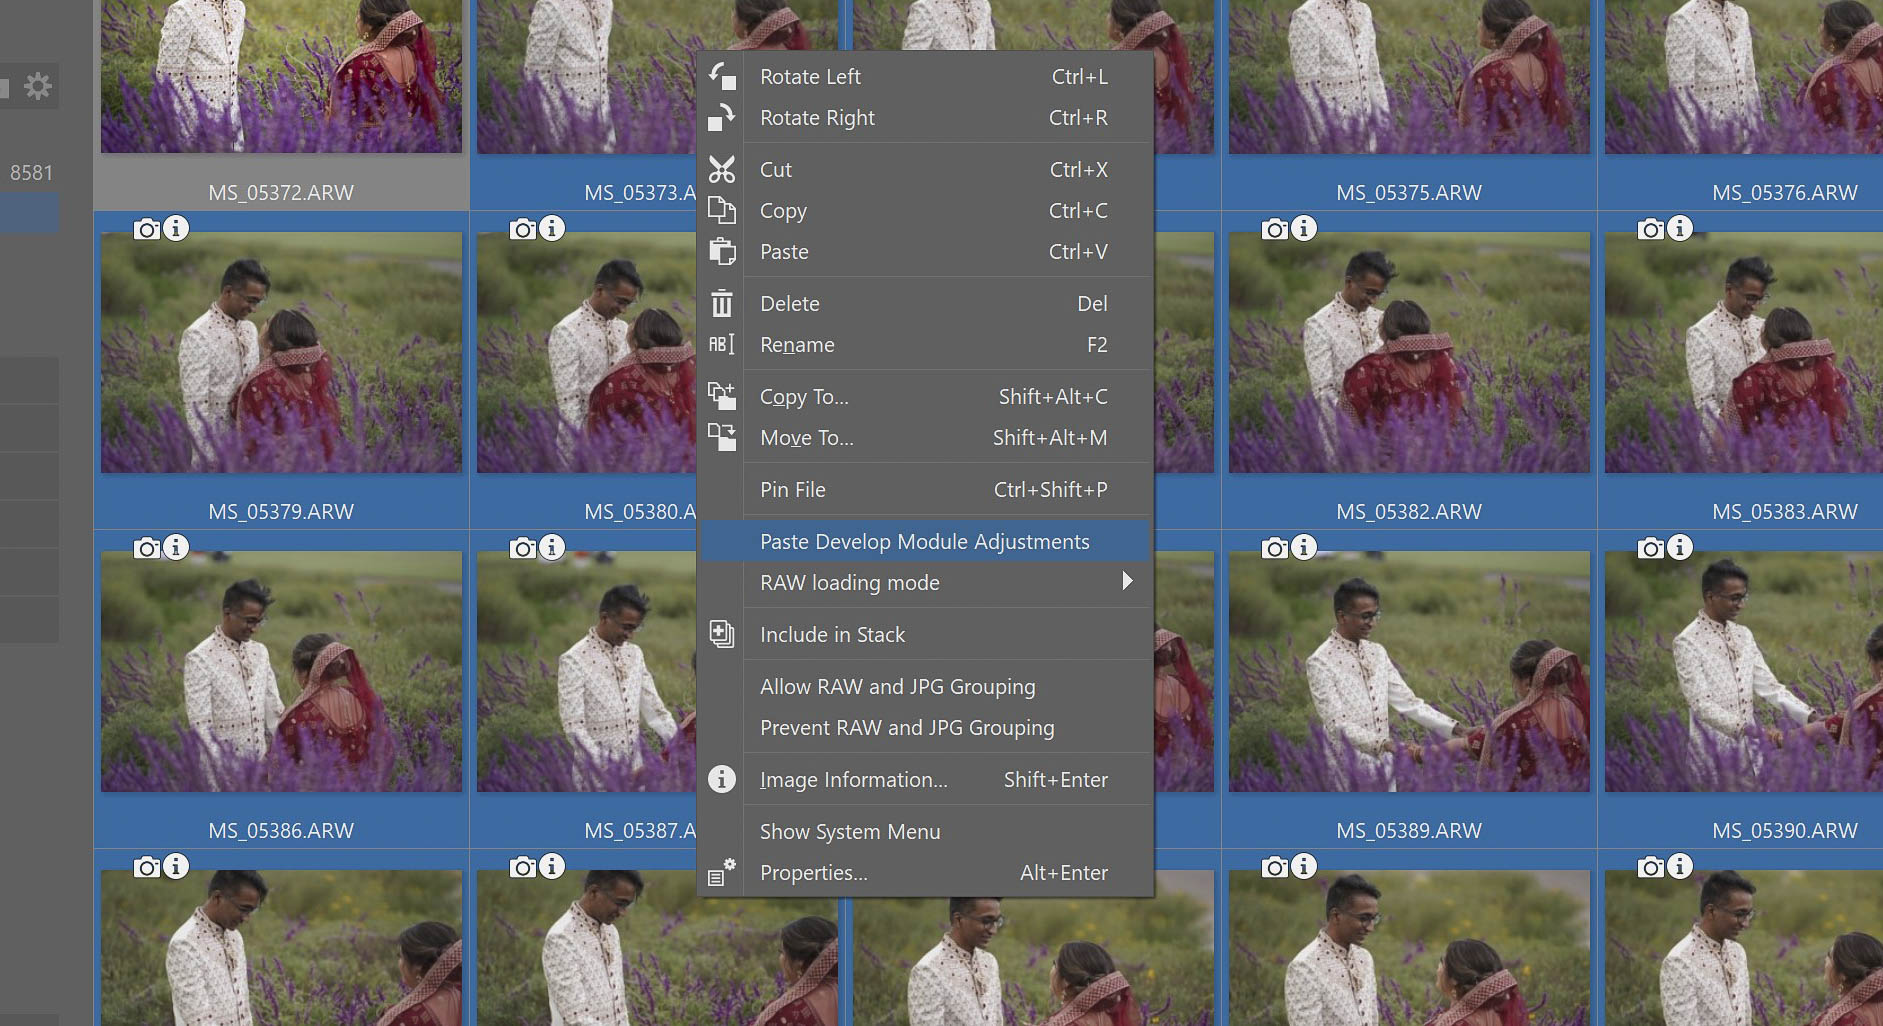
ZPS X offers a few ways to edit photos in batches. You can edit one photo and then copy & paste your settings to one or more photos, or, you can directly apply edits to numerous images at once. (AKA, auto-sync)
Another thing to note is that no matter which application you’re using, your computer may slow down when you really get going fast, color-correcting image after image, rapid-fire. The more megapixels each image has, the slower your computer might “bog down” eventually.

The best way to work around this is to use raw previews. They give your computer a huge break when it comes to the “heavy lifting” with each raw file. Luckily, it’s easy to set “Preload Smart RAWs” in ZPS X, as seen above, to minimize any slow-down. In our wedding studio, our pace for color-correcting might be faster than most, but we try to only spend a few seconds per image!
Step 4: Advanced retouching on select images
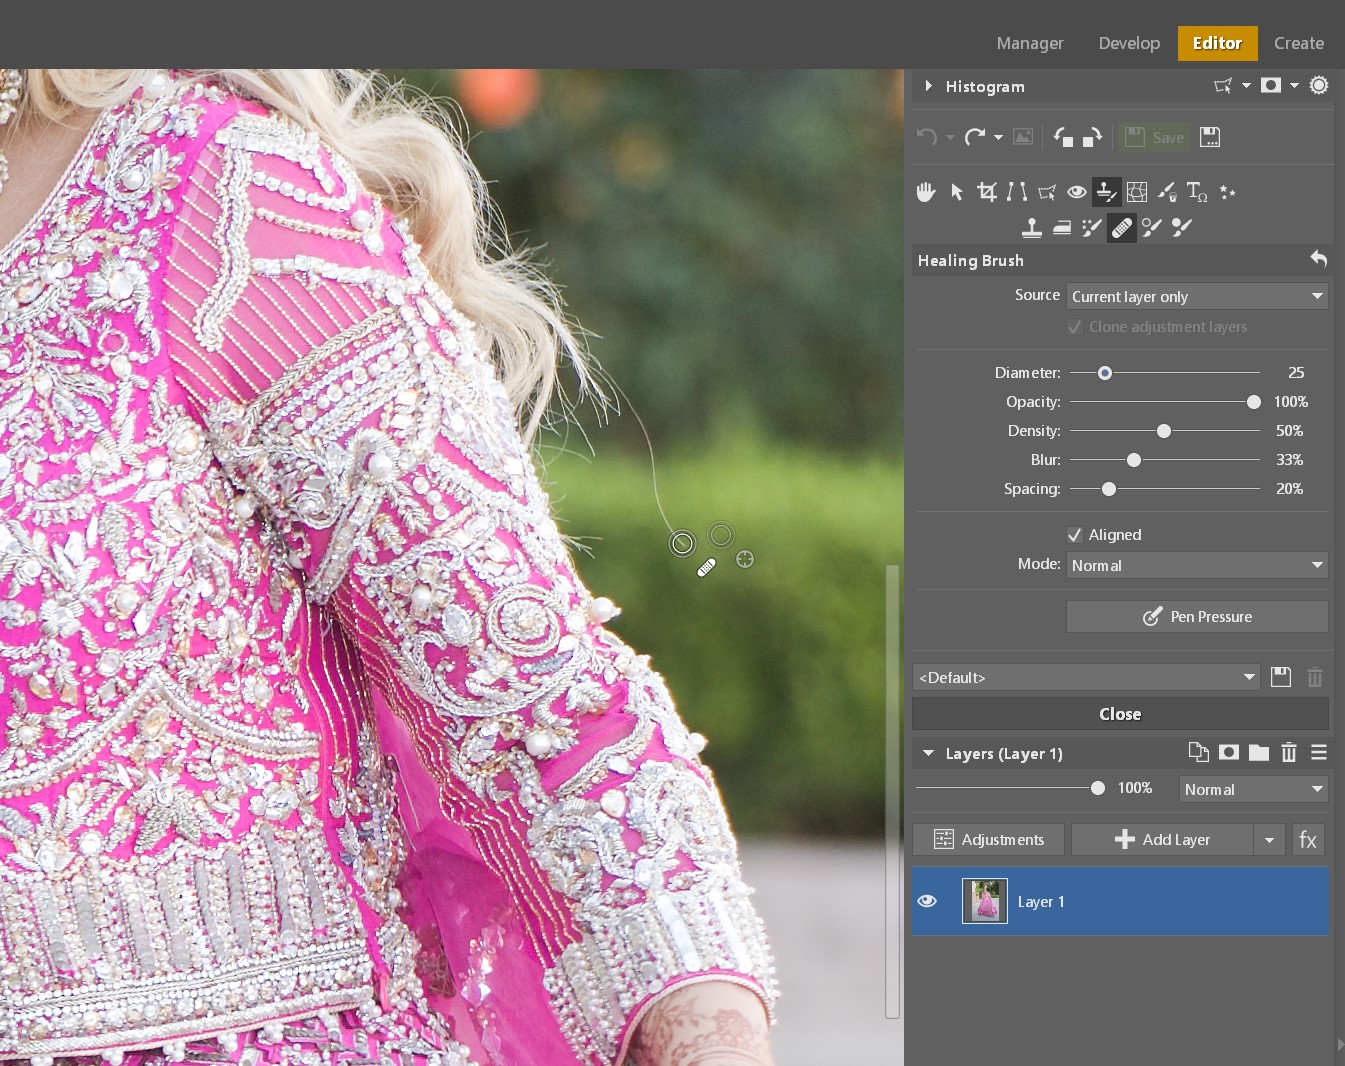
A select few photos from each wedding may require actual retouching work, such as blemish removal in a portrait, or distraction removal from a background of a wide-angle scenic portrait or venue/ballroom, etc photo.
Honestly, advanced photo editing programs like Photoshop are downright overkill for most of what a wedding photographer will need in this regard! Most of the time, all you will need is a simple healing brush or clone stamp tool, and that’s it! (You might have a pesky spot of dust on your sensor that you never notice until you take a picture at f/8 instead of f/2.8!) At most, you might need to do a little bit of layer masking with two images.
Aside from the fact that advanced photo manipulation is hardly even necessary, there is an added complication: the fact that every retouched image that “leaves” your native raw editing software is going to “come back” as a TIF or PSD file, not a raw file,
The Zoner Photo Studio X “Editor” module can make these special retouches happen for your raw images, within the same program as the rest of your workflow. This eliminates the extra step of needing to come and go between an additional application, or worry about saving additional files that lose your raw edits and need to be kept track of on your hard drive.
Step 5: Export print-ready JPGs
Once you have “finished” your editing workflow, of course, you’re not done yet! You need to save (export) all of your raw images to JPG format so that you can deliver them to your clients, or use them for whatever physical products you might be creating.
Thankfully, raw editing applications almost all have export tools, so you can walk away from your computer and let it do the heavy lifting of creating a few hundred (or a few thousand) JPG files while you do something else.
We recommend saving decently high-quality JPG images, without too much compression, but not necessarily at the full resolution of your camera. Unless you are making a very large print, nobody needs 40-60 megapixel images of every moment of their wedding day! Usually, 12-20 megapixels are more than enough, even if the client wants to make prints of their own.
Batch exporting in ZPS X allows you to export full-res and/or re-sized versions of all your edited photos at once.
Don’t forget to also export your best 10-20 photos at web resolution for things like social media sharing, too! We recommend saving these images to a Dropbox or Google Drive folder, for easy access on all your devices.
Step 6: Online Image Delivery & Presentation
Of course, your work is still not done, not until the newlywed couple actually sees the images!
These days, online delivery, in the form of a beautiful viewing gallery, is the most common method of image delivery. Clients usually don’t want to just get a hard drive in the mail, let alone a set of DVDs! That’s so 2012. A USB thumb drive can be useful, as an added gift/bonus, but they’re also super easy to misplace, and long-term data failure is always a risk.
Therefore, delivering your images in an online, high-quality gallery is the best choice for both the initial aesthetic presentation and the long-term archival potential.
There are many options for online delivery, but for wedding photography, there are a few important details to look for when choosing an online host:
First, you may be delivering a LOT of photos, so having a gallery host that offers unlimited storage is good.
Second, professional presentation, or a high-quality visual experience, is important. You want your photos to look as crisp and detailed as how you captured them; not horribly compressed and mushy. At the same time, you don’t want to lose the original files’ resolution, either.
Thirdly, since this is a business, you want to minimize your monthly/annual expenses, of course. We recommend an online host with a low monthly or annual fee, or a free host, if possible.
As one final side tip, we recommend saving your best 10-20 images to a cloud folder like Dropbox or Google Drive in low or medium resolution. Then, you can have easy access on all your devices, if you want to use a phone or tablet to view and show off your latest work, or of course upload to Instagram or Facebook or Flickr, etc.
In terms of high-res storage and client delivery, of course, most social media sites, and even high-res platforms like Flickr, just won’t work. They are an important, separate part of your wedding photography business, but to deliver images to clients, you’ll want that high-res, unlimited storage option.
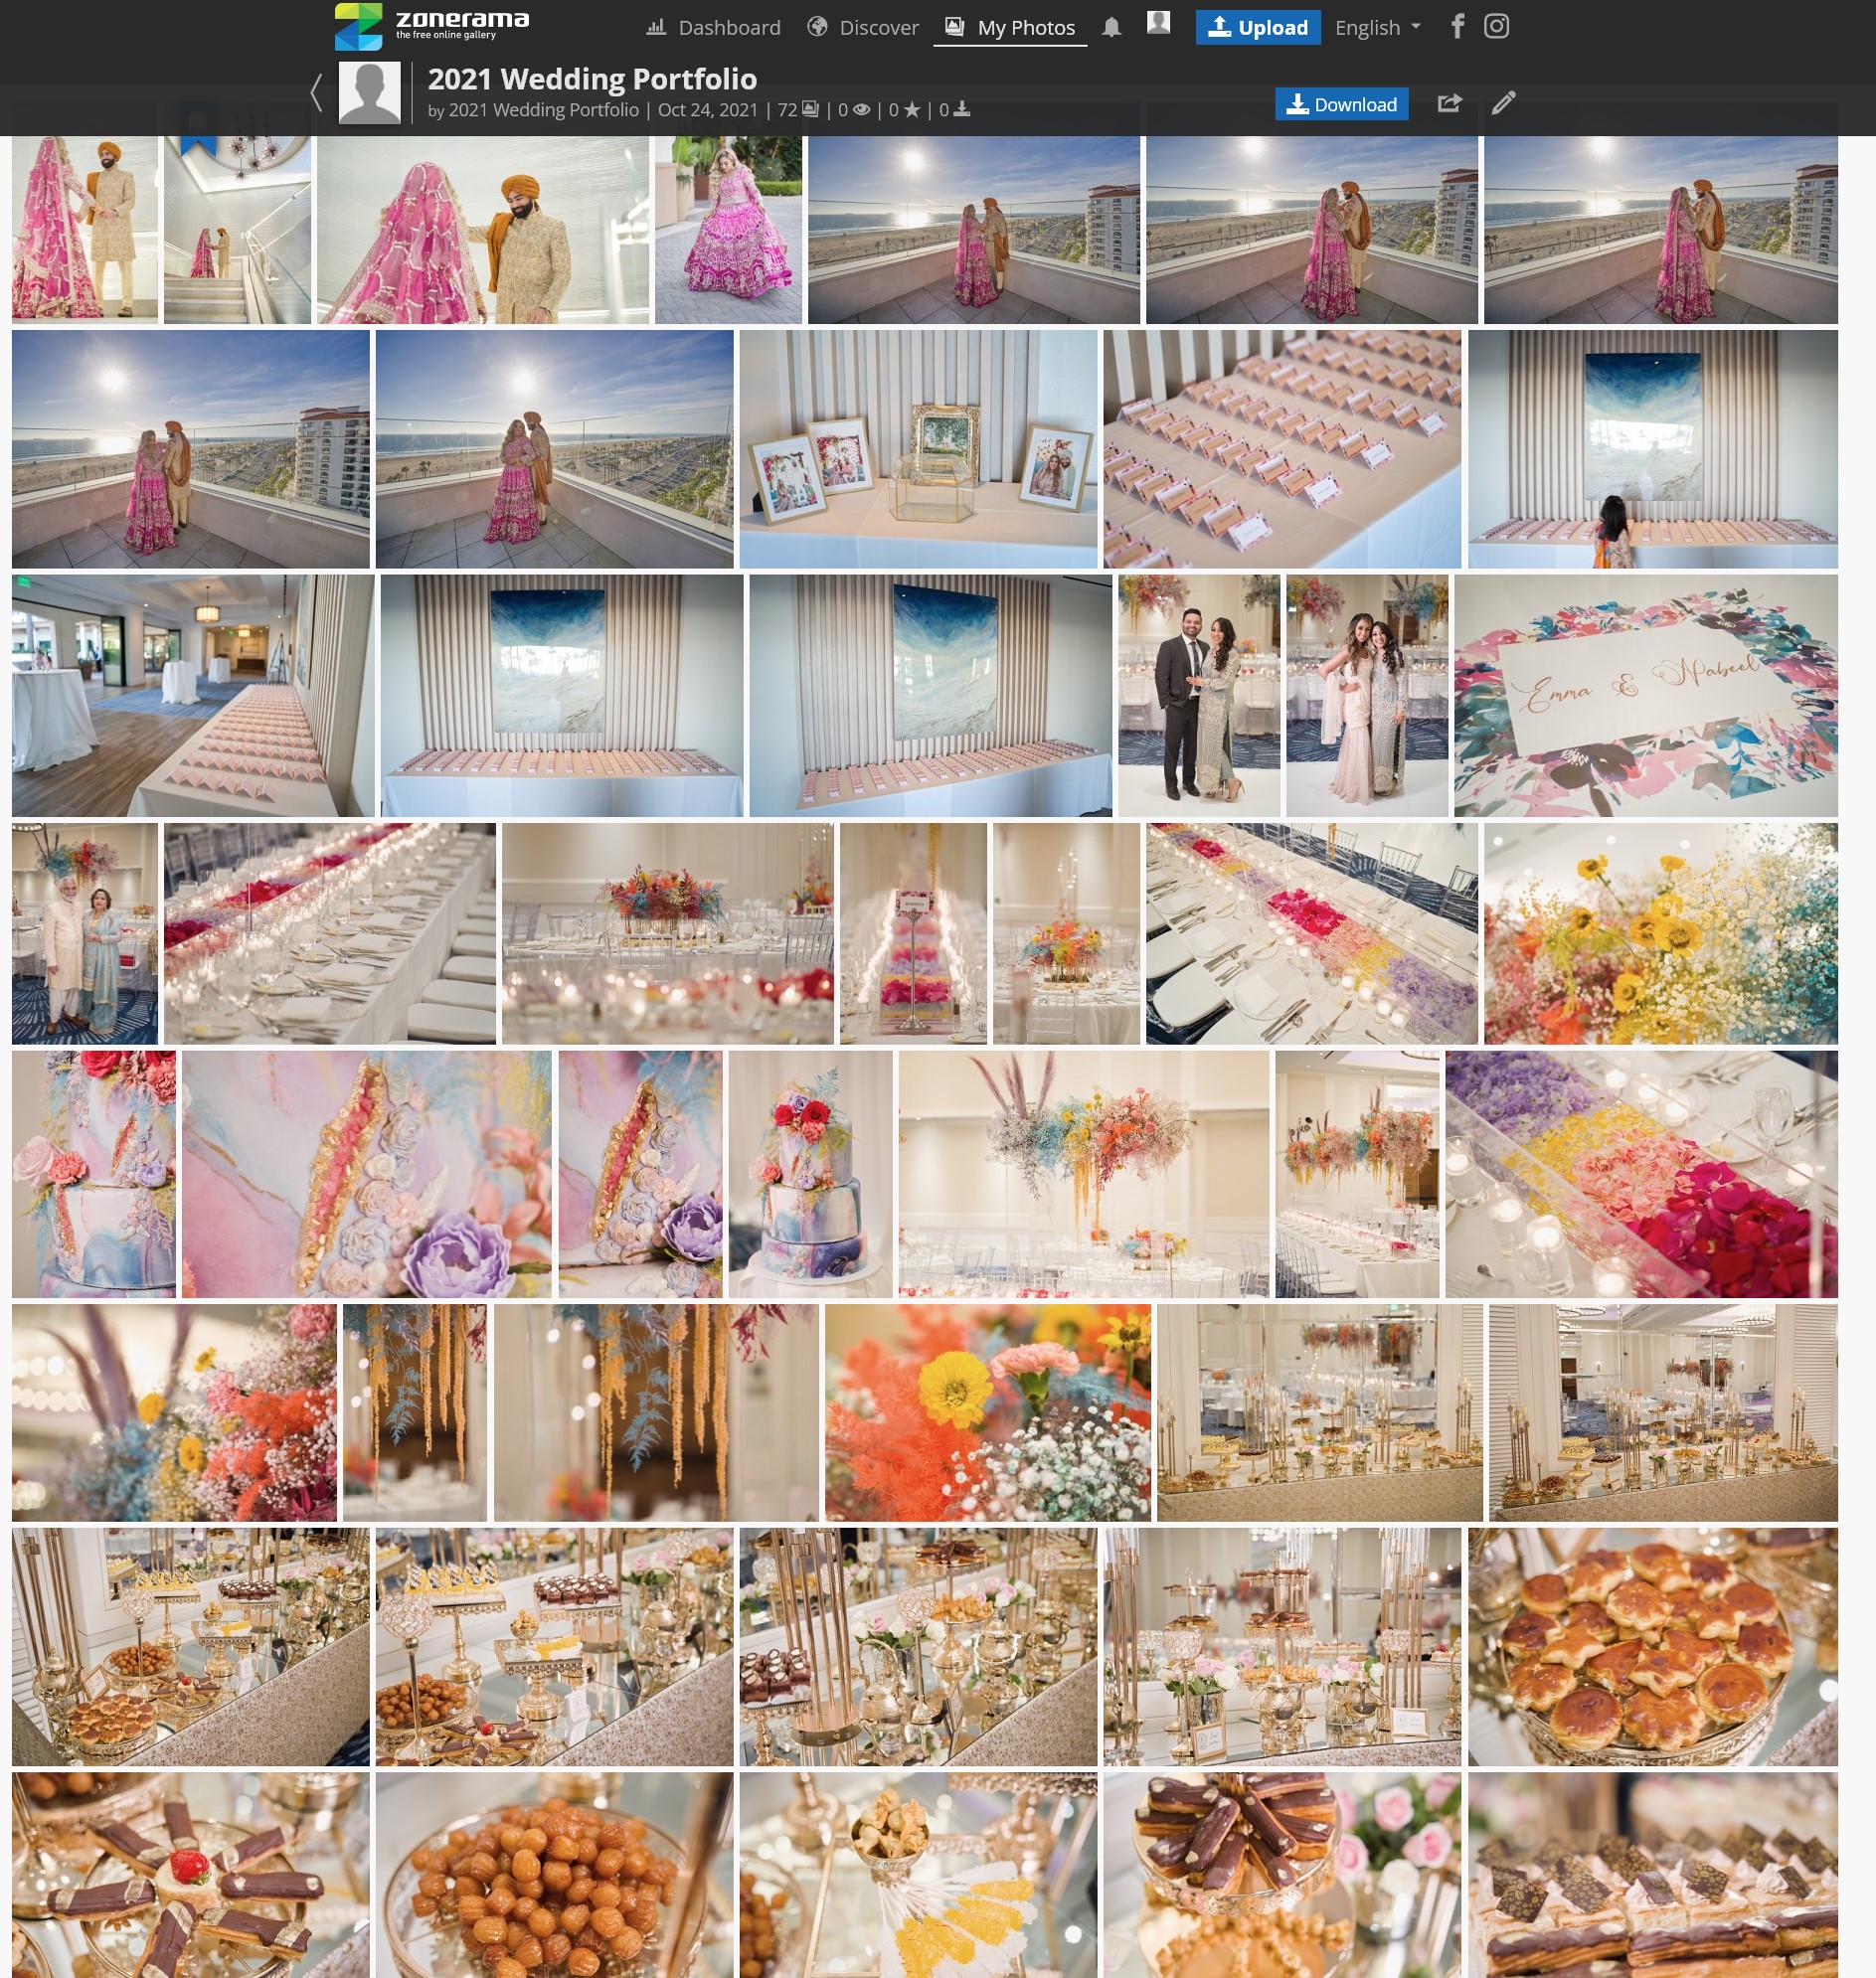
One of the features that is relatively unique to Zoner Photo Studio X as a workflow too is, that they actually offer an online hosting service, Zonerama, where you can not just create and share galleries of your best images, but also upload the high-res JPG images, and they will be stored without being compressed or re-sized. This allows you to fully integrate your online presentation and delivery into your main workflow.
Zonerama offers all of the above features, for free, so you can integrate online delivery directly into your workflow.
Actually, photographers looking to share or deliver images online don’t necessarily need to be using ZPS X; anyone can take advantage of Zonerama.
Conclusion | A Complete Wedding Photography Workflow With Zoner Photo Studio X
If you made it through this article, you now have a complete overview of a start-to-finish wedding photography workflow! There are many ways to go about achieving this workflow, however, the key points we want to highlight are definitely these:
Your time is valuable. If you can streamline your workflow in any way, especially without paying more money, then do it! The savings will add up to many hours per week or month, and this will not just give you days back over the course of your career, but it will also make your life easier, period.
Your creative eye and style should not suffer just because you have to edit a lot of photos! Avoid monotony by editing your photos in batches, Focus on your creative style, and consistently delivering a “look” that represents your aesthetic as an artist, without too much repetitive editing as you move from photo to photo.
The photos themselves are valuable! From start to finish, from the download and backup process to the export and online delivery steps of your workflow, you must be responsible and professional with your photos. Whether it is the archival safety or the visual presentation, always remember that your clients are paying you to give them a consistently beautiful visual experience that showcases their wedding day in the best possible light.
Do you have any questions about wedding photography workflows, or about Zoner Photo Studio X? Please feel free to leave a comment below!
If you’d like to try out Zoner Photo Studio X, you can get a free 30-day trial by clicking here.