
Today, Adobe is releasing updates to the entire Adobe photography ecosystem, including Camera Raw, Lightroom Classic CC, and Lightroom CC for Mac, Windows, Android, ChromeOS, and iOS.
Enhance Details
In this release, they’re introducing an all-new Sensei-powered feature, Enhance Details. Harnessing the power of machine learning and computational photography, Enhance Details can now be found in Adobe Camera Raw, Lightroom Classic CC, and Lightroom CC for Mac and Windows, and takes a brand new approach to demosaicing raw photos to better resolve fine details and fix issues like false colors and zippering. Demosaicing is an integral process to raw processing and works at the pixel level, converting the information captured by a camera into something that looks like the photos we all expect to see.

The new Enhance Details algorithm enables you to increase the resolution of both Bayer and X-Trans based photos by up to 30%. Applying Enhance Details to your photos can greatly improve fine detail rendering, improve the reproduction of fine colors, and resolve issues that some customers reported with their Fujifilm X-Trans based cameras.
Enhance Details uses machine learning—an extensively trained convolutional neural network (CNN)—to provide state-of-the-art quality for the images that really matter. Enhance Details works well on both Bayer (Canon, Nikon, Sony, etc.) and X-Trans (Fujifilm) raw mosaic files.


[Get Adobe Lightroom CC Here: B&H | Amazon | Adobe ]
All of the apps have also been updated to support new cameras and lenses.
[REWIND: Adobe Releases Lightroom Classic CC 8.1 With Develop Panel Customization]
How Cameras See the World
To understand how Enhance Details works, it’s helpful to first understand how a typical digital camera sensor actually sees the world.
The human eye can distinguish millions of colors. Most of us are trichromats, with different types of cones—color-sensitive photoreceptor cells—present on our retinas that can perceive red, green, and blue colors. Each type of cone allows the eye to distinguish approximately 100 shades of color and our visual system can then mix the signals together to see those millions of colors.
But that’s not how cameras see the world.
All digital photographs start out in monochrome. They are then turned into color through an algorithmic process called demosaicing.
Digital camera sensors consist of two parts. First, there’s the main photosensor array. Microscopic, light-sensitive cavities measure the intensity of light for a given pixel. Again, they measure intensity of light, but not color. Say you’re at the beach, and you’re gazing out over the Pacific Ocean at a spectacular sunset.
While you are seeing something like this…

The main photosensor array on your camera is seeing something like this…

Next, there’s a color filter array that sits on top of the photosensor array. The color filters allow the sensor to record the color of any given pixel.

Your digital camera only records one of the three color values for any given pixel. For example, for a red pixel, the color filters will remove all the blue and green information, resulting in only red being recorded by the pixel. Every single pixel in a raw image is therefore missing all the information about the other two colors.![]()
How Software Recreates the Image
To create the composite red, green, and blue value of every pixel in a digital photo is created through a process is called demosaicing.
There’s an art and science to creating a demosaic method and there are many ways to demosaic a photo. Demosaic design choices can impact everything from the overall resolution of your photos to the fidelity of small color areas, even to the accurate rendition of fine details.
In its most basic form, demosaicing averages the color values of the neighboring pixels. For example, for a pixel with a red filter over it, we’d see the red value. The demosaicing algorithm would average the values of the of all four neighboring blue pixels to arrive at the blue value, and then do the same for the surrounding green pixels to arrive at the green value.
Demosaicing can be relatively straightforward in the areas of an image that have smooth gradients or constant color. Think blue skies and puffy white clouds. However, the process gets a lot trickier in the more complicated regions of an image. In areas with texture, fine details, repeating patterns, and sharp edges, standard demosaicing methods can struggle, producing lower resolution and problematic artifacts.

Advanced demosaicing methods can handle these complicated areas, but they can be very expensive computationally. Myriad mathematical calculations are required to perform the interpolation necessary to build an image. This takes time, even on the most powerful computer hardware.
As a result, software like Lightroom is constantly balancing the tradeoff between image fidelity and speed.
Demosaicing Issues
There are really just a handful of major demosaicing issues that need to be solved, but they keep popping up again and again in image after image, in new and convoluted ways.
Small-scale details — Images with small details close to the resolution limit of the camera sensor are a big problem. If you’re lucky, you simply lose the details into a hopeless jumble of color. If you’re not, you can run into moiré patterns, where color artifacts arrange themselves into striking maze-like patterns.

False colors — When a demosaicing algorithm mis-interpolates across, rather than along, a sharp edge, you can see abrupt or unnatural shifts in color.
Zippering — At the edges of an image, where you lose half the pixels you would normally use to interpolate your color data, you can see edge blurring.

Adobe is constantly striving to improve their demosaicing algorithms. Over the years, they’ve been able to refine their algorithms to the point that they’re doing very well for the vast majority of images. But these special, difficult cases require us to think about the problem in a different way.
[REWIND: What Is Adobe Lightroom And Who Is It For?]
Enter Adobe Sensei
Sensei integrates all branches of artificial intelligence, including the raw power of machine learning—what we refer to as “deep learning.”
Enhance Details uses an extensively trained convolutional neural net (CNN) to optimize for maximum image quality. They trained a neural network to demosaic raw images using problematic examples, then leverage new machine learning frameworks built into the latest Mac OS and Win10 operating systems to run this network. The deep neural network for Enhance Details was trained with over a billion examples.
Each of these billion examples contained one or more of the major issues listed above that give standard demosaicing methods serious trouble. Two models were trained, one for the Bayer sensors, and another for the Fujifilm X-Trans sensors.
As a result, Enhance Details will deliver stunning results including higher resolution and more accurate rendering of edges and details, with fewer artifacts like false colors and moiré patterns.

“We calculate that Enhance Details can give you up to 30% higher resolution on both Bayer and X-Trans raw files using Siemens Star resolution charts.”
Best Practices
To get the most out of Enhance Details, here are some tips and takeaways…
- Enhance Details requires Apple’s Core ML and Microsoft’s Windows ML, so it won’t work on older operating systems. Please be sure to update your computer’s operating system to the latest version.
- Enhance Details requires intensive processing, and it can take some time to do its work.
- Faster GPU means faster results. An eGPU can make a big difference.
- You’ll find Enhance Details most effective on the following image types:
- Images that you want to print or display at a large size.
- Images that display popcorn/wormy artifacts
- Images with lots of fine detail
Additional new features introduced in this release
In addition to Enhance Details, they’ve also added HDR, Pano, and HDR Pano Merge Tools, the Targeted Adjustment Tool, and Histogram Clipping Indicators.
HDR, Pano, and HDR Pano Merge

High dynamic range (HDR) and panoramas are two types of photos that combine multiple frames to create visually stunning results that would otherwise be impossible to create from a single photo. Lightroom CC can merge either raw and non-raw photos together into HDR and panorama photos, and when merging raw files, the resulting DNG maintains all of the benefits of a raw file with the ability to change white balance and recover highlights, giving you the best possible results.
Capturing a panorama can be done either handheld or with a tripod. When shooting handheld, Lightroom’s powerful alignment technology will align each photo and correct for any distortion. Using a tripod can yield even higher quality results and provides more flexibility for difficult shots, such as a super-wide panorama.
When capturing a series of photos for HDR, including both HDR and HDR Panos, it’s often recommended to use your camera’s auto exposure bracketing mode, which results in a series of photos being captured in a row, varying the exposure for each shot. Consult your camera’s manual for how to enable its auto exposure bracketing mode. When capturing an HDR Pano, capture each series of exposures before moving the camera. This is where having a tripod and a remote trigger can be quite handy.

Once you’ve imported the photos into Lightroom, select the photos that you want to merge, and then navigate to Photos > Photo Merge > and select the appropriate merge option.
Targeted Adjustment Tool
The Targeted Adjustment Tool (TAT) gives you precise control over color and tonality and is available in both the Tone Curve and Color Mixer tools.
To access the TAT, open either Color Mixer or Tone Curve and click on the to target icon. A new control will show up at the bottom of the screen that provides control over what the TAT will affect while interacting with your photo. Clicking and dragging on your photo will then directly control the tool, enabling you to quickly modify different parts of your image directly and effectively. For example, clicking and dragging on the sky in a photo with the TAT focusing on the Color Mixer tool in Saturation mode enables you to increase or decrease the saturation of the colors in the sky.

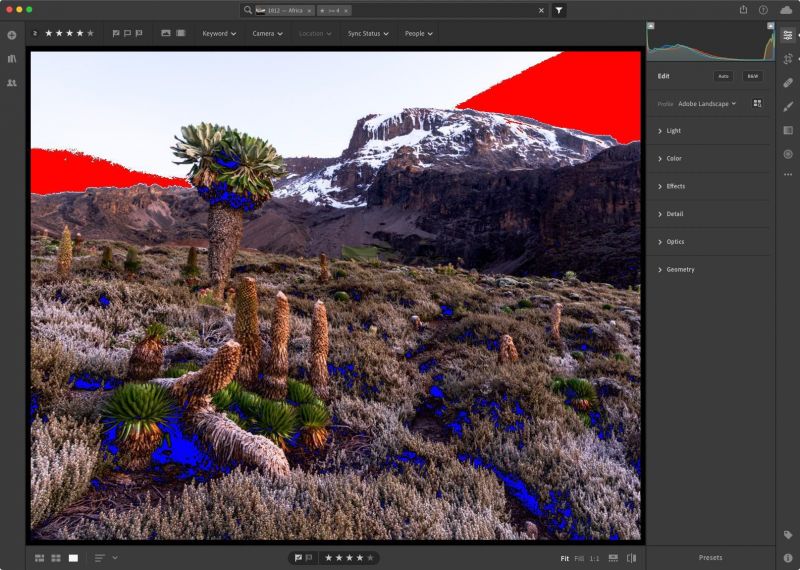
Histogram Clipping Indicators
The term clipping refers to areas that have become either too bright or too dark to have any details in them, such as an area of pure white (highlights) or pure black (shadows). An image may either be captured with clipped highlights or shadows due to the scene having too high of a dynamic range. A very bright and sunny day or clipped areas may be introduced while editing the photo. You can use the histogram clipping indicators to ink the areas of your photo with clipped highlights in red or clipped shadows in blue.
To enable the histogram clipping indicators, first ensure that the histogram is visible by navigating to View > Edit Panels > Show Histogram, which will show the histogram at the top of your edit panels. You can then selectively turn on the clipping indicators individually by clicking on the either the left (shadows clipping) or right (highlight clipping) triangles (as seen in the image below).
Adobe Lightroom CC for iOS
This release makes it possible to create ad-hoc photo shares and continues to focus primarily on behind-the-scenes updates and preparation for exciting features that will be coming soon. For a full list of improvements and bug fixes found in this release, please visit the What’s New page.
Ad-hoc Photo Shares
You can now create an online share of photos with an arbitrary assortment. Instead of creating an album and sharing that album, you can now select any number of photos that you want to share, tap the 3-dot menu at the top-right of the screen, and then select Share to Web. Like any other web share, you can control whether people that you share that link with can download or see the photos’ metadata.

Adobe Lightroom CC for Android and ChromeOS
This release primarily focuses on foundational improvements and bug fixes, making way for new features coming soon. For a full list of improvements and bug fixes found in this release, please visit the What’s New page.
Adobe Lightroom Classic Updates
In this release, Adobe further improved tether performance and stability with Nikon cameras. They’ve been able to achieve the same level of speed and stability increases for Nikon cameras as were introduced for Canon cameras in the October 2018 release. Tethered image transfer at the time of capture should now be a faster experience overall in Lightroom Classic. You also now have the convenience of controlling basic camera features, like ISO, shutter speed, aperture, and white balance within the tether bar itself. Additional details on this enhancement can be found here. For a full list of the improvements and bug fixes, please visit the What’s New page.

[REWIND: Adobe Lightroom’s 3 Strengths and Weaknesses | Official Guide]
Conclusion
No matter what version of Lightroom you’re using, there is a LOT of power being packed into the release today that will be sure to enhance the images and workflow of everyone who updates. While I’ve not personally been able to test this out yet, I plan on downloading it pretty much immediately and running the update through a battery of tests with some recent photoshoots. I’ll be sure to update the post with any issues and observations found.
Are there any features listed here that you’re most excited about? Let me know in the comments if you’ve got any questions or concerns.
SLRLounge LIGHTROOM TUTORIALS
Browse our industry-leading Lightroom education. Whether you’re just getting started and need to learn Lightroom basics or you’re a seasoned pro looking for advanced Lightroom techniques, we have the right workshops for you.
SEE LIGHTROOM WORKSHOPS


Get Connected!