Even if you love editing photos and transforming your images from raw files into glorious works of art, you’d no doubt like to streamline your process. Well, you’ve come to the right place. In this article, we’re going to share 6 Lightroom export hacks (or more specifically, Lightroom export settings) for Lightroom Classic that you can use to simplify your workflow and make life easier when it comes to exporting images.
Video for 6 Lightroom Export Hacks that Everyone Should Know
To get started, open up a Lightroom Catalog and press CTRL+SHIFT+E (Windows) or CMD+SHIFT+E (Mac) to bring up the Export Dialogue. This is not one of today’s hacks, but it’s a great way to get started. That said, let’s get started.
Lightroom Hack #1: Use the “No Exist” Folder Prompt Trick
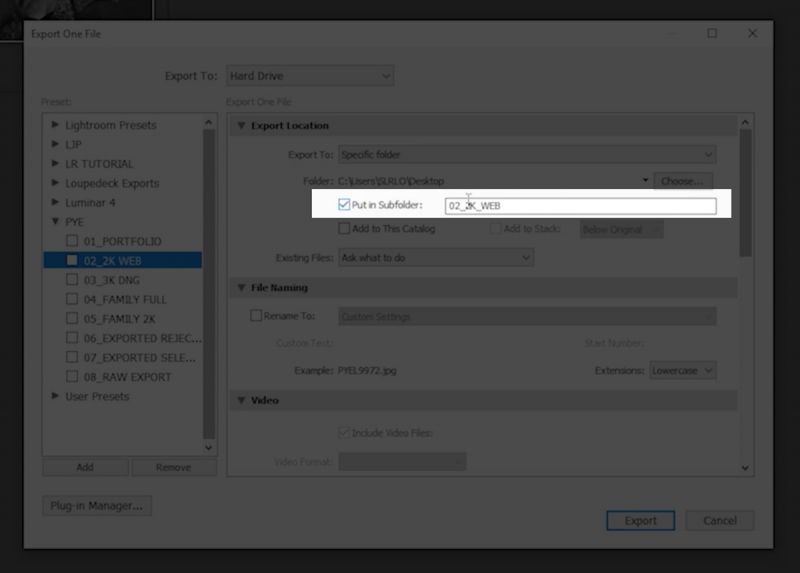
We’re going to set up Lightroom to prompt us for a specific folder upon export while still using the subfolder option. What does this mean? I like to set up my Lightroom export settings to follow an export workflow. Basically, I export most of my images as “portfolio” or “web-based” images. I typically export my portfolio images at high-res for print while I export web-based images at 2000px wide with “sharpen for screen” selected, etc. (as shown in the image below).
I use these two export presets often and each Lightroom export setting for portfolio or web-based images will use the function “Put in Subfolder” (see the image below). However, I don’t want my Lightroom export settings locked into a default setting for where they export images. Without this hack, that’s exactly what will happen. Your export preset will always send the images to the same destination.
If we were to select multiple export presets (which we’ll discuss later in the article), we would not normally be prompted to decide where to place the exports; instead, the files would go to a previously determined location, which you would’ve selected when you initially set up the preset (such as a “Photos” folder on your desktop). If you only ever export to your desktop, then there’s no issue. If you would like to export to specific folders (Google Drive, Client Folders, etc.), however, then you’ll need to set up a prompt. This way, you can still use your export presets and avoid having to locate and move around folders after exporting your files.
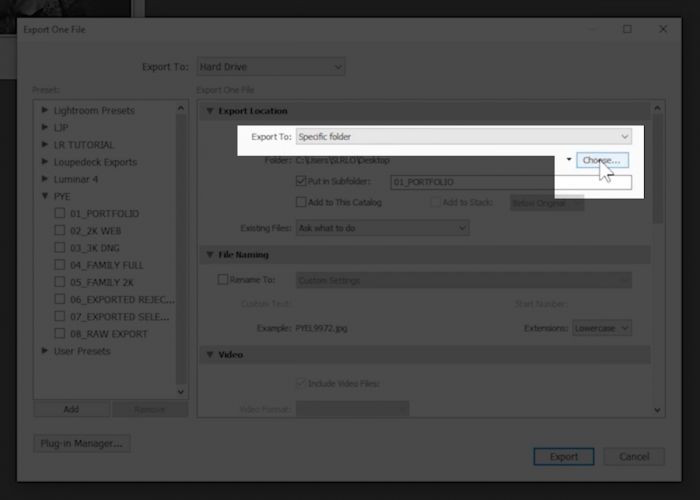
To set up a prompt, select a preset (such as your “Portfolio” export preset) and click the “Choose” button under the “Export To Specific Folder” option (see the image above). You will be prompted to create & name a new folder. Create a folder called “no exist” on your desktop. (You won’t need it later, so it doesn’t matter.) Then, after saving the folder, right-click on your export preset and select “Update.” You can then select another export preset (such as the “Web-based images” preset) and choose the same new folder for exporting that you’re using for the “Portfolio” images. After you’ve updated your presets with the new “Export to Specific Folder” settings, go back and delete the new “no exist” folder you created on the desktop.

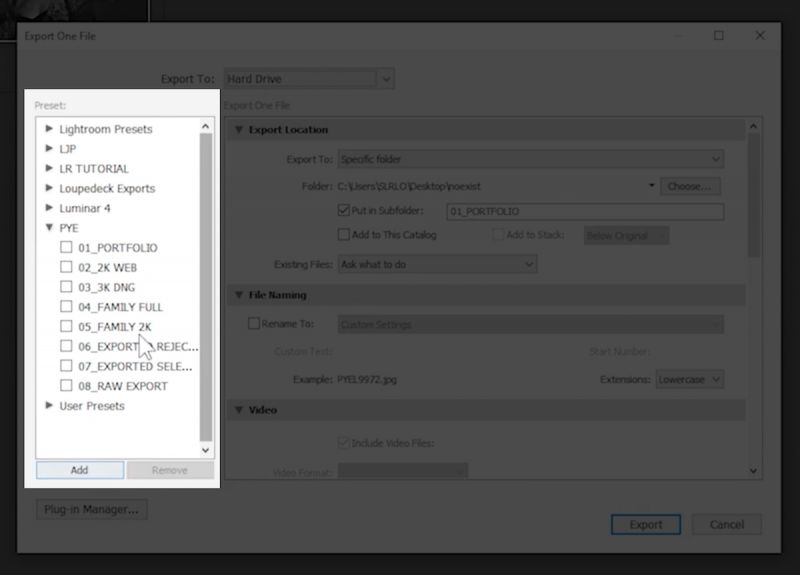
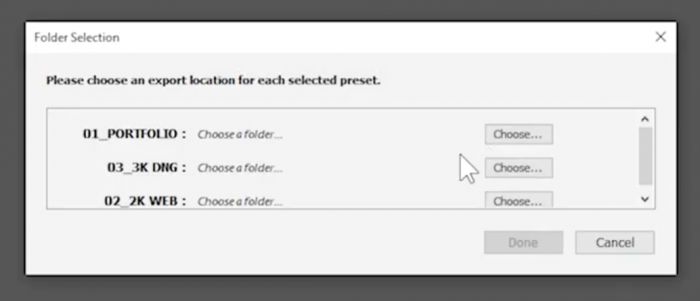
Now, when you export your images, Lightroom will be unable to find the “no exist” folder that you set up and you’ll be prompted to choose a destination for your images. At this time, you can select “Choose” for each export preset (see the image above) and create & name a folder in whichever location you prefer. From here on, Lightroom will maintain your folder structure and prompt you to choose a destination folder when exporting files using your export presets.
[Related Reading: Pye Teaches Lee How to Use Lightroom]
Lightroom Hack #2: Skip the Export Dialogue
Let’s talk briefly about how to name, rename, and order your export presets. After you’ve created your preset and added it to your list, you can always rename it by hovering over the preset and right-clicking it. As you can see in the image below, I like to use a numbering system to keep the order clear and easy to follow, and I organize the presets in the order in which I use the most. The first few presets are “no exist” presets (see Hack #1 above), but the second half of the list features presets that always send files to the same locations. For example, when it comes to “Family Full” exports, all of my family photos end up in the same location.
Once your presets are established, you can right-click an image and choose an export preset directly from the pop-up options rather than open up the export dialogue box (see the image below).

Lightroom Hack #3: Create New Presets from Other Presets
You can always create new export presets based on variations of other presets. Rather than create new presets from scratch all the time, choose one you already have that’s close to what you want, and then customize it. Remember, it’s all about simplifying the process. So, for example, if you want a full resolution export but you want to set it up to re-name the images, you can make quick adjustments to an existing export preset, click on the “Add” button, and then name & save the new preset (see the image below).

Lightroom Hack #4: Transfer Your Export Presets
Your export presets do not need to live on a single device. You can easily transfer them from one device to another. Here’s how.
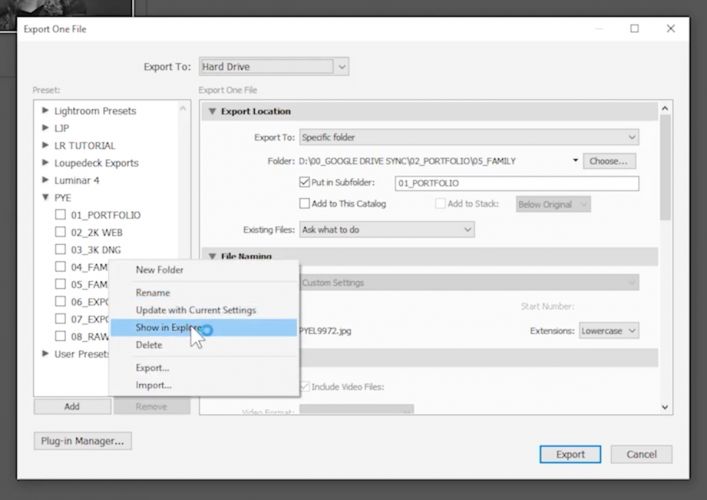
First, right-click on an export preset and select “Show in Explorer” (or “Finder,” or whatever you have; see the image above).
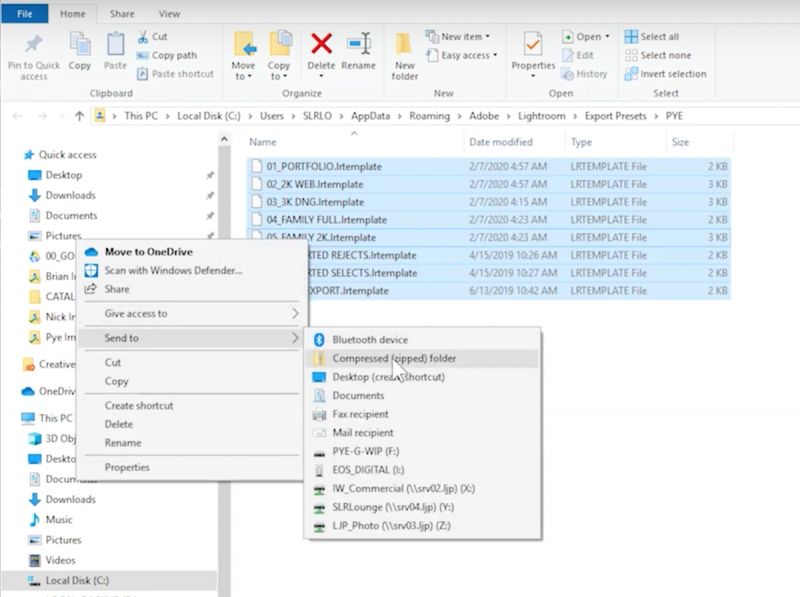
Then, you will see exactly where your presets are stored. Select all of the presets you want to transfer. At this point, you can choose to compress the presets into a zipped folder (see the image above). Lastly, name the zipped folder and drag it to your desktop or wherever you like.
From there, you can email the folder to yourself to use on your other devices. You’ll just need to do the following to install/import the presets:
- Download the presets onto your new device
- Open the Export Dialogue in Lightroom
- Right-click over the preset section
- Select “Show in Explorer”
- Select the new presets from wherever you downloaded them onto the new device
Lightroom Hack #5: Utilize Export to Multiple Presets Function
You are not limited to using one export preset at a time. You can select multiple presets (as mentioned in Hack #1) and they will all work simultaneously. If you followed the steps in Hack #1 to enable a “no exist” folder prompt, you’ll just need to designate the location in which you’d like to export your files for each export preset.
[Related Reading: The Best Lightroom Export Settings for Print | Quick Reference]
Hack #6: Use LR to Convert DNG Files
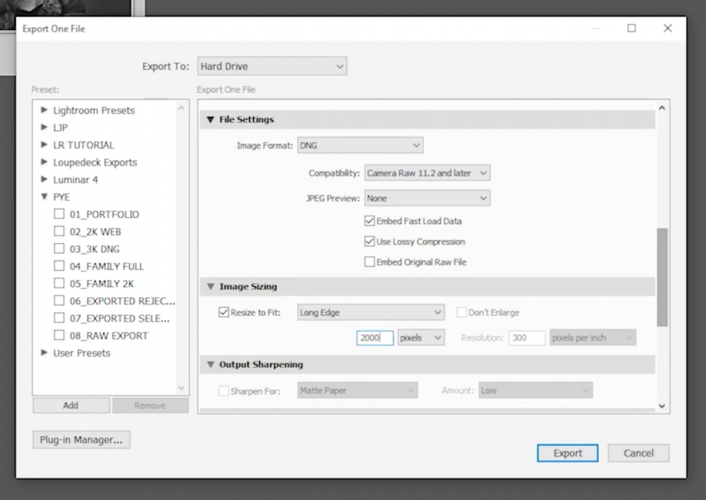
Among its many capabilities, Lightroom is also a DNG converter. Take advantage! This is your ticket to sharing reduced-size raw files with others. You don’t need Adobe’s DNG Converter application to do it. Lightroom can handle the task. All you need to do is bring up the Export Dialogue and select “DNG” under the “Image Format” dropdown menu (see the image below).

Then, select “Use Lossy Compression” and dial in the file size you want. In the image below, we’ve selected “Resize to Fit” the long edge to 2000 pixels wide. This can reduce the file size from a 20-30MB file down to a 530KB file, all while maintaining full raw editing functionality.
Conclusion
To recap, here are the 6 Lightroom export preset hacks we shared for Lightroom Classic to help streamline your workflow make exporting images easier than ever.
- Use the “No Exist” Folder Prompt Trick
- Skip the Export Dialogue
- Create New Presets from Other Presets
- Transfer Your Export Presets
- Utilize Export to Multiple Presets Function
- Use LR to Convert DNG Files
If you’re interested in learning more about Lightroom, don’t miss our new Mastering Lightroom workshop. It’s an A-to-Z Lightroom course designed to take you from little to no knowledge of how to use Lightroom to complete mastery of this powerful editing tool. You are also welcome to join our free Lightroom Education & Lightroom Presets group on Facebook. It’s a great place to connect with other photographers and get the latest updates on all things Lightroom.


Get Connected!