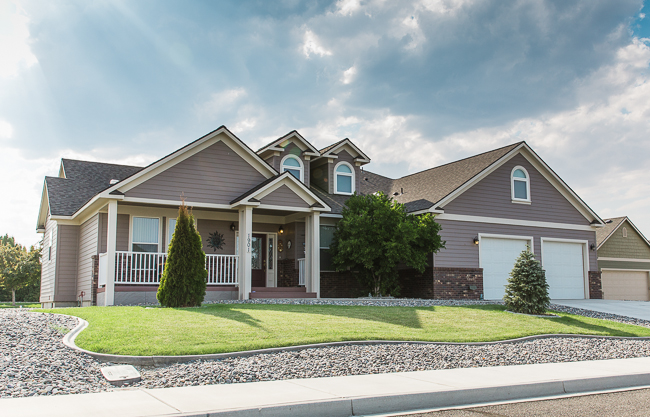
Last week I was hired, for the first time ever, to photograph a luxury home for a Real Estate listing. In an industry where a picture is literally worth a thousand words (and possibly several thousand dollars), this was a job I didn’t want to take lightly. I hate to admit it, though, I was very unprepared for the shoot. I learned a lot, and I hope my tips for first time Real Estate Photographers will help you avoid some of my mistakes.

Use a Tripod
My shoot was in an out-of-town location and in my packing haste, I forgot my tripod. Oops! I figured it wouldn’t be that big of a deal, since my Canon 5D Mark III can handle low light very well and I had a flash with me. I was able to get a decent exposure handheld, but a tripod would have been nice to have around. Especially if I had wanted to try some HDR techniques. For Tripod recommendations, check out Cha’s latest Gear Talk Episode: OUR FAVORITE TRIPODS!
[Related Article: How to Become a Real Estate Photographer]
Bring More Than One Flash
I keep one portable light, like the Canon 530EXII, in my kit at all times. I have a second one that I didn’t happen to have with me at this shoot and it would have come in handy. One flash for small rooms and closets was perfect, but for large areas, like the great room and kitchen combo, two or more lights would have been ideal. In the end, I had to rely on natural light for these large spaces.
[LEARN: Lighting Tips and Tricks!]
Bring Light Stands
On a related note, I was kicking myself for not bringing any light stands. I used the little stand that comes with my speedlite, but it kept falling off (so annoying!) Plus, if I needed light in an area of a room that didn’t have a counter top or furniture item where I could place my light, I was out of luck.
Use a Wide Angle Lens

My go-to lens these days is the Canon 24-70mm f/2.8 markII. It’s so versatile that I rarely take it off my camera. Plus, the focus is always spot on and tack sharp. I love it! I thought 24mm would be wide enough for shooting in this large house. But I was wrong! If Real Estate photography is going to be part of my regular client offerings, I definitely need to invest in a wider angle lens. While I think photos created with a fish eye lens are annoying (and deceiving, even) something a little wider like the Canon EF 16-35mm f/2.8L II USM Lens, if you’re on a full frame body, or the Canon EF-S 10-18mm f/4.5-5.6, if you’re on a crop sensor body (and a budget! It’s so affordable) would be ideal. For more info on affordable gear options for Real Estate Agents, click here.
Have a Contract
This is probably a no-brainer for most of you, but in this instance I was working for family and just kind of showed up without knowing the details of the job. What I thought would be a quick 30-minute shoot turned into 4 hours of cleaning, staging and photographing an estate that wasn’t ready at all to be photographed. While this was a unique situation, I could see this kind of thing happening often to naive photographers like myself. Make sure you know what you’re getting into and that you’re being compensated fairly for your time and work. Have a signed contract stating all the details of the job.
Have Insurance
During this entire shoot, I was a little paranoid about touching and moving the property of the home owner. What if I broke something? Am I covered by my standard liability insurance? As a photographer, do you even have insurance? It’s something to think about before you agree to enter someone’s home and start touching their things.
Be Flexible
When the agent and I arrived at this shoot, the light was not ideal for shooting the exterior of the home but I took a few shots anyway. By the time we left the home (four hours later…) the sky was full of beautiful clouds and the light was a little more diffused. Perfect! If weather isn’t on your side or the lighting is horrible, be prepared to come back later. You might also consider learning how to create a High Dynamic Range (HDR) image, which involves taking three different exposures and combining them in order to get an even exposure and detail in the highlights and shadows of a landscape or architectural image. The SLR Lounge HDR Photography Workshop covers everything you need to know about this popular technique for Real Estate Photography.
Use Preset Editing


Editing the images from this shoot was fast and easy. I use Adobe Photoshop Lightroom and the SLR Lounge Lightroom Preset System. Before I found this system I was very anti-presets, but this system has saved me so much time and allows me to create my own style, not copy someone else. I love it!
Use Advanced Editing Techniques
For the most part, the editing on these images involved a couple clicks and I was done. A few required just a little advanced editing to make them stand out above your average snap shot. I used the graduated filter with the Sky/Cloud/Ocean preset in the SLR Lounge Preset System and adjusted the Hue and Saturation to make the lawn and trees greener (at the request of the agent). That’s it!
Consider a Photo Editing Service
If you don’t have time to edit photos or need to deliver a volume order within a short period of time, consider using a . For $2-$10 per photo (depending on the work needed), they can get you a finalized product within a day or two, potentially saving you hours.
Have a Quick Turn Around
The Real Estate industry is driven by location, price and timing. Communication with the agent who hired you is key to making sure you get your images to them in time for whatever deadlines they may have. Generally, the faster the better. I was able to deliver these quickly because I have my editing system in place for a quick turn around.
Well, that wraps up my Top Ten Real Estate Photography Tips (and Mistakes to Avoid) for Beginners. Will you give be giving Real Estate Photography a try? Let me know how it goes.
For those looking to specialize in real estate photography, check out our review of FSTOPPERS’ WHERE ART MEETS ARCHITECTURE.
CREDITS: Photographs by Tanya Smith are copyrighted and have been used with permission for SLR Lounge. Do not copy, modify or re-post this article or images without express permission from SLR Lounge and the artist.