
This may be a topic that seems basic and easy to gloss over, but have you ever thought about to properly hold your camera? Sure, DSLRs have been designed to give you better and better ergonomics and grip, but when you start shooting with slow shutter speeds or telephoto lenses with no vibration compensation, having the right technique can be the difference between a photo that looks sharp and a photo that has shaky motion blur. Some of these technique may feel weird, but think of it like learning to play golf. It doesn’t always feel right, but the results will speak for themselves. Read the following article to learn how to hold a camera!
Note: This article was originally written in 2012 and updated with more tips and images in 2022.
6 Ways to Hold a Camera for Slow Shutter Speeds and Sharp Images
Let’s start with one of our most popular videos on Youtube. In this video, a sample from the Photography 101 Workshop in SLR Lounge Premium, Pye demonstrates how proper camera holding techniques can allow you to shoot at much slower shutter speeds. These are shutter speeds slow enough for panning. We recommend that you start here with this video to learn how to hold a camera, then read the article below.
Tip 1. Tuck the Arms When Standing
INCORRECT: One of the most common mistakes in holding a camera is to have the elbows out to the side, which makes it easier for your arm to sway around. This also makes your left hand hold the lens from the side, which provide less support for the camera, especially when you have larger and longer lenses attached.

CORRECT: Tuck in your elbow to your body so that your arms are anchored to your torso’s center of gravity. This helps keep your arms from swaying and also allows you to move your left hand under the lens to give it more support. It does feel weird at first to hold it like this, but you will be able to shoot at much slower shutter speeds without noticing camera shake. As for your posture, be sure to stand up straight without leaning forward or backwards with your legs apart in a comfortable, but stable stance. All of this applies when you’re shooting in portrait mode.


Most cameras are built with the grip and shutter button on the right side, so your left hand should be used to stabilize the camera underneath the lens. This is a good habit that you want to build because it’s the easiest way to get sharp images and also the most comfortable way to hold a camera.
Tip 2. Brace Yourself Against a Stable Object
If you are using a really slow shutter and you are still getting some shakiness in the image, try to find a wall (or something else that is stable) to support and stabilize your upper body.


“This can be a wall or a tree, basically anything that’s not moving. When we stand on our two legs, our body is constantly moving slightly to keep balance. When we brace ourselves against an immobile object, we give ourselves an anchor point that’s more stable.” – Pye
Tip 3. Brace Your Camera On Your Arm
If you cannot find a wall, this is another standing technique can give you that extra stability. What you do is bring your left arm around the right arm and hold on tight to your right shoulder. This restricts motion in your right hand. Next, by placing your camera on the upper part of your left arm, you now have a more stable base.
Of course, the disadvantage of this technique is that you can’t zoom or focus with the lens, so be sure to set that up first or use your camera’s focus points.


“If you’re in a location where you have nothing to lean against, the elbow shelf is an excellent alternative. To create the elbow shelf, take your left hand and grab your right shoulder, and then place the camera on your left elbow and now you have an all natural man-made shelf for your camera to rest on. This is also useful on long shooting days when your arms are fatigued.” – Pye
Tip 4. Place Your Feet Flat-Footed
INCORRECT: If you have to crouch to get a low perspective, there is a big difference in stability between the two popular ways of crouching. The first one, where you are on the ball of your feet, is inherently unstable and will transfer motion to your camera.

CORRECT: Plant your feet so you are crouching flat footed, then tuck the elbows in either on or between your knees. The stability provided by your elbows and planted on your knees gives you a solid base when holding your camera.


“The super squat is when we get into a squat position and rest our elbows on our knees. This gives us more points of contacts and allows us to hold our camera more stable than if we were just standing.” – Pye
Tip 5. Sit With Your Elbows On Your Knees
INCORRECT: Sitting down is generally the better choice when you have to shoot from a low perspective. But even while sitting, there still methods we can use to improve stability. If you are just sitting with your legs out or legs crossed, your torso and your arms are essentially still free-standing with minimal support.

CORRECT: While sitting, place your feet on the ground with your knees propped up. Place each elbow on each side of the knee using your knees as a brace. If you think about it, you are essentially acting like a human tripod when holding a camera. When Post Production Pye does this move, I like to call him the Pye-Pod =)


“Remember in the other tip how we talked about an immobile object to brace against? Well, the ground is also an immobile object you can brace against, but instead of your shoulder, this time we’re going to use our butt. Sitting down is a great way to stabilize your camera, get a new angle, and rest without looking lazy.” – Pye
Tip 6 | Regulate your breathing
This last tip is less of a tip on “How to Hold a Camera” and more of a general tip when shooting at slower shutter speeds. Do not hold your breath. If you hold your breath, you’re depriving your muscles of oxygen and causing your muscles to tremble. The trick here is to breath slowly and shoot between breaths.
Conclusion
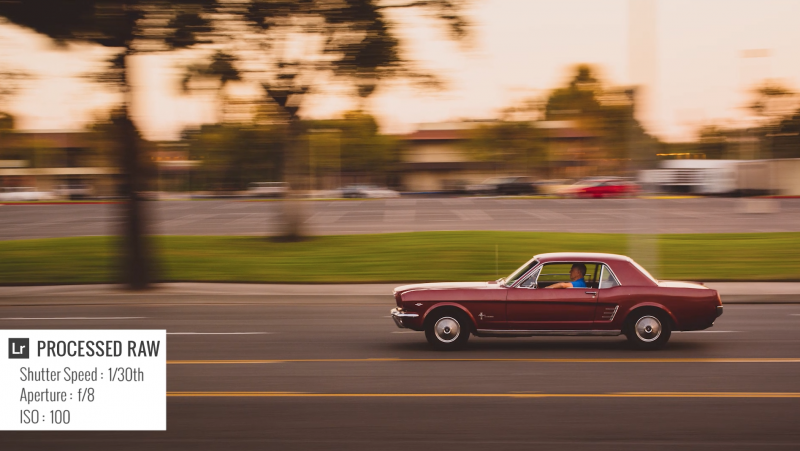
By using these 6 tips on “How to Hold a Camera,” we’re able to get impressive and sharp images at slow shutter speeds handheld! Here are a couple examples of hand held panning shot at slow shutter speeds.

That’s it folks! If you have any other tips in shooting with slow shutter speeds or long telephoto lenses without a handy tripod or monopod, post it in the comments below!


Get Connected!