
As portrait photographers, one of the most important fundamental lessons we learn involves lighting patterns. We often focus on posing and expressions (for good reason), but a basic understanding of common key light patterns can make all the difference in capturing quality portraits. A key light, simply put, is the main or primary light source used to capture an image. How we position that light directly affects the shadows that fall across our subject’s face, which then creates drama (or not) and determines the mood. That said, knowing when to use a particular pattern is also very important. To help you have more control when lighting your portraits, we’re going to look at 5 common key light patterns and share situations and typical uses for each pattern.
5 Primary Key Light Video
In this video, we’ll explain the 5 primary key light patterns and the ‘why’ or purpose behind each of them. Keep watching after this video to watch our past episodes of this series.
5 Common Key Light Patterns
Common Key Light Patterns #1: Flat Lighting
Flat Lighting Definition:
The first common key light pattern we’re going to look at is flat light. With this pattern, the light source faces directly into the subject from the angle of the lens. Flat lighting offers the least dramatic lighting pattern because it casts the least amount of shadows on the subject’s face.
Flat Lighting Placement:
Place the key light in front of your subject in the same direction you’re shooting. Angle the light so it lies “flat” on the face (see the image below). This pattern offers very flattering light for portraits because it decreases wrinkles and imperfections. Also, when using flat light, remember to light from slightly above the subject’s face. Lighting from below will create an unnatural and unflattering look.

Flat Lighting Common Uses:
Because this light pattern produces very flattering light, photographers primarily use flat lighting in headshots and glamour editorial shots.
Flat Lighting Examples:
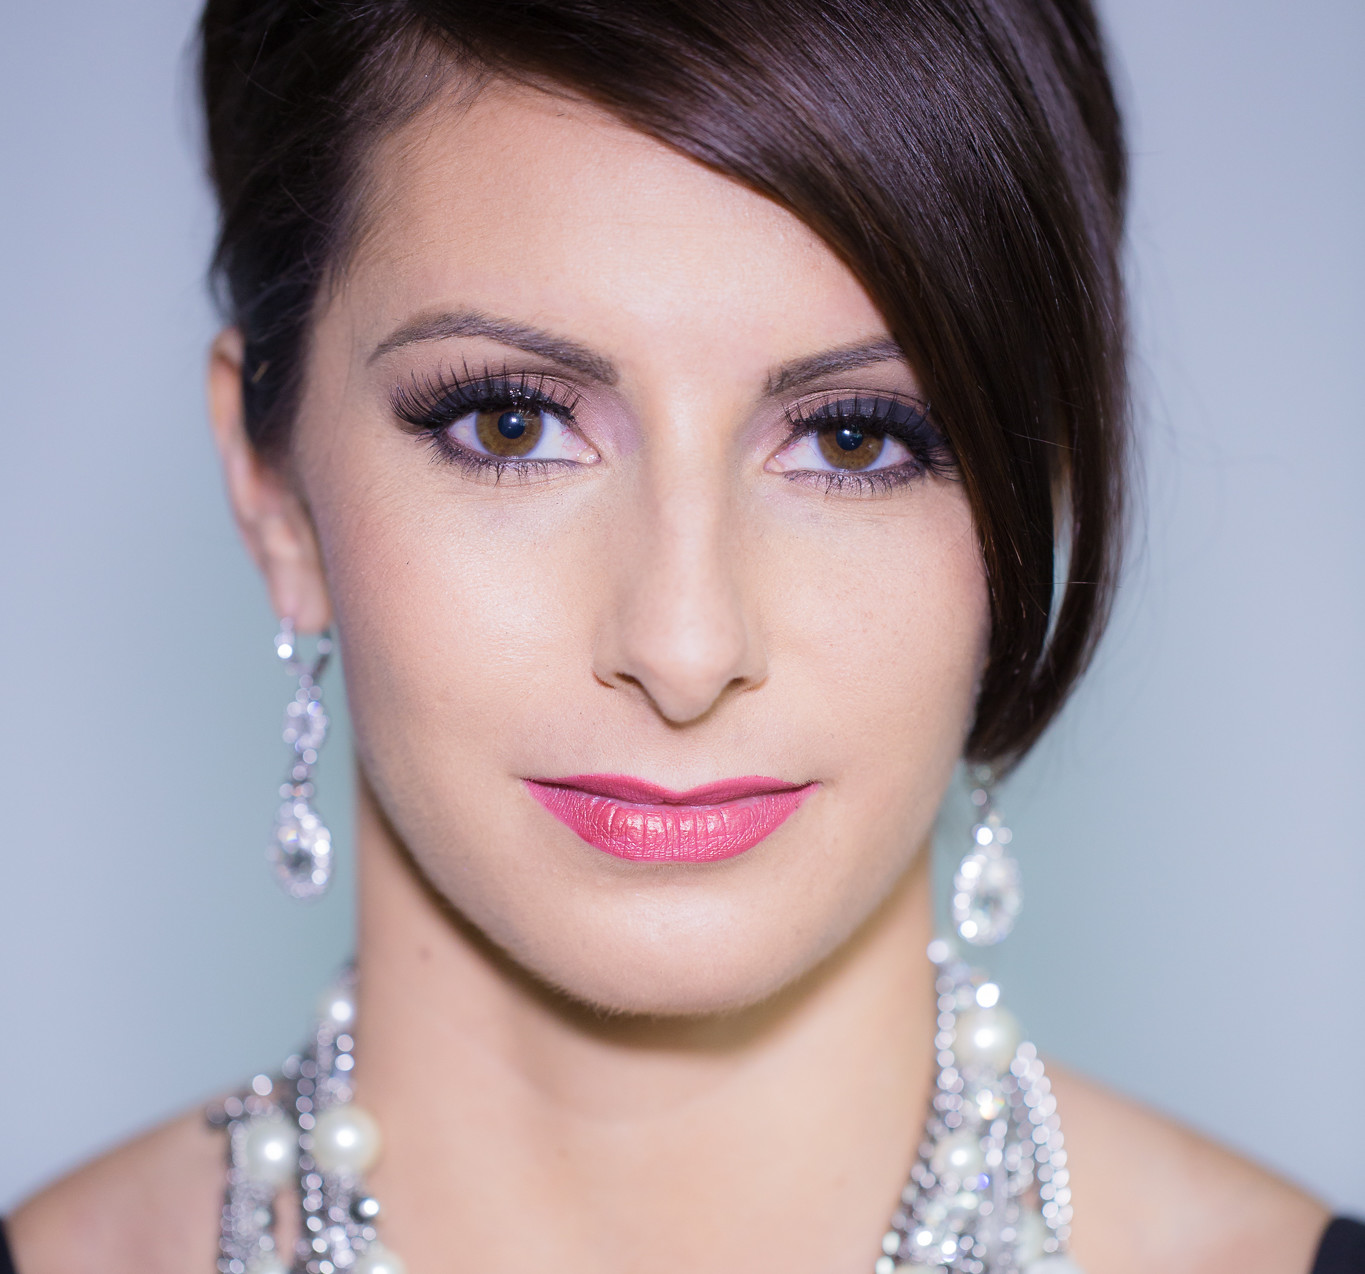

Summary: When we light the subject from the same angle of the camera, it’s referred to as flat lighting. It’s purpose is to cast minimal shadows, and fill the details of our skin to create a soft and flattering look. In fact, of all the lighting patterns, a soft flat light is generally going to be the most flattering since it will fill lines, and imperfections. For this reason, it’s often used for beauty and fashion work.
Common Key Light Patterns #2: Butterfly Lighting
Butterfly Lighting Definition:
Butterfly Lighting (or Paramount Lighting) comes directly in front and above the subject’s face. This pattern creates shadows directly below the subject’s facial features. The most notable shadow, and where this lighting pattern gets its name, is a butterfly-shaped shadow just under the nose. It is also called “Paramount Lighting” because this lighting pattern was used heavily in the Paramount movie studio of old Hollywood.
Butterfly Lighting Placement:
Start the key light in the flat light pattern, then raise the light up until you see the “butterfly” shaped shadow under your subject’s nose. Angle the face of your light so it points at your subject. The only difference between flat lighting and butterfly lighting is the height and angle of the Key Light. This creates the same flattering features as flat lighting but includes shadows underneath the nose and chin.

Butterfly Lighting Common Uses:
This lighting pattern works well in beauty shots when a reflector is added underneath to soften the shadows.
Butterfly Lighting Examples:


Summary: This light source is similar to flat light, the light source is still directly in front of the subject, and from the same angle as the lens. The difference is that it’s simply brought up to shoot down onto the subject’s face. It’s characterized by a bit more shadows directly under facial features and specifically a butterfly shadow that appears right under the nose. Fun fact: it’s nickname “paramount” comes from Paramount studios who often used to use this lighting technique to photograph their talent.
Common Key Light Patterns #3. Loop Lighting
Loop Lighting Definition:
Loop lighting is one of the more common key lighting patterns. From the featured image at the top of the article, we see that this pattern falls right in the middle of the spectrum between flattering flat light and dramatic split light. Loop Lighting offers a nice middle ground where most of the face is lit, but enough shadows remain to create some definition.
Loop Lighting Placement:
Loop Lighting evolves from Butterfly Lighting very simply. If you already know how to get to Butterfly lighting, all you need to do is move your light around the subject until you get roughly 25°-50° to the left or right and angled down to the subject’s face.

Loop Lighting Common Uses:
Because this light pattern’s unique angle, it creates a more dramatic look with a shadow that falls off the nose pointing down to one side. The subject will have more light on one side of their face. You can use this to your advantage and light your subject’s “good” or preferred side of their face.
Loop Lighting Examples:

Loop Lighting Example 2:

Summary: This is where we begin to move the angle of the light source about 25-50 degrees from the subject’s face. From this angle, we start to introduce a little more directional shadow on our subject. Keep in mind, as we introduce more shadows onto our subject, we can dictate the intensity of that shadow by the amount of fill light that we let into our scene. In this current slide, we have very little fill light so the shadows are more intense. But here, we have the exact same lighting patterns that are used over a soft fill light. The result is again, fewer shadows = less drama.
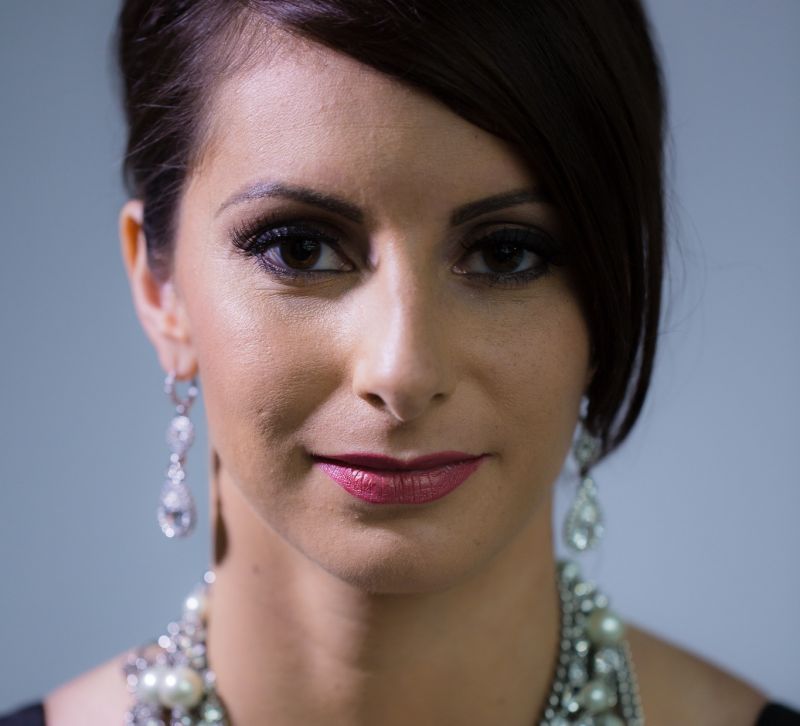
Common Key Light Patterns #4: Rembrandt Lighting
Rembrandt Lighting Definition:
The Dutch master painter, Rembrandt, used this style of lighting in many of his paintings, thus, the name of this pattern. While it is true that many Baroque painters used Rembrandt lighting in their paintings as well, the combination of Rembrandt’s popularity and prolific use of the pattern likely earned him the nod. Rembrandt lighting can be distinguished by half of the subject’s face in shadow except for triangle-shaped light on the cheekbone and eye.
Rembrandt Lighting Placement:
From the Loop Lighting position, move your key light around the subject until the shadow of the nose is touching the shadow of the face. This primarily leaves one side of the face in shadow but keeps a triangle of light on the cheekbone and eye.

Rembrandt Lighting Common Uses:
Rembrandt is a stronger angle than loop lighting, making it look more dramatic. The more shadow we add to our subject and the more we turn our light away from flat lighting, the more dramatic our lighting becomes. It is used heavily in all types of portrait photography, including portraits of athletes. It is also the type of lighting we used in the video above!
Rembrandt Lighting Examples:


Summary: Our light comes from above, but now at a stronger angle to the face where now we only see triangle shape light over the opposite cheek and eye. This visually interesting lighting pattern is named after the painter Rembrandt who’d frequently use this lighting pattern for his portraiture. For many of us (myself included), this is a photographer favorite.
Common Key Light Pattern #5: Split Lighting
Split Lighting Definition:
Let’s turn now to the last lighting pattern on this list: split lighting. Split lighting simply “splits” the subject’s face, lighting half of your subject’s face while leaving the other half in shadow. Because of the angle of light, there is no Rembrandt triangle, only shadow.
Split Lighting Placement:
Set up the key light 90° directly to the right or left side of the subject’s face. The line separating light and shadow will be down the middle of the nose and chin. This creates the most dramatic light and the least flattering light to use.

Split Lighting Common Uses:
If flat and loop lighting fills in wrinkles, split lighting will exaggerate them. Photographers often use this lighting pattern in athletic portraits just for that purpose. It exaggerates their muscle definition and body features.
Split Lighting Examples:
 Summary: Split lighting is created when the light source comes directly from the side of our subject. It’s characterized by half of the face in light, versus half in shadow. Split lighting is not for the faint of heart, use this lighting pattern when your intention is to show heavy shadows or light vs dark type concepts.
Conclusion
I hope you enjoyed this overview of 5 common key light patterns. Once you’ve mastered the primary patterns featured here, you can take it a step further and modify the light or add secondary lights. As a result, setting up your key light for what you want will save you time and unneeded frustration in post. We guarantee that if you understand these 5 common key light patterns, you will instantly start to create more images the way you want to, whether they be flattering or dramatic.
If you’d like to dive deeper into lighting education, check out our Flash Photography Training System, which covers the fundamentals for shooting with everything from on-camera flash to multiple off-camera flashes for creative effect.


Get Connected!