We’ve teamed up with Adorama to bring you a series of photography tutorials called “Master Your Craft” to be featured on their Youtube Channel. Subscribe to see more of our videos on their channel that covers all things photography-related from lighting and posing to editing to help you hone your skills and master your craft and don’t forget to check out our playlist to watch the entire series!
Video: Stacking Two Lights to Create Depth in Your Portraits
There are many ways you can use just two lights to create stunning images. In this article/video, I’ll be walking you through my favorite two light setup that I call “Light Stacking.” I’ve taught this technique in our Lighting 3: Advanced Off-Camera Flash Course from our Premium Content and it’s a simple technique I use to create depth by stacking two lights in front of each other to chisel out the details on the subject. I’ll be demonstrating this technique with my friend Renee, so be sure to check out her Instagram.
Gear Used in Tutorial
- Canon EOS 5D Mark IV
- Sigma 35mm f/1.4 DG HSM Art Lens
- Canon EF 24-70mm f/2.8L II
- Profoto B10
- Profoto A10
- Air Remote TTL
- Umbrella
- MagMod MagShoe
- Manfrotto Nano Stand
Before you pick up your camera or reach for your flashes, check out our C.A.M.P. framework and simplify your lighting process.
- Composition: What do we want our scene to look like? Where do we want the camera to be? What’s the angle? What do we want our subjects to be doing?
- Ambient Light Exposure: Choose the intention of the scene. Do we want a dramatic image (darkening the ambient light and using more flash) or do we want a softer image (brightening the ambient light and using a more natural power of flash)?
- Modify/Add Light: Are your subjects visible in the frame or do they need to be chiseled out? Do you need to add an additional light source?
- Pose & Photograph: Take your shot!
Let’s get started.
Step 1: Compose Your Shot

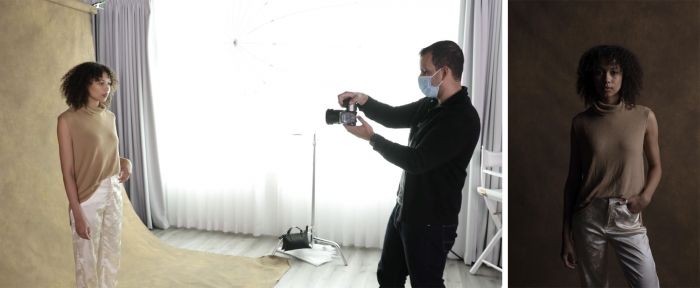
I’m keeping the composition simple by having Renee stand against the backdrop and I’ll be capturing mostly full-body shots using the 35mm. Notice the uniformity among the colors of Renee’s shirt and backdrop. This will create an overall warm tone to the image.
Step 2: Dial In Your Ambient Exposure

The window is providing nice natural light but I’m going to cut away all of it. To do that, I’ll have to dial in my settings to f/4 with a low ISO of 50 and a shutter speed of 1/200 seconds and that knocks out most of the light in the scene.
Step 3: Add and/or Modify Light

I’m going to start with the primary light using the Profoto B10 with a 6 foot umbrella as the modifier. I want to mimic the natural light coming in through the window so by raising up and moving it by the window. The umbrella allows the light source to open up and provide a large soft light over the subject.

You’ll see that the image lacks depth with only one light. To add in the depth, I’ll be bringing in a Profoto A1 attached using a MagMod Cold Shoe and modified with a smaller umbrella. I want this light to sculpt Renee’s face so I’ll be bringing it right in front of the larger umbrella.

What we end up with is the larger umbrella filling in the scene with light from behind and the smaller umbrella focusing in on Renee and adding additional light to just her face as well as her shoulder area. Since the front light is much closer, I can dial in a lower power setting which will be enough to light up Renee the way I want.

Next, I added a reflector to open up the shadows. Placing the reflector more behind the subject will create a rim fill and bringing it forward will lift more shadows out of the face and body.


You can use a V-Flat or any ordinary reflector and adjust the position until you get the light you desire on your subject.
Step 4: Pose & Photograph
Lastly, I switched over to the Canon 24-70mm f/2.8 to capture the rest of the set using the zoom and edited the final images with our Visual Flow Modern Presets and here are some of the results.

Before & After
Conclusion
We hope you enjoyed this article/video on how to capture depth using the Two Light Stacking Setup. It’s fun to get creative with simple ways to enhance your lighting and by continuing to think outside the box, you can wind up with stunning portraits. If you want a deep-dive into more lighting techniques and tutorials, be sure to check out our Lighting 3: Advanced Off-Camera Flash Course as well as our other comprehensive lighting courses which are a part of our Premium Subscription.
Be sure to catch our next episode of Mastering Your Craft on Adorama’s YouTube channel next week! If you want to catch up on all the episodes, make sure you check out our playlist!


Get Connected!