Mauna Kea is one of the premier dark sky locations for observatories and scientific research of our heavens, and also for traditional astrophotography and nightscape photography of our night skies, and the elusive Milky Way core!
Mauna Kea Heavens is Sean Goebel’s 4th and final timelapse film that features night and daytime timelapses of Mauna Kea and its various telescopes, on the Big Island of Hawaii.
The still images that comprise each timelapse sequences were captured using numerous Canon and Sony cameras, both crop-sensor and full-frame, with a vast array of Rokinon, Sigma, and Nikon (via adapter) lenses, ranging from 12mm to 1000mm! A DJI Ronin stabilizer was used for….well, just watch the timelapse and you’ll see!
Mauna Kea Heavens 4
Although I’ve never been to the Big Island myself, I have been on many other adventures together with Sean, so I sent him a few questions that our readers might be interested in.
[Learn More: SLR Lounge Milky Way Photography Workshop]
If you’re curious about nightscape photography, Milky Way timelapse photography, and especially photography on Mauna Kea itself or anywhere on Hawaii, read on! Also, check out the still images, plus BTS video/images below.
Is that enormous moon real, or Photoshopped? What lens did you use to get it? Why is the whole image shimmering?
The opening scene and all the other scenes in the montage are real and not composited. People are forever pasting giant fake moons into their skies, but I wanted to show that it could be done without the fakery. I bought a 1970s-era Nikon 1000mm f/11 mirror lens from Japan eBay and used The Photographer’s Ephemeris to calculate where to stand to catch the full moon setting behind the Mauna Kea telescopes. We identified the bayfront in Hilo, about 30 miles away from the summit.
 Moonset Over Mauna Kea Observatories, from Hilo, Hawaii
Canon 7D mkII, Nikon 1000mm f/11 mirror/reflex lens | 1/500 sec, f/11, ISO 320
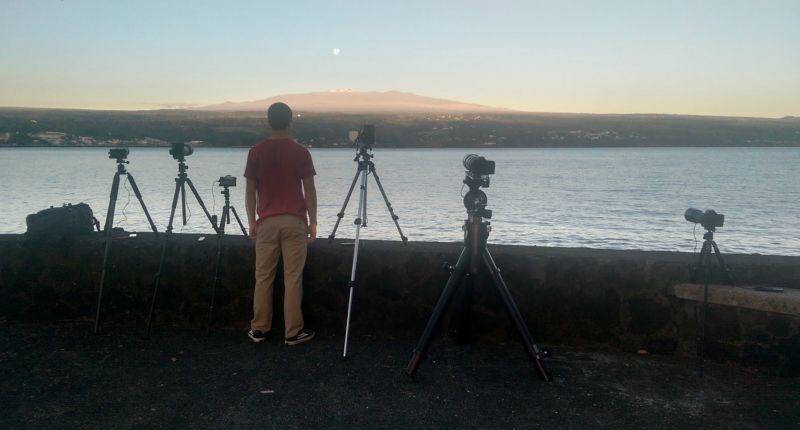
Hilo is nearly always cloudy, so it took several attempts before I was successful. Raiatea Arcuri and I each ran three cameras (in my case, one stills camera + 2 timelapse cameras) and the moonset occurred exactly where I predicted it would. I used a Canon 7D mk II with an adapter on the Nikon 1000mm to achieve a 35mm equivalent focal length of 1600mm and sustain the 2 fps shooting necessary for a slow moonset. That focal length is extremely sensitive to any sort of vibration or wind, so I used a tripod normally intended for telescopes. (Below, 2nd from right)

(Sorry for the potatophone image–my real cameras were all in use!
Raiatea and his three cameras are on the left; my cameras are on the right.)

I had to build a bracket in order to stabilize the lens and camera
since the tripod foot was entirely inadequate at preventing wobble.
The shimmering is caused by atmospheric turbulence. There was 30 miles of air between the camera and the telescopes, and the lens hugely magnified the turbulence. This is the same phenomenon that causes stars to twinkle or shimmering heat waves over pavement. This turbulence is actually a big problem in astronomy, and is the reason that adaptive optics exists, which brings us to the next question…
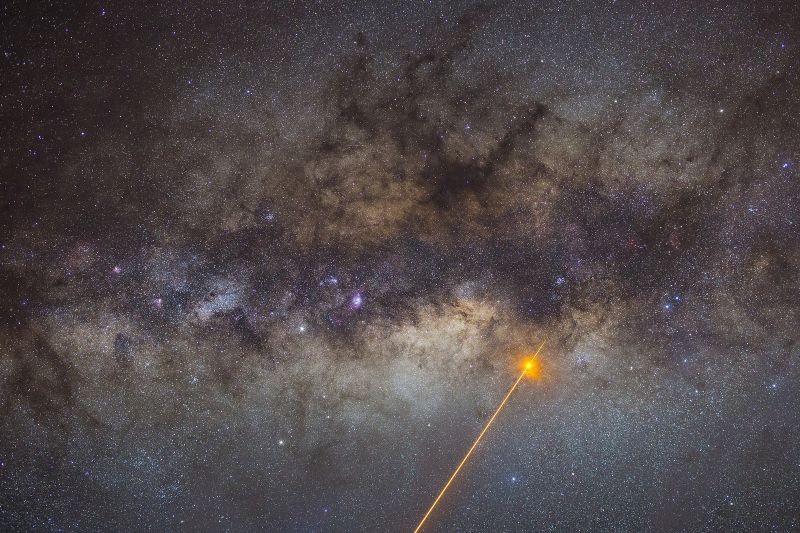
So, what about the giant lasers? Why are they mostly pointing at in the center of the Milky Way?
The lasers are used for adaptive optics. Just as the atmospheric turbulence in the opening scene obscures details in the telescopes 30 miles away, the turbulence also blurs details in the stars and galaxies which the telescopes are trying to observe. It’s possible to deform a mirror in the optical path of the telescope hundreds or thousands of times per second to bend the light back to where it should be, a technique known as adaptive optics. For this technique to work, a bright star is needed for measuring the turbulence. Often the scientifically interesting target is too dim for this, and a solution is to create an artificial “star” next to it to use for the wavefront sensing. A sodium laser, typically about half a meter wide and with a power of 10-40 W (a typical laser pointer is 0.005 W!), is focused into the upper atmosphere at an altitude of about 100 km/60 miles. This causes sodium atoms to fluoresce (glow), and the telescope uses this artificial “star” to measure the atmospheric turbulence.
 Subaru Telescope & Adaptive Optics Laser
Canon 6D, 14mm, 45 sec, f/2.8, ISO 3200
Adaptive optics is used for observing all different parts of the sky. However, an interesting target is the center of our Milky Way galaxy. The center of the galaxy hosts a supermassive black hole a few million times the mass of our Sun. A group at Universities of California Los Angeles and Berkeley observes it several times per year using both Keck telescopes simultaneously in order to map the paths of stars around the black hole. They have produced cool animations and tested general relativity using these observations. The double lasers into the core of the Milky Way is visually extremely impressive, and happens a few times per year, so I tried to get up to the summit and film these observations.
(And yes, these lasers are so powerful that they must be turned off briefly whenever any airplanes or satellites pass overhead!)
Can other nightscape photographers go up Mauna Kea and get photos of these lasers too? Surely they don’t allow just anyone to go inside the telescopes.
The summit of Mauna Kea is a public area, and anyone with a four-wheel-drive vehicle (the road up is very steep and loose) can visit. There are also commercial summit tours available. In general the public can’t visit the inside of the telescopes, though Subaru Telescope (no relation to the car company!) hosts tours a few times per month. The lasers occur a few nights per month, mostly around the full moon.
However, at 13,700 ft/4200m tall, Mauna Kea is a very high-altitude area (altitude sickness is almost guaranteed if you stay there for more than a few hours after driving up from sea level!), and it is considered sacred to Hawaiian practitioners, so one should thoroughly read up on precautions before visiting the mountain. The visitor center, located on the side of the mountain at an altitude of 3000m/9000 ft, hosts stargazing most nights. If one goes to the summit after dark, he/she should be extremely careful of light usage, in particular car headlights, because it can interfere with the telescopes.
Behind The Scenes – Milky Way Timelapse Inside an Observatory
What is your best recommendation for anyone who wants to capture the Milky Way during a trip to Hawaii?
Hawaii has many locations with excellent stargazing conditions. The Big Island, which is where Mauna Kea is located, is quite rural, so almost anywhere can see great stars if it isn’t cloudy. Maui has Haleakala, an extinct and very impressive volcano that also hosts telescopes. Even Oahu can have great dark skies if you go to the North Shore.

Canon EOS M5, Rokinon 12mm f/2, 300 sec, f/2.8, ISO 3200
How Many Gigabytes of total images did it take to create the 4:20 minute final product?
I shot 650 GB of images for this montage.
Did you ever go up the mountain and have it be completely cloudy?
Yes, I lost many nights to poor conditions. The first rule of observational astronomy and landscape photography is “The universe hates you.” Since this project covers both, huge amounts of time and effort were wasted. The most frustrating occasions were when I spent months obtaining permits (the red tape for commercial filming on the mountain is enormous!), set up cameras inside a telescope for remote filming, and then, unpredicted fog rolled in and I collected thousands of pure-black photos of the interior of unopened domes. And on those occasions, I had to stay up all night anyway because I couldn’t retrieve the cameras until after sunrise. Photography isn’t my main job and I needed to be at work in the morning, so it’s a bit disheartening to come into work on 2 or 3 hours of sleep with no cool photos to show for it.
 Canon 6D, Rokinon 50mm f/1.4, tracked exposure @ f/2.5, 25 sec, ISO 4000
How To Photograph The Milky Way Photography Workshop
What other timelapse projects are you working on next?
My next timelapse project will contain Yosemite footage shot over the last several years. Most of it involves hikes into the backcountry and parts of Yosemite that haven’t been timelapsed before. There are a few winter scenes that I’m hoping to film this winter as snow storms come through, and then it will be done.
 (Yes, that is a DJI Ronin mounted to the top of a car!)

See More of Sean Goebel’s Work:
Check out the other Mauna Kea Heavens Videos on Sean’s Youtube and Vimeo Pages, or view more of Sean’s nightscape and landscape photography at www.sgphotos.com and on Flickr.
How To Photograph The Milky Way & Nightscapes
Want to learn how to photograph the Milky Way, and become a master of nightscape photography techniques? Check out our full-length workshop in the SLR Lounge Store, or consider becoming an SLR Lounge Premium member!
Matthew Saville
Follow his wilderness nightscape adventures on Instagram: instagram.com/astrolandscapes


Get Connected!