Introduction
In this video from our Lightroom 4 A to Z Workshop on DVD, we will demonstrate how to fix the distortion in images, which naturally occurs from camera lenses and the perspective / angle of view we choose to use in our images. In our previous tutorial, “Examples of How to Make Minor Crops to Images in Lightroom 4,” we demonstrated how to straighten and fix crooked horizon lines. However, sometimes cropping and straightening images won’t be enough. Instead, we also need to use the Lens Corrections Panel in Lightroom 4 to fix the bent horizon lines in our images.
Watch the video or continue reading the article below!
Watch the Video
Profile Corrections vs. Manual
In the Lens Corrections Panel (“Ctrl + 6”), there are 2 ways to fix lens distortion: Profile Corrections and Manual. When you check the box next to “Profile Corrections,” it will automatically try and fix the distortion in your image, based on a profile that Adobe may have for your particular lens. Adobe has profiles for many different lenses, but not all. Profile Corrections will do a great job if Adobe has the lens in it’s collection, however, Manual gives you more extensive control over exactly what you want to fix in your image. Even if you use the automatic profile for correcting things like vignetting and “mustache” distortion, we recommend that you also select Manual so you can dial in your own distortion corrections.

How to Correct Distortion in Images
As mentioned earlier, curves in the horizon line can actually be caused by lens distortion, and therefore cannot be fixed with a simple crop. If your image is still crooked or bent after you have cropped it, then it is distortion that needs to be fixed.
To get to the Develop Module in Lightroom 4, press “D.” To cycle through to Full Screen Mode, press “F’ twice.
Image #1
In this particular image below, there is some distortion visible on the horizon. This usually happens on wider angle lenses, especially when the horizon is placed near the edge of the frame. For example this image has a slight upward bow curve.

Make sure that you have expanded the Lens Corrections Panel (“Ctrl + 6”). If we bring the Distortion slider down, our image will start to get a bulbous, fisheye look. Oops, wrong direction! Instead, we want to bend that horizon line downwards just a touch, so bring the Distortion slider up to +10. At around this point the horizon line in our image matches the Grid Lines pretty accurately.

Although the horizon line in our image matches the Grid Lines, we now have this gray effect around the edges of our image, especially at the top and bottom of our images. Whenever you make adjustments to the distortion of an image, you need to constrain the crop to prevent these gray edges from showing up. So, make sure you have the box next to “Constrain Crop” checked!
After we have constrained our crop, we now have a straight horizon line and we are done fixing the distortion in this image.

Image #2
Our next image was shot on an iPhone so there is bound to be some distortion since the camera on the iPhone is a wide angle lens. Since her head is near the edge of the frame, her head is also a bit distorted as well.

In the Lens Corrections Panel (“Ctrl + 6”), pull Distortion up to +5. Since we fixed the distortion, the crop is a little off now, so twist the crop just a bit with the Crop Overlay Tool (“R”).

Once again, remember to constrain the crop so that there are no gray edges in the image.

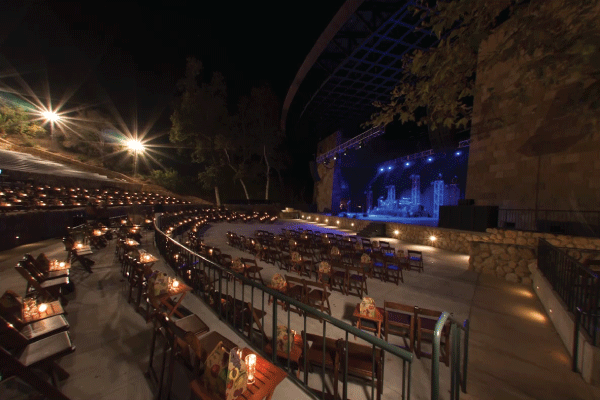
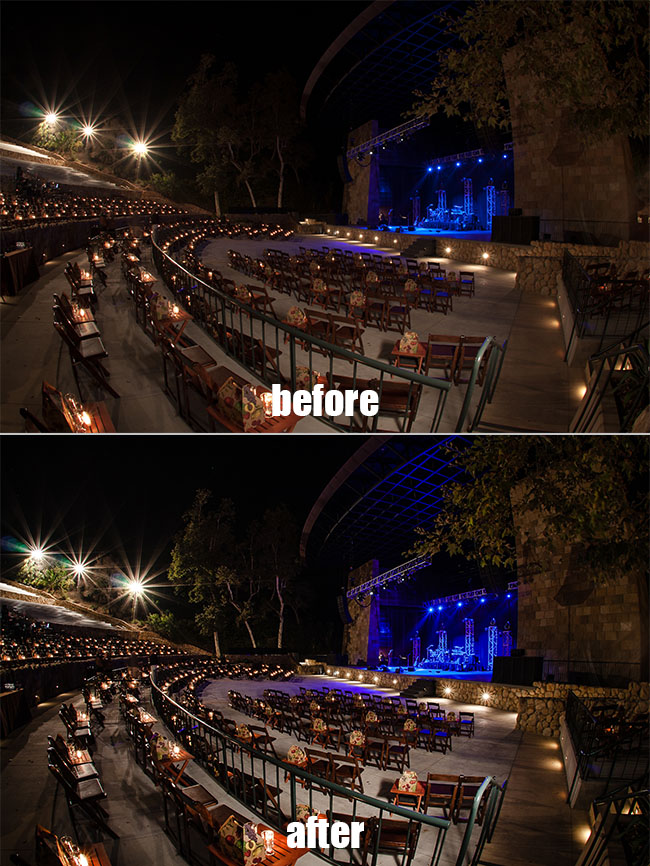
Image #3
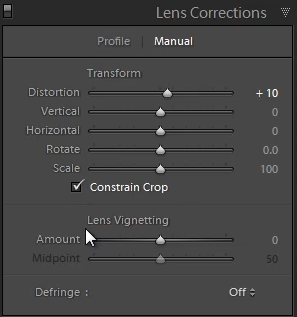
Our final image needs quite a bit of distortion correction. First, we have vertical distortion, where the lines are angled up. In addition, the lines on the amphitheater are curved because this image was shot on a fisheye lens, so we need to bend them back straight.

If we pull Distortion up to +20, this will pull our image back in, straightening out the edges. Next, pull Vertical down to -10.
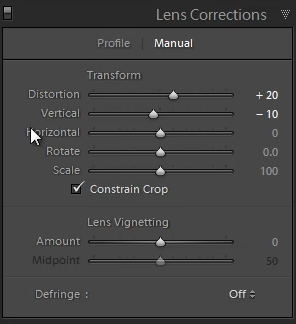
Notice how much of our image we will be losing since we are cropping in quite a bit of the edge when we crop into the image.

We can try Profile Corrections, instead of Manual, to see how it fixes the distortion in this image. Switch to Profile Corrections from Manual and check the box next to “Enable Profile Corrections.” When we do so, Profile Corrections has made the lines on the amphitheater perfectly straight. However, check out the edges of our image – they are completely stretched out. So, this is why we do not usually automatically enable Profile Corrections for a lens unless you are certain that you want what it will give you. For a fisheye lens, it will perform a very extreme correction!

Un-check the automatic profile, and go back to Manual Mode from Profile Corrections. Our settings before (Distortion at +10 and Vertical at -10) are fine for this image.
Conclusion & Learn More!
Sometimes, distortion is not always a bad thing. In fact, it can create a cool effect to your image. However, you want to be able to know how to control distortion and use it where you want. Remember that at times, simply just cropping and straightening an image is not enough to fix the crookedness of an image image. Instead, you may have to fix the distortion as well.
We hope you enjoyed this article and video excerpt from the Lightroom 4 A to Z Workshop on DVD. Stay tuned for our next article and episode!
The Lightroom 4 A to Z Workshop on DVD is a 14 hour video workshop turning any Lightroom novice into a complete master of Lightroom 4 in no time! The Lightroom 4 A to Z Workshop can be purchased by itself, or within the Lightroom 4 Workshop Collection which also contains our award winning and industry standard Lightroom 4 Preset System, as well as the Lightroom 4 Workflow System.


Get Connected!