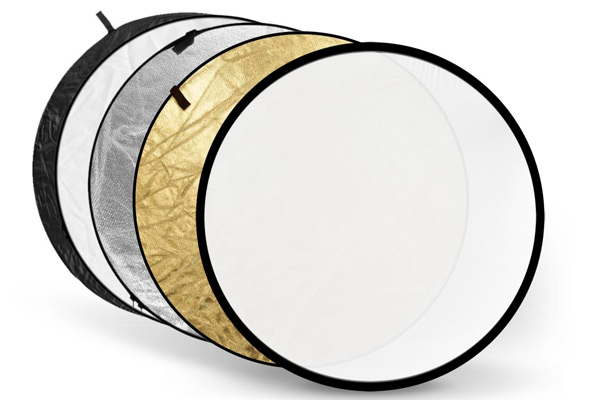
They’re cheap, portable, and possibly the most versatile piece of lighting equipment you’ll ever own; 5-in-1 reflectors will serve photographers well at every level, and in nearly every genre. It may not be the most exciting piece of gear, but it can be an absolute life-saver in a variety of situations. These are just a few uses for every photographer’s best friend.
If you’re unfamiliar, these reflectors typically come in either circular or rectangular varieties, in varying sizes, and generally include a collapsible disk with a semi-rigid frame holding a piece of diffusion fabric. On top of that is a double sided sleeve that fits snugly around the disk. The sleeve has 4 sides: white, black, silver, and gold. the entire assembly can be neatly folded into thirds and packed away.
You can find our recommended list of 5-in-1 reflectors below.
1. Fill Light
Perhaps the most obvious use is as a soft, subtle fill light for portraits. Whether you’re shooting in direct sunlight, open shade, under overcast skies or in a studio, you can use your 5-in-1 to quickly and easily throw some extra light into your shadows. Reflectors in general, be they the collapsible variety or huge V flats, are excellent for adding fill light, as they will never overpower the key light and cast shadows of their own- a vital feature of a good fill.
With a 5-in-1 reflector, you’ll have the choice of using the white surface for the most subtle, natural look, the silver side for a slightly more specular vibe, or the gold to add some warmth into your composition.
2. Key Light

If you’re in a heavily backlit situation- trying to get some groovy sun flares during golden hour perhaps- you can place your reflector on the camera side of your subject to bounce that backlight to light your subject’s face. For maximum impact, use the silver side to give a slightly harder light which will mimic the sun, or use the white side up close for a softer look.
*The main thing to keep in mind in this setup is to get the reflector higher than your subject, or at least above the level of the camera. When using a reflector as a fill light, it’s fine to hold it low, under their chin to reduce those shadows, but when the reflector is acting as the key light, you generally want it up high to cast flattering shadows. Holding it low will give your subject that scary stories around a campfire look. No bueno.
3. Backlight
Naturally, when you use the same ideas outlined above, but from behind your subject, you can create a lovely backlight to add an extra degree of separation between your subject and background. This technique is most effective if you can find a spot where your subject is in the shade, but with an area of direct sunlight behind them.
Once everyone is in place, place the silver side of the reflector in the sun, just outside of your frame, and bounce it back towards your subject. It will provide a lovely, angelic outline around them. This is also probably the best use for the gold side of your reflector, as the extra warmth won’t overpower the photo, but will give a hint of that ‘golden hour’ glow.
4. Substitute Umbrella
Yes, you can use the reflector in place of a photo umbrella to soften light, but in a pinch you can also hold it over your head if it starts raining to keep yourself dry. Laugh now, thank me later. The reflectors I’ve used have been waterproof, and if it gets a little dirty, you can either wash it off or go get a new one. They’re cheap!
5. Diffusing Sunlight
The diffusion panel inside most 5-in-1 reflectors is also incredibly powerful. You can essentially make any hard light source into a soft light source. It’s like magic.
If you’re using direct sunlight as your key light, but it’s too hard for your taste, just pop open that diffusion panel, and hold it so that it’s shading your subject, and Boom! – soft light. The limitation with this setup is that the light will only be softened in the shadow of your reflector, so the size of the reflector itself comes into play. If you have a smaller 40” circular reflector, you’ll be limited to close up portraits with this method. If you have a huge 72” rectangular diffuser, you’ll be able to shoot 3/4 or full length.
Alternatively, if you’re shooting in the middle of the day and are unable to find a good shady spot, you can hold the diffuser above your subject to shade them and provide a soft hair light. This works best when the sun can be placed a bit behind your subject. You’ll also generally want to provide a key light from the front, which you can do with another reflector, or using just the limp outer panel you took off of the diffusion disk.
6. Negative Fill
The flat black surface in your 5-in-1 reflector is probably the least understood, and most underutilized 1 of the 5. In most cases, the goal is to add extra light, soften shadows, etc., but in some cases you may want to block light and create shadows.
If, for instance, you’re shooting out in the snow on an overcast day, your light will be incredibly flat, because it will be coming, in nearly equal measure, from everywhere. This can be a great look, but if you want to create a bit more definition in your subject’s features you can hold the black surface facing your subject on one side of the camera to block some light, and add some soft, subtle shadows. The closer you hold the black disk, the deeper and darker those shadows will be.
This also works in open shade, when the light is too flat and even for your taste.
7. Impromptu Wind Machine
If you need a nice gust of wind to give a some movement to your subject’s hair or clothing, but you forgot your fan or leaf-blower, your trusty 5-in-1 can come to the rescue! Have your assistant stand as close as they can to the subject, just out of frame, and give that big reflector a good waft. One up-and-down per shot will do the trick nicely.
8. Mini Backdrop
In lieu of a big seamless backdrop or cyc-wall, you can quickly and easily pop your reflector behind your subject as a nice backdrop. Of course this will work best for close-up headshots (unless you have a massive reflector) but you’ll have a few options with this strategy.
If most of your light is coming from behind the camera, you can use the white surface for a white background, or, if you have more light coming from behind your subject, put the diffusion disk behind them, in frame, shading the subject, for a white background and a beautiful, soft backlight. The silver and gold sides are a bit tougher to use for this, as they tend to just look like silver or gold reflectors, and, naturally, you can use the black side for… well, a black background.
Also, if you’re doing small product photography, (wedding rings, food, etc.) you can use a couple of clamps and a table to flex your collapsible reflector and make a mini white cyclorama.
9. Softbox
There are times when you know exactly what you want a shot to look like, until you don’t. Maybe you’re caught with a strobe or speedlite (or a few) but no softbox, and need to soften your light. At this point, you may be able to guess where I’m going with this. 5-in-1 reflector time!
You can use the diffusion disk a few feet in front of the light for a basic stand-in softbox. You can even do this with one light stand if you have a boom arm- just attach the light to one end and hang the reflector from the other. The shadow of the stand itself with have no discernible impact. Another option is to point your light away from the subject and into your white or silver (or gold) surface to bounce that light back. This works especially well if all you have is a small on-camera flash.
10. Photographer’s Sun Shade
Why should you have to bake in the hot sun unnecessarily? When you’re shooting out in the desert and you need a little relief, just hide under your reflector. While this seems like the very height of pretension, it can actually be very helpful if you’re trying to review images on the back of the camera.
And there you have it. 10 bulletproof reasons why you (yes you!) should absolutely own a 5-in-1 collapsible reflector. Or 2. Or 5. If you begin to bring one with you whenever you shoot, I guarantee that it will prove itself to be amazingly useful time after time. Let us know in the comments if you have any other creative uses for these magical pieces of kit!
If you don’t already have one, here are some we recommend:


Get Connected!