
Introduction
In HDR photography, we are usually taking bracketed sequences to create the final HDR image. Since bracketing involves multiple consecutive shots, any moving objects in your scene will be moving across each bracketed image, a common artifact in HDR photography known as ghosting. Do not confuse ghosting with motion blur as motion blur and ghosting are two different artifacts created by two different pieces of the overall HDR process. In this article, we will explain the difference is between motion blur and ghosting in HDR photography.
GHOSTING
As mentioned before, ghosting is caused when moving objects across multiple images are combined into one image. Ghosting is an actual artifact created from the overall HDR processing. The most common example of ghosting is a bird flying through the scene. In a bracketed sequence, the shots taken are consecutive. Therefore, in the first shot of the bracketed sequence, the bird will be in Position A. In the next shot, the bird will be in Position B and in the last shot, the bird will be in Position C. The bird has moved right across the frame, so when we combine and stack these 3 images, we basically get duplicates of the bird. Each of these duplicates will look a little faded and transparent, making the duplicates of the bird look like little ghosts, hence the name “ghosting.” You will essentially end up with 3 birds in your final HDR image, so you will have to go back and fix each one of the images in the bracketed sequence. With ghosting, there is nothing you can really do, except to shoot a single-shot HDR whenever possible. If you can capture and compress everything to one single image, then shoot a single-shot HDR. If you must do a bracketed sequence, you will need to mask and clone out any ghosting in the HDR image in Photoshop. However, one factor that can help reduce ghosting in HDR photography is to use a DSLR with a faster frame rate, which we will discuss in a future article.
In the image below, the moving cars look a little transparent and faded, hence the name “ghosting.” There is also motion blur in this image, which we will explain next.
MOTION BLUR
The other type of artifact that we will get in HDR photography is motion blur. Motion blur is not necessarily a factor of the HDR process but rather the slow shutter speed on a camera. Motion blur occurs when the shutter speed is slow and there is movement within a single frame, not necessarily across the frame. For example, if your shutter speed is at 1/30th of a second and there is someone moving in your scene, that person will come out blurry in the image. So, motion blur is caused when the shutter is left open or “dragged’ when objects are moving in the scene, while ghosting is caused when we combine 3 images with moving objects into 1 single image.
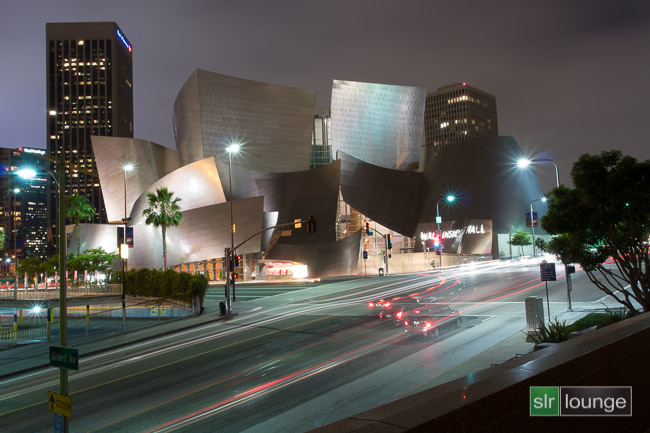
As you can see in the image below, there is a blur where the cars are moving. In addition, the brake lights on the cars are being dragged out because of the slow shutter speed. When you have motion blur in your HDR image, you will always have ghosting as well. We will discuss why this is in the next section of the article.
ONE WITHOUT THE OTHER
If the shutter speed on your camera is fast enough, it is possible to have ghosting without motion blur in your image. If the slowest shutter speed on your camera is 1/500th of a second, it will freeze most moving objects; therefore, you will not necessarily have motion blur in the image. However, regardless of how fast your camera’s frame rate is, there will still be a quick duration of time in which moving objects have time to move throughout each frame, thus causing ghosting. Therefore, you will still have ghosting, but you may not capture motion blur in your image.
It is also possible to get a combination of motion blur and ghosting in your image. Unlike ghosting where you can have one artifact (ghosting) without the other (motion blur), if you have motion blur in your image, you will have ghosting as well. For example, if there are moving objects in your scene and your shutter speed is slow, you will see a combination of motion blur and ghosting. Just remember that, depending on the overall shutter speed settings, ghosting can come without motion blur but motion blur always comes with ghosting. Now, there are many photographers who intentionally use motion blur and ghosting in their HDR images to create interesting effects, so ghosting and motion blur are not always bad.
Ghosting and motion blur are both visible in the image below. However, the motion blur also creates a cool effect with the brake lights, giving the impression that the cars are moving quickly.
CONCLUSION
Ghosting is caused by the combination of the 3 shots with moving objects while motion blur is caused by the moving object with a slow shutter speed. The speed of the moving object and the shutter speed will determine the amount of motion blur and ghosting that will be caused in the image. Although some photographers intentionally use the ghosting artifact to create effects in their images, ghosting may not always be intentional. The only way to fix ghosting across a bracketed sequence is to use Photoshop.
CHAPTER 1: INTRODUCTION TO HDR
- 1.1 – Introduction to HDR
- 1.2 HDR Workshop Introduction
- 1.3 What is HDR?
- 1.4 What is a Stop of Light
- 1.5 Boosting Dynamic Range by Combining Exposures
- 1.6 When Do You Really Need to Shoot HDR Images
- 1.7 Improvements in Technology
- 1.8 Installing the Presets
- 1.9 – What you will Need for HDR Photography
- 1.10 – Tripod
- 1.11 – Remote Shutter Release
- 1.12 –Lens Filter
- 1.13 – Memory Cards
- 1.14 – Backpack
- 1.15 – UNDFIND Bag
- 1.16 – Laptop
- 1.15 – HDR Software
CHAPTER 2: HDR CAMERA SETTINGS
- 2.1 – HDR Camera Settings Introduction
- 2.2 – What is Auto Exposure Bracketing
- 2.3 – How Many Exposures Do You Really Need
- 2.4 – Changing Your Cameras Bracketing Order
- 2.5 – Ceteris Paribus (Shutter Speed Changes)
- 2.6 – Capture All Shots by Shooting in Continuous Modes
- 2.7 – Camera Modes
- 2.8 – Metering Modes
- 2.9 – Timer
- 2.10 – Setting the Correct Median Exposure
- 2.11 – Nailing and Locking the Focus
- 2.12 – In-Camera HDR
- 2.13– In-Camera HDR
CHAPTER 3: HDR CONSIDERATIONS
- 3.1 – HDR Considerations Intro
- 3.2 – Using a Tripod
- 3.3 – Optimal Shutter Speedl
- 3.4 – Optimal Aperture Settings
- 3.5 – Optimal ISO Settings
- 3.6 –Moving Objects and Ghosting
- 3.7 – Using DSLRs with Faster Frame Rates
- 3.8 – Using Mirror Up Mode-Mirror Lockup
- 3.9 – Shooting in RAW vs. JPEG
- 3.10 – Macro Mode with Food Photography
- 3.11 – Clean Your Lenses & Sensor!
- 3.12 – Don’t Forget the Photographic Composition
CHAPTER 4: SALTON SEA, CA
- 4.1 – Salton Sea, CA HDR Introduction
- 4.2 – Salton Sea HDR | Pt.1| How it was Shot
- 4.3 – Salton Sea HDR | Pt.2| RAW preparation and HDR Export
- 4.4 – Salton Sea HDR | Pt.3| HDR Processing
- 4.5 – Salton Sea HDR | Pt.4| RAW Processing and Photoshop Import
- 4.6 – Salton Sea HDR | Pt.4| Photoshop Layer
- 4.7 – Salton Sea HDR | Pt.6| Final Image Processing
Chapter 5: PAGE, AZ
- 5.1 – Page, Arizona HDR Introduction
- 5.2 Horseshoe Bend HDR |Pt.1| How it Was Shot
- 5.3 Horseshoe Bend HDR |Pt.2| RAW Preparation and HDR Export
- 5.4. Horseshoe Bend HDR | Pt.3| HDR Processing in Photomatix Pro
- 5.5 Horseshoe Bend HDR |Pt.4| RAW Processing and Adobe Photoshop Import
- 5.6 Horseshoe Bend HDR |Pt.5| Photoshop Layer Blending
- 5.7 Horseshoe Bend HDR |Pt.6| Final Image Processing
- 5.8. Antelope Canyon HDR |Pt.1| How it Was Shot
- 5.9 Antelope Canyon HDR |Pt.2| RAW Preparation and HDR Export
- 5.10 Antelope Canyon HDR |Pt.3| HDR Processing
- 5.11– Antelope Canyon HDR |Pt.4| Final Image Processing
- 5.12 – Antelope Canyon HDR |Pt.5| RAW Processing and Photoshop Import
- 5.13 Antelope Canyon HDR |Pt.6| Final Image Processing
Chapter 6: MOAB, UT
- 6.1 Moab, Utah HDR Introduction
- 6.2 Moab Utah HDR |Pt.1| How it Was Shot
- 6.3 Moab Utah HDR | Pt.2| RAW Preparation and HDR Export
- 6.4 Moab Utah HDR |Pt.3| HDR Processing
- 6.5 Moab Utah HDR |Pt.4| Processing and Photoshop Import
- 6.6 Moab Utah HDR |Pt.5| Photoshop Layer Blending
- 6.7 Moab Utah HDR |Pt.6| Final Image Processing
Chapter 7: SALT LAKE CITY, UT
- 7.1 Salt Lake Union Pacific HDR Location
- 7.2 Salt Lake Union Pacific HDR |Pt.1| How it Was Shot
- 7.3 Salt Lake Union Pacific HDR |Pt.2| RAW Preparation and HDR Export
- 7.4 Salt Lake Union Pacific HDR |Pt.3| HDR Processing
- 7.5 Salt Lake Union Pacific HDR |Pt.4| RAW Preparation and HDR Export
- 7.6 Salt Lake Union Pacific HDR |Pt.5| Photoshop Layer Blending
- 7.7 Salt Lake Union Pacific HDR |Pt.6| Final Image Processing
- 7.8 Salt Lake City HDR Introduction
- 7.9 Salt Lake LDS Temple HDR |Pt.1| How it Was Shot
- 7.10 Salt Lake LDS Temple HDR |Pt.2| RAW Preparation and HDR Export
- 7.11 Salt Lake LDS Temple HDR |Pt.3| HDR Processing
- 7.12 Salt Lake LDS Temple HDR |Pt.4| RAW Processsing and Photoshop Import
- 7.13 Salt Lake LDS Temple HDR |Pt.5| Photoshop Layer Blending
- 7.14 Salt Lake LDS Temple HDR |Pt.6| Final Image Processing
- 7.15 Salt Lake Capital HDR |Pt.1| How it Was Shot
- 7.16 Salt Lake Capital HDR |Pt.2| RAW Preparation and HDR Export
- 7.17 Salt Lake Capital HDR |Pt.3| HDR Processing
- 7.18 Salt Lake Capital HDR |Pt.4| RAW Processing and Photoshop Import
- 7.19 Salt Lake Capital HDR |Pt.5| Photoshop Layer Blending
- 7.20 Salt Lake Capital HDR |Pt.6| Final Image Processing
Chapter 8: SALT LAKE MOUNTAINS, UT
- 8.1 Salt Lake Mountains HDR Introduction
- 8.2 Heber Valley Fishing Bracketed HDR |Pt.1| How it Was Shot
- 8.3 Heber Valley Fishing Bracketed HDR |Pt.2| RAW Preparation and HDR
- 8.4 Heber Valley Fishing Bracketed HDR |Pt.3| HDR Processing
- 8.5 Heber Valley Fishing Bracketed HDR |Pt.4| RAW Processing and Photoshop Import
- 8.6 Salt Lake Union Pacific HDR |Pt.5| Photoshop Layer Blending
- 8.7 Heber Valley Fishing Bracketed HDR |Pt.6| Final Image Processing
- 8.8 Heber Creeper Train HDR |Pt.1| How it Was Shot
- 8.9 Salt Lake LDS Temple HDR |Pt.1| How it Was Shot
- 8.10 Heber Creeper Train HDR |Pt.3| HDR Processing
- 8.11 Heber Creeper Train HDR |Pt.4| RAW Processing and Photoshop Import
- 8.12 Heber Creeper Train HDR |Pt.2| RAW Preparation and HDR Export
- 8.13 Heber Creeper Train HDR |Pt.6| Final Image Processing
- 8.14 Uinta Summit Panorama HDR |Pt.1| How it was Shot
- 8.15 Uinta Summit Panorama HDR |Pt.2| Single Shot Faux HDR Processing
- 8.16 Uinta Summit Panorama HDR |Pt.3| Photoshop Panorama Processing
- 8.17 Uinta Summit Panorama HDR |Pt.4| Final Image Processing
Chapter 9: BRYCE & ZION, UT
- 9.1 Bryce Canyon HDR Introduction
- 9.2 Bryce Canyon HDR |Pt.1| How it Was Shot
- 9.3 Bryce Canyon HDR |Pt.2| RAW Preparation and HDR Export
- 9.4 Bryce Canyon HDR |Pt.3| HDR Processing
- 9.5 Bryce Canyon HDR |Pt.4| RAW Processing and Photoshop Import
- 9.6 Bryce Canyon HDR |Pt.5| Photoshop Layer Blending
- 9.7 Bryce Canyon HDR |Pt.6| Final Image Processing
- 9.8 Road Side Panorama HDR |Pt.1| How it was Shot
- 9.9 Salt Lake LDS Temple HDR |Pt.1| How it Was Shot
- 9.10 Road Side Panorama HDR |Pt.3| Photoshop Panorama Processing
- 9.11 Road Side Panorama HDR |Pt.4| Final Image Processing
- 9.12
Zion River HDR |Pt.1| Location - 9.13 Zion River HDR |Pt.2| How it was Shot
- 9.14
zion River HDR |Pt.3| RAW Preparation and HDR Export - 9.15 Zion River HDR |Pt.4| HDR Processing
- 9.16 Zion River HDR |Pt.5| RAW Processing and Photoshop Import
- 9.17 Zion River HDR |Pt.6| Photoshop Layer Blending
- 9.18 Zion River HDR |Pt.7| Final Image Processing
Chapter 10: LAS VEGAS, NV & LOS ANGELES, CA
- 10.1 Las Vegas and Los Angeles HDR Introduction
- 10.2 Las Vegas Aria HDR |Pt.1| How it Was Shot
- 10.3 Las Vegas Aria HDR |Pt.2| RAW Preparation and HDR Export
- 10.4 Las Vegas Aria HDR |Pt.3| HDR Processing
- 10.5 Las Vegas Aria HDR |Pt.4| RAW Processing and Photoshop Import
- 10.6 Las Vegas Aria HDR |Pt.5| hotoshop Layer Blending
- 10.7 Las Vegas Aria HDR |Pt.6| Final Image Processing
- 10.8 Downtown Los Angeles HDR |Pt.1| How it was Shot
- 10.9 Downtown Los Agneles HDR |Pt.2| Single Shot Faux HDR Processing
Chapter 11: BONUS
- 11.1 Heber Creeper Train HDR
- 11.2 Heber Valley Fishing SIngle Shot HDR
- 11.3 Uinta Summit Bracket HDR
- 11.4 Bryce Canyon Panorama HDR
- 11.5 Zion Entrance Panorama HDR
- 11.6 Las Vegas Cleveland Clinic HDR
- 11.7 Palos Verdes HDR
- 11.8 Shen Zhen Pier HDR
- 11.9 China Street Photography HDR
- 11.10 Stearns Wharf HDR
Total Course Run Time: 13H 6M 50S
ACCESS TO INDUSTRY-LEADING EDUCATION
Let SLR Lounge guide you in your photography journey with the best photography education and resources. Browse our complete, comprehensive solutions and take the next step in your photography.
BROWSE WORKSHOPS
Pye Jirsa
1 Comment
Leave a Reply Cancel reply
You must be logged in to post a comment.
Can ghosting happen with a single shot? No motion blur just a portion of the subject looks tranparent.