
If the fundamentals aren’t down, the rest is just built on quicksand. Well, that or some other platitude from the top of the grab-bag pile. Whatever, it’s trite but it’s true, and that’s evidenced in our field in more ways than I care to or could share on this page. The problem, of course, is that in our multiple-choice trial and error day of digital learning, many take that route of least resistance and manage to produce some good images, and maybe even start a career that way.
This is all fine and dandy, and if you can make a career out of that way of learning, you’re clearly strong in another set of skills, but you will hit a ceiling. In my experience, that ceiling comes rather quickly and tends to center around limiting efficiency, and hampering creative potential. I often wondered why anyone would choose this trial and error method, and I gather that what is often lacking is an actual resource where people can go to get their questions answered. We would like to be that resource for you and a quick email or comment to us, and we’ll try our best.
In that vein, one of the more common questions I’m asked in regards to post processing deals with some of the absolute basics, such as what is the difference between Highlights and Whites. It’s so simple a question, and yet it’s also profound because, without an understanding of this, one can’t really understand the histogram very well or utilize it to its potential, and won’t really be able to manipulate an image to its full potential. So let’s address it:
Highlights Vs. Whites
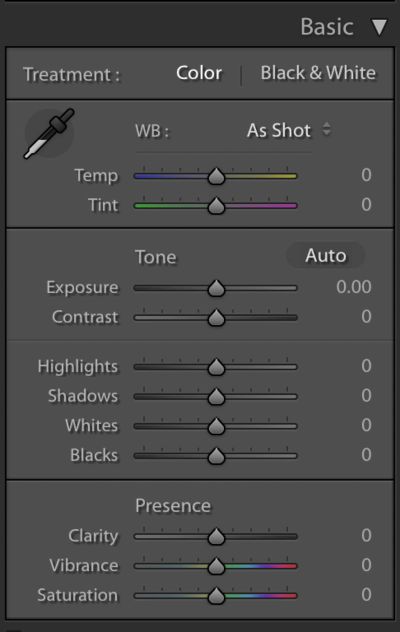
Highlights and Whites are most commonly associated with the basic panel in Lightroom’s Develop module and within Adobe’s Camera Raw. Luckily, they use the same engine, so getting to know one in theory and in practice will carry over to the other.
*As we speak a little about the basic develop panel sliders, it warrants saying that there are those out there who preach that Adobe designed Lightroom in such a manner where the order of the sliders dictates which order they should be manipulated in. This is rubbish.
Highlights and Whites, as you already know, are actually very similar to each other, but know that they are not the same and do not behave the same. Think less identical twins, and just a cousin who looks a hell of a lot like you. These two sliders give you the power to lighten or darken the brightest pixels within your image file.
Highlights
Highlights, if you’ve looked or read elsewhere, will almost always be defined as the brightest area in a photo, but it’s not simply the case, as both sliders affect the bright pixels. Highlights control a slimmer range of tonal values than do the Whites, and absolutely key to understand here is that the Highlights slider will not adjust the white point in the image – only the White slider will do that (or histogram or tone curve but that’s another story).
This is why I tend to suggest setting the Whites before the Highlights, so you can literally set your White Point, your absolute brightest pixels in the image, and the Highlights slider will then basically play within the range the Whites sets.


You can check this out for yourself by doing a quick test (See images above). Simply go into an image, hold the alt/option key as you move the Whites slider, and you’ll see a clipping mask. Set it to a point where there’s just a little bit of clipping. Now go to the Highlights slider while holding alt/option and do the same and push the Highlights as far as they will go. When you do this, you’ll see that even maxed out, the clipping will not really exceed those set of the Whites.
If we accept that the Whites are controlling the White Point and can push the White Point past the point of detail, then it helps us redefine Highlights. I tend to think of Highlights as being the brightest parts of an image wherein can still be found some degree of detail; that is to say, it’s not a washout. This is why you can use it well to retrieve some cloud detail and so forth. With that in mind, the Highlights Slider then becomes something that you can use to decide the degree to which you want to ‘highlight’ any detail still found in the image.
Whites
Well, most of Whites was described above by default, but whites do generally change the overall brightness of an image along with the white point, and, of course, the change is global. Both of these changes are, and the changes are essentially algorithmic exercises in changing contrast. Try using the White slider or the Highlights slider with a Jpeg to bring back some bright detail and you’ll basically just end up with gray.
One caution, however, is to be careful when changing your Whites particularly as it can really mess with the tones all through the image in ways the Highlights just really won’t; colors come out shifted, and it’s just a mess. That’s not to say don’t use it, as you can sculpt to a high degree with just the Whites and exposure. Try taking a slightly underexposed portrait, drop the exposure down another stop, then up the Whites slider and you’ll see how much pop just doing that can achieve.

[REWIND: SPLIT TONING | THE ‘SECRET’ IN THE RECIPES FOR MANY ADORED IMAGES, & TOTALLY UNDERVALUED]
As hinted to above, you can use the Tone Curve to adjust the Whites and Highlights also, as the curve can be thought of as an extension of the sliders, but there’s much more precision and depth to the tone curve and most won’t want to use it for the purposes of Whites and Highlights. What seems to catch some eyes and thus, some attention, is that if you adjust using the Tone Curve using the ‘Points Editor’ where you can pick and lock certain values, the Whites and Highlights sliders don’t seem to move, so it would appear you can push them even further – though I don’t know why you would want to.
Hope this helps you find a way to push your edits that much better, that much quicker.
If you made it this far and this is up your alley, check out the Lightroom Workshop if you want to make the most of your investment and time – there is simply nothing better, and of course SLR Lounge Premium members get that workshop and all the rest.
*This article was originally published in March 2016.


Get Connected!