You know what photographers love? To be told they’re doing something wrong; to have the potholes in their knowledge-base pointed out, and to have it all done by someone younger. This, of course, is utter crap because, in my experience, artists are (as I’ve said before) largely, egos covered in skin, and prone to bruising.
I bring this up because I’ve been asked many a time, by budding and mature photographers alike, to give my opinion on some of their work (for whatever reason), and realized most view the exercise of requesting and receiving critique as an exercise in fishing for compliments – not things I’m prone to hand out. But, I know a spoonful of sugar helps the medicine go down, so I try to highlight the good points first or give my opinion on what the smallest changes to be made are in order to have the largest impact.
Invariably my go-to was, and is, to speak to them about their use of black and white points. Time and again the understanding and conscious manipulation of these points proved to be of significant consequence in changing the impact of the photography work. I used to see it in the darkroom and now in digital darkrooms like, err, Lightroom.

The tricky part about dealing with these points in the digital realm is that we are presented with a few options that confuse us. The whites are accompanied by ‘highlights’ and blacks accompanied by ‘shadows’, and the difference between each leads to confusion, misuse, and ultimately that causes the potential of the images and their maker to be dampened. With a little understanding, however, that changes almost instantly. I wrote recently about the difference between highlights and whites and how to use them, and as per your requests, here is a breakdown on the shadows and blacks.
*If you’ve not read Highlights vs. White, it would be highly beneficial to do so first. Find it here.
Shadows vs. Blacks
I firmly hold to the belief that having a good understanding of your white point and black point in an image, consciously setting them and operating around them, will serve you well from capture to process to print. The fundamental appreciation of the concept of ‘zones’ will come in handy here, or if you’re a bit of a historian then recalling some of Ansel Adams’ words will do the same. Adams, as I understand it, suggested that for an image to have the most impact, the image must have a point of true black, and true white. This should let the image cover a broader ‘dynamic range,’ preventing ‘flatness’.

Let that sink in and grasp that if you can. It’s deep, and I was a bit thick to it for years and abrasive to the concept. Essentially, he is advocating having areas that are full white and full black, both ends of the spectrum devoid of detail, and this is so against the grain of what so many teach. But, in my experience, it works. You’ve just got to know how to see how much of your image is full white and how much is full black.
In the darkroom, this was more difficult because if someone shot an image of a white shirt, or sky with white clouds, or a black shirt and a black dog, they may think those were white and black because they knew in real life they’re ‘supposed’ to be. But comparing the print to any true white or black source often revealed it wasn’t….back to the enlarger.
In Lightroom, however, you can adjust your blacks (or whites) to see exactly when true black is introduced and how much of the image it covers. You can even see which colors are clipping as LR will show you clipping ‘blinkies’ in those colors. So, now the business of defining and setting those…
Shadows
If highlights and whites refer to the brightest pixels in an image, shadows and blacks refer to the darkest. More precisely, as discussed in Highlights VS. Whites, we can think of highlights as the brightest points in an image where can still be found some detail, meaning it’s not washed out. Similarly, shadows are the darker areas of an image where can still be found some detail without being a black hole. Therefore, it makes sense then that the shadows slider is going to cover a smaller range of dark pixels than the blacks.

It calls to memory something some of you with a design or art background may be familiar with, and that is that old saying, ‘Don’t use black for shadows when dealing with color.’ This concept is hammered into the heads of design students the world over, and what it’s trying to concisely state is that shadows are not black, but darker versions of whatever colors they are laying over. This is how you should think of shadows, do not see them as black, even if they ‘appear’ to be in some high contrast image, but instead as darker areas that still have detail.
Blacks
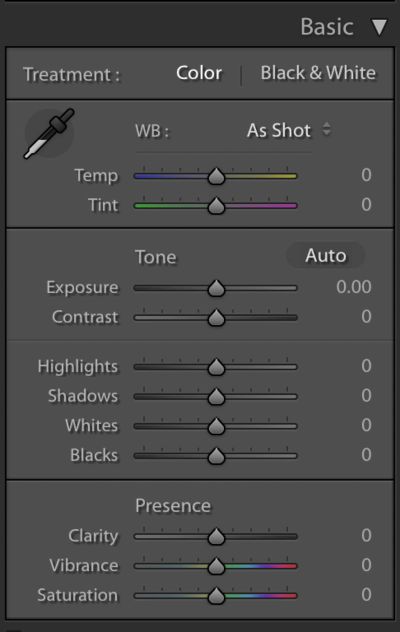
Through context of the above, you’ve likely already got a good understanding of what blacks are now. Blacks control the darkest areas and pixels of an image, are essentially devoid of detail, and the slider covers a much wider range of tonal values than shadows. Just to see this in practice, take an image in Lightroom and make a virtual copy, then take one and drop the shadows all the way down, then in the other, drop the blacks all the way down. What you’ll notice is the image with shadow slider manipulation left more bright areas intact, and the image where the black slider was altered looks much more altered than the shadowed image. Blacks then, change the overall darkness of an image much more than shadows. They also affect skin tones more so watch out for it.


As a consequence of this, you’re more prone to overdoing things with blacks than with shadows, and the black slider can really change your image drastically in ways you don’t want, so use with care.
That said you should use it, and also, it helps to think of blacks as the anchor to which shadows are tied to. Just as the highlights slider will not adjust the white point in an image, the shadows slider will not adjust the black point. So set your black point first, generally, then use the shadows slider to maneuver within the range the blacks have set.
[REWIND: HIGHLIGHTS VS. WHITES | WHAT’S THE DIFFERENCE & WHEN TO USE WHICH?]
So that’s it really, and I hope this helps you to achieve images that really show what you can do, and what you envisioned.
If you made it this far and this is up your alley, check out the Lightroom Workshop if you want to make the most of your investment and time – there is simply nothing better, and of course SLR Lounge Premium members get that workshop and all the rest.
*This article was originally published in March 2016.


Get Connected!