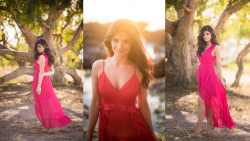
Photography is all about capturing the perfect moment, but sometimes the lighting just doesn’t cooperate. When this happens, it can be frustrating to have a photo that doesn’t showcase your subject as you intended. Fortunately, with the right tools and techniques, you can fix bad lighting in a photo and bring it to life. In this article, we’ll explore how to fix bad lighting in a photo using Lightroom, one of the most powerful and popular photo editing tools available. Whether you’re a professional photographer or just starting out, these tips and tricks will help you transform your photos from dull and lifeless to vibrant and captivating.
Video: How to fix bad lighting in a photo
Bad lighting on a photo? Don’t toss it out just yet. You might still be able to bring it back alive. In this video, I’ll be walking through 9 easy steps to fix a photo with bad lighting in Adobe Lightroom Classic.
Let me preface this by saying that you should always, always, strive to get the shot right in-camera. This means taking the time to get the right settings and properly lighting your subjects. However, there are many reasons to learn editing techniques to save imperfect images. As photographers, we face countless different scenarios and it’s nearly impossible to get the perfect shot 100% of the time. Understanding what’s possible in post-production can help you still achieve a professional result nonetheless.
Before we dive in, be sure to download the exercise file here and follow along as I edit.
Getting the Image Right In-Camera

You can see how this image was shot in a previous video where I talk about why the Canon RF 28-70 f/2 is my favorite lens. Even if the conditions aren’t the best, you want to try and get the best shot that’s possible by:
- Shoot in RAW format to capture as much information as possible.
- Expose properly to preserve as much detail in the shadows and highlights as possible.
- Work with the natural lighting.
Step #1: Raise the Exposure

The first step to fix bad lighting in a photo. is to roughly set the exposure to the subject. For imperfectly lit images such as this, it’s okay to let the background blow out. The priority is to make sure the subject is well exposed.
Step #2: Set the White Balance

Use the eyedropper to set the white balance. I selected Kiara’s shirt. Notice the green color cast from the surrounding leaves and grass still persists. We’ll fix that shortly.
Step #3: Base Tone Adjustments

The third step to fix bad lighting in a photo is to settle on your overall base tones. I used the basic tones to make subtle adjustments that brought out more detail in the highlights and shadows.
Step #4: Set the Tone Curve

The next step to fix bad lighting in a photo is to adjust the tone curve. I started off with a basic S-curve to add contrast. Then, I created a matte look by pulling the white point down and black point up.
Step #5: Color Calibration

Step 5 to fix bad lighting in a photo is color calibration. The color calibration panel is a great tool to make corrections for unwanted color casts. I focused on restoring the skin tones.

Then, I went back to fine tune the white balance to match the updated colors.
Step #6: HSL Adjustments

This is where we can continue to separate the skin tones and remove the green tint we started out with. Start with the hues and focus on the color. Then move onto saturation and luminosity.
Step #7: Split-Tones


The seventh step to fix bad lighting in a photo is to use split toning. I used the eyedropper tool to select a the shadow hue from a color already in the image. I did the same for the mid-tones and highlights to bring out the skin tones even more.
Step #8: Tweak Your Adjustments
Go ahead and make your final tone adjustments here. I tweaked the basic adjustments to add a touch more contrast. However, fixing the bad lighting will be different depending on the lighting issue.
Step #9: Local Adjustments

Lastly, I added a subtle radial filter from the Visual Flow Retouching Toolkit. This adds a subtle vignette around your subject.
The Final Image

Let’s see the final image compared to where we first began. The difference is huge!


