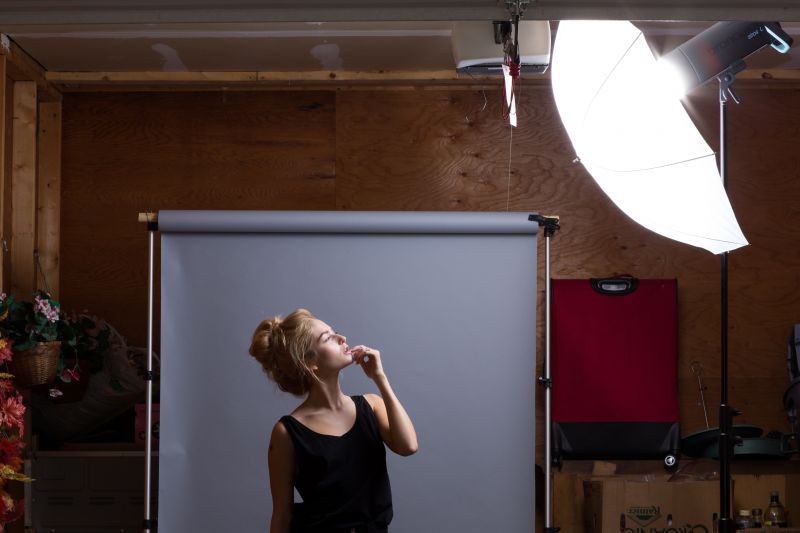
The beautiful thing about photography is how much can be achieved with very little. A studio setup isn’t necessarily a $250/hour space with a cyclorama, a wall of windows for natural light and mounted stands for various shades of seamless gray paper. A studio is wherever you can setup and make it work.
Gear:

In this case, the studio consisted of a single car garage stall with approximately 9 foot ceilings. There was fashion gray seamless paper, but no official seamless backdrop stand. Thanks to a friend, the backdrop stand consists of two light stands and a five foot wooden pole that are hooked together with wire. It isn’t glamorous, but it works.
The most important details of the shoot are the equipment used to capture the vision. Being manned with only a single monolight in tight quarters, it may not seem like a lot can be accomplished. Au contraire, my friends. This is where the magic happens.

Gear: Canon 5D Mark III, Canon 85mm 1.2L II, Broncolor Siros L 800Ws
Tech Specs: ISO 160, f/16, 1/100 of a second.
This shot was conceived with the idea of a lot of contrast in mind. I began shooting bare bulb. The Broncolor Siros L 800Ws was positioned camera right and raised approximately eight feet high, pointing down and away from the background to provide more separation. The model was standing about three feet away from both the background and the light.
Since the overall mood of the image was soft and romantic, it was decided to feather the light, thus softening the contrast by spreading the beam of light and filling in the shadows a little more. Feathering is easily achieved with a diffusing light modifier such as an umbrella. That’s right, the Siros L was paired with a $17 shoot through umbrella from B&H. It did the trick. Deciding whether or not to use 100% total harsh, undiffused light or a softened version is a personal choice.

Gear: Canon 5D Mark III, Canon 85mm 1.2L II, Broncolor Siros L 800Ws, Savage 36″ Shoot Through Umbrella
Tech Specs: ISO 100, f/16, 1/100 of a second.
RELATED: Simple Natural Light Swimwear Shot | How I Shot It
When directing the subject, it is important to have them find the light. The center of the light should be hitting their face. It may be necessary to do some micro movements and see the difference of how the light hits the angles to find the most desired result. In this instance, a tilt of the chin up toward the light and angled slightly toward the camera did the trick. Once the lighting is dialed in, I will have the model move slightly to provide the tiniest of micro adjustments in posing. Moving and adjusting together often adds that little extra to the final shot.
Model: Rachelle Kathleen


Get Connected!